ZX-14R Fairing Kit Makeover Made Easy for Everyone

You can fix your ZX-14R Fairing Kit easily. It does not matter if you are new or skilled. Many riders fix their old fairings for a better fit. Some riders buy new kits for a new look. Good brands like Nicefairings use strong materials. This helps you get great results.
Statistic/Feature | Details |
|---|---|
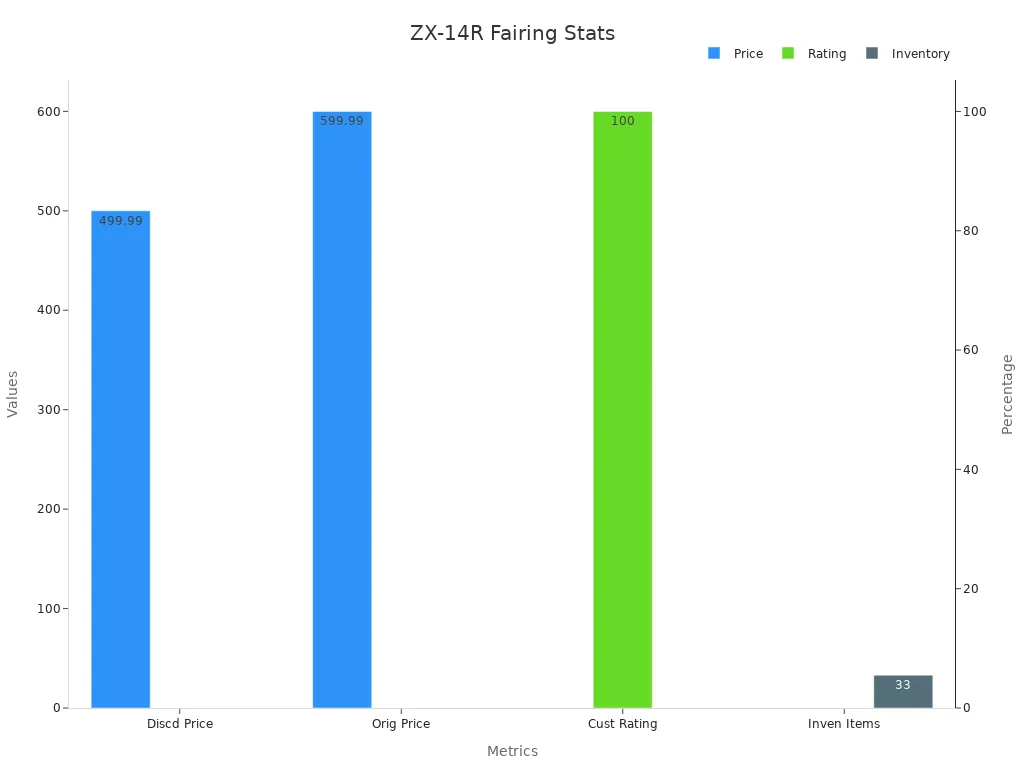
Price per fairing kit | $499.99 (discounted from $599.99) |
Customer rating | 100% across multiple injection fairing kits |
Number of available items | 33 items |
Model years covered | 2006-2011 and 2012-2019 |
Included extras | Free heat shielding and free windscreen |
Fitment guarantee | Perfect fitment guaranteed |
Design options | OEM style and custom designs available |
Tip: You can start your project with confidence. These fairing kits fit well and come with useful extras.
Key Takeaways
Look at your ZX-14R fairings closely for cracks, scratches, and broken tabs before you start.
Fix small damage with plastic repair kits or get new panels if the damage is bad. Good aftermarket kits fit well.
Use the right tools like screwdrivers, sandpaper, and a spray gun. These help you take off, fix, and paint your fairings easily.
Paint your fairings by following steps. Clean them, put on primer, paint, and then add clear coat for a nice look.
Take care of your fairings by cleaning them often. Check for damage, tighten fasteners, and keep them safe from sun and strong chemicals.
Assessing Your ZX-14R Fairing Kit
Common Wear and Damage
You should start by looking closely at your fairings. Over time, your ZX-14R Fairing Kit can show signs of wear. You might see cracks, scratches, or faded paint. Sometimes, mounting tabs break off. Road debris can cause chips or dents. Sunlight can make colors fade. Even small accidents can leave marks.
Here are some common problems you might find:
Cracks along the edges or near mounting points
Scratches and scuffs on the surface
Broken or missing tabs
Paint that looks dull or faded
Holes from impacts
Tip: Use a flashlight to check for hidden cracks or weak spots. Run your hand over the surface to feel for rough areas.
Repair or Replace
You have two main choices when you find damage. You can repair the original fairings or replace them with new ones. Repairing your original fairings often gives you the best fit. The factory parts match your bike perfectly. If the damage is small, you can fix cracks or scratches with a plastic repair kit and some paint. This saves money and keeps your bike looking original.
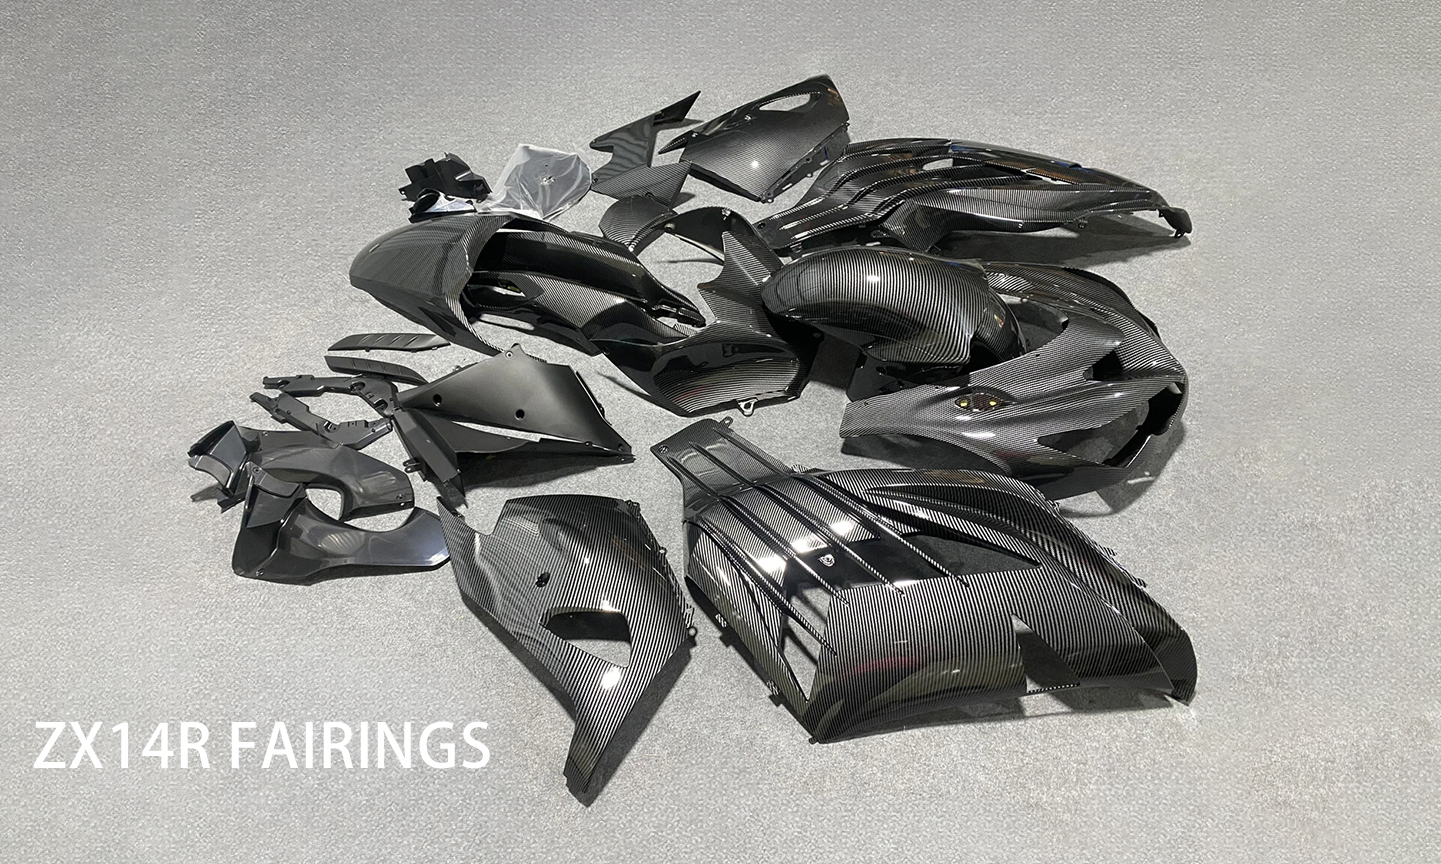
Sometimes, the damage is too much. If you see large cracks, missing pieces, or warped panels, you should think about replacement. High-quality aftermarket kits, like those made from ABS plastic, offer a strong and reliable option. These kits often come pre-drilled and ready to install. Brands like Nicefairings make sure you get a good fit and finish.
Repair Original Fairings | Replace with Aftermarket Kit |
|---|---|
Best fit and finish | Good for severe damage |
Keeps original look | Many design options |
Lower cost for small fixes | Strong ABS plastic |
Note: Always check the cost and time needed for each option. Sometimes, a new kit is the easiest way to get your ZX-14R Fairing Kit looking new again.
Tools and Materials
Essential Tools
You need the right tools to make your fairing project smooth and successful. Start with a basic set of screwdrivers, a socket set, and a plastic trim removal tool. These help you take off panels without damage. For repairs, a plastic repair kit is a must. It usually includes epoxy or plastic weld, which fixes cracks and holes.
Sandpaper in different grits helps you smooth surfaces before painting.
A Dremel tool works well for trimming edges or making small adjustments.
Use a primer to prepare the surface for paint.
A quality HVLP spray gun, such as the Iwata lph-400, gives you a smooth, even finish.
Clear coat protects your paint and adds shine.
A thread chaser tool (M10 1.25 tap) helps restore damaged threads if needed.
"Many riders say a Dremel tool is your best friend for smoothing rough edges or making small fitment changes. Take your time and check the fit often."
If you want to practice, start with a less visible part like the front fender. This helps you learn before you paint the main panels.
Affordable Materials
Choosing the right materials saves you money and gives you better results. ABS plastic is a popular choice for fairings. It is strong, flexible, and lightweight. Most aftermarket kits use ABS because it is affordable and easy to work with. Fiberglass is another option. It is lighter and more durable than ABS, but it costs more. Some racers use carbon fiber for the lightest and strongest fairings, but this material is expensive.
ABS plastic offers strength, flexibility, and good value.
Fiberglass is durable and light, often used in racing.
Carbon fiber is the lightest but costs the most.
You should buy from trusted brands like Nicefairings. Good brands use quality materials and offer better fitment. This means your fairings last longer and look better. Avoid cheap knock-offs. They may not fit well or last long. Investing in decent fairings saves you money over time because you will not need to replace them as often.
Riders often reuse OEM foam parts for heat shielding. Aftermarket kits may include foil-covered foam, but using original foam gives better heat protection.
Fairing Removal and Prep
Safe Removal
Start by making sure your motorcycle is stable. Use a paddock stand or center stand to keep it upright. Remove the seat and disconnect the battery for safety. Gather your tools before you begin. You will need screwdrivers, a socket set, and a plastic trim tool.
Follow these steps for safe removal:
Take off any mirrors and windscreen first.
Remove bolts and screws from the fairing panels. Keep them in a labeled container.
Use a plastic trim tool to gently pry off the panels. Avoid using metal tools, which can scratch the surface.
Work slowly around the edges. Do not force any part. If a panel feels stuck, check for hidden fasteners.
Tip: Take photos as you remove each part. These will help you remember the correct order during reinstallation.
Deep Cleaning
Once you remove the fairings, clean them well. Dirt and grease can hide damage and affect repairs. Use mild soap and warm water. A soft sponge works best for washing the panels. Rinse with clean water and dry with a microfiber towel.
For stubborn grime, use a plastic-safe cleaner. Avoid harsh chemicals that can damage the surface. Pay extra attention to corners and mounting points. These areas often collect the most dirt.
Cleaning Step | Tool/Material |
|---|---|
Wash panels | Mild soap, sponge |
Rinse | Clean water |
Dry | Microfiber towel |
Remove tough grime | Plastic-safe cleaner |
Surface Prep
Proper surface prep helps repairs and paint stick better. Start by sanding rough spots with fine-grit sandpaper. Smooth out scratches and scuffs. Wipe the panels with a tack cloth to remove dust.
If you plan to paint, apply a plastic primer. This step ensures the paint bonds well. Let the primer dry fully before moving on. Check each panel for any missed spots or damage.
Note: Good prep work leads to a smoother finish and longer-lasting results. Take your time with this step.
Repairing Fairings
Cracks and Holes
You can repair cracks and holes in your fairings with the right approach. Start by cleaning the damaged area. Remove any loose plastic or dirt. Use a plastic repair kit with epoxy or plastic weld. This creates a strong bond and restores the shape.
Sand the area around the crack or hole.
Apply the repair material and let it cure.
Sand the surface smooth after it dries.
A new modeling approach using neural networks and phase-field gradient finite element methods has improved the accuracy of predicting the strength of repaired cracks and holes. This method reduces the error in predicting how strong the repair will be by about 39-44% compared to older methods. It also works well across different shapes and sizes of cracks. These results show that modern repair strategies can make your fairings strong and reliable again.
Tip: Always check both sides of the fairing. Sometimes cracks go deeper than they look.
If you see a large hole, you may need to use a mesh or patch behind the repair area. This gives extra support and helps the repair last longer.
Scratches and Scuffs
You will often find scratches and scuffs on your ZX-14R Fairing Kit. Some small scratches can be hidden with a black sharpie or a touch-up pen. This works for quick fixes, but it does not last long. For deeper scratches, you need to sand the area and repaint it.
Here is a step-by-step process for fixing scratches and scuffs:
Fill dents and valleys with a plastic filler.
Sand the surface until it feels smooth.
Clean the area with a plastic-safe cleaner.
Apply a primer coat.
Spray on the color coat to match your fairing.
Finish with a clear coat for shine and protection.
Check for any missed spots and touch up as needed.
Wax the fairing to restore its shine.
A case study on wear-resistant materials shows that some plastics, like PVDF and PEEK, resist scratches better than others. These materials show only surface wear after long use, while others like PE develop deep scratches and debris. This means that using quality materials and proper repair steps can help your fairings stay smooth and shiny for a long time.
Note: If the damage is too deep or covers a large area, consider replacing the panel with an OEM or custom fairing kit.
Reinforcement
You can reinforce weak spots on your fairings to prevent future damage. Use fiberglass mesh or plastic strips on the inside of the panel. This adds strength without adding much weight.
Cut the mesh or strip to fit the area.
Attach it with epoxy or plastic weld.
Let it cure fully before reinstalling the fairing.
Experts in art restoration use advanced methods to repair and reinforce delicate surfaces. They check the repair for consistency, detail, and strength. You can use a similar approach by checking your repair from different angles and making sure it feels solid.
Tip: Reinforcing mounting tabs and stress points helps your fairings last longer, especially if you ride often or on rough roads.
A strong repair not only looks good but also keeps your ZX-14R Fairing Kit safe and secure on your bike.
Painting and Finishing
Paint Selection
Choosing the right paint gives your fairings a professional look. You want to match the color of your bike or try a new style. Use high-quality automotive paint for the best results. This type of paint sticks well to plastic and lasts longer. You can pick from gloss, matte, or metallic finishes. Gloss paint shines and looks bright. Matte paint gives a smooth, flat look. Metallic paint adds sparkle and depth.
Tip: Always check the paint code on your bike if you want an exact match. You can find this code on a sticker under the seat or near the frame.
If you want a unique upgrade, consider carbon fiber fairings. Carbon fiber looks modern and feels light. Many racing teams use carbon fiber for its strength and low weight. Research shows that carbon fiber fairings can reduce weight by about 10% without losing strength. The way the fibers are arranged and the thickness of the layers make a big difference in how strong and light the fairing will be. Some new methods even use recycled carbon fibers, which help the environment and make the fairings last longer.
Painting Steps
You can get a smooth, shiny finish by following a careful painting process. Here is a step-by-step guide:
Remove all bolts and fasteners from the fairings. This keeps the paint safe from scratches.
Use a brass detail brush and microfiber towels to clean away old polish or wax around bolts and fasteners.
Work around the bike, paying close attention to small fasteners and corners where dirt collects.
Wash the fairings with soap and water. Use Q-tips or small swabs to clean tight spots like bolt holes and letters.
Use a nylon brush with soap or cleaner to scrub away any leftover wax or grime from small areas.
After cleaning, wash the fairings again to remove any dust or polish left behind. Use a microfiber-wrapped card to clean behind emblems and in panel gaps.
Dry the fairings carefully with a soft towel. This prevents scratches.
Sand the surface with fine-grit sandpaper to make it smooth.
Wipe the fairings with a tack cloth to remove dust.
Spray on a plastic primer and let it dry.
Apply several thin coats of your chosen paint. Let each coat dry before adding the next.
After the color dries, spray on a clear coat to protect the paint and add shine.
Let the fairings dry completely before handling or installing them.
Note: Always paint in a clean, dust-free area. Wear a mask and gloves to protect yourself from fumes.
Decals and Clear Coat
Decals let you add custom designs or logos to your fairings. You can buy pre-made decals or make your own. Place the decals on clean, dry paint. Use a soft squeegee to press out air bubbles. Make sure the edges stick well.
After you add decals, spray a clear coat over the whole panel. The clear coat seals the decals and protects the paint from scratches and sun damage. Use two or three thin coats for the best results. Let each coat dry before adding the next.
Step | What to Do |
|---|---|
Apply decals | Place on clean, dry paint |
Smooth bubbles | Use a soft squeegee |
Spray clear coat | Cover decals and paint evenly |
Let dry | Wait between coats for best finish |
Tip: A good clear coat makes your fairings shine and keeps them looking new for a long time.
If you want to take your project further, you can upgrade to carbon fiber fairings. Carbon fiber not only looks great but also makes your bike lighter and stronger. Studies show that using recycled carbon fibers can make fairings even more durable and better for the environment. This option works best for advanced users who want top performance and a unique look.
ZX-14R Fairing Kit Installation
Alignment and Attachment
You want your ZX-14R Fairing Kit to fit perfectly. Start by laying out all the panels and hardware. Check each piece for damage before you begin. If you see any cracks or missing parts, do not install them yet. Take photos and contact your supplier right away. This step helps you avoid problems later.
Use the correct clips and fasteners for each panel. These small parts keep your fairings secure. If you use the wrong ones, the panels may not line up. Pre-drilled holes in new kits make the job easier. You do not need to guess where each screw goes. Good packaging from brands like Nicefairings protects your fairings during shipping, so you get parts that fit well.
Follow these steps for proper alignment and attachment:
Hold each panel in place before tightening any screws.
Check that the edges line up with the frame and other panels.
Insert all fasteners loosely at first.
Adjust the panels until everything fits smoothly.
Tighten the screws and clips in a crisscross pattern.
Tip: If you notice any resistance or gaps, stop and realign the panel. Forcing it can cause cracks.
Final Check
After you attach all the panels, do a careful inspection. Walk around your bike and look at every seam. Make sure there are no gaps or uneven edges. Press gently on each panel to check for movement. If a panel feels loose, tighten the fastener.
Check that the windscreen, mirrors, and other parts fit snugly. Look for any leftover screws or clips. If you find any, double-check your work. Take a few photos of your finished ZX-14R Fairing Kit. These can help if you need support from your supplier.
Note: Many suppliers require you to report any issues within 30 days. If you spot a problem, act quickly to get help.
A careful installation keeps your fairings secure and looking great. You protect your investment and enjoy a smooth ride.
Maintenance Tips
Keeping your motorcycle fairings in top shape helps your bike look great and last longer. You can follow these simple tips to protect your panels and keep them shining.
1. Clean Regularly
Wash your fairings with mild soap and water. Use a soft sponge or microfiber towel to avoid scratches. Dry the panels with a clean towel. Dirt and dust can scratch the surface if you leave them on too long.
2. Inspect for Damage
Check your fairings every month. Look for cracks, loose fasteners, or faded spots. Early detection helps you fix small problems before they get worse.
3. Protect from Sun
Store your bike in a garage or use a cover. Sunlight can fade paint and weaken plastic over time. If you ride often, park in the shade when possible.
4. Tighten Fasteners
Vibration from riding can loosen screws and clips. Check all fasteners after long rides. Tighten any that feel loose. This keeps your fairings secure.
5. Wax for Shine
Apply a plastic-safe wax every few months. Wax adds a protective layer and makes cleaning easier. It also helps your fairings resist water and dirt.
6. Avoid Harsh Chemicals
Stay away from strong cleaners or solvents. These can damage paint and plastic. Always use products made for motorcycles.
Maintenance Task | How Often | Tools Needed |
|---|---|---|
Wash fairings | Weekly | Soap, sponge |
Inspect for damage | Monthly | Flashlight, hands |
Tighten fasteners | After long rides | Screwdriver, wrench |
Apply wax | Every 2-3 months | Plastic-safe wax |
Tip: Keep a small repair kit in your garage. You can fix minor scratches or loose tabs right away.
You can restore your ZX-14R Fairing Kit with patience and the right steps. Clean, repair, and install each panel carefully. Your bike will look new again. Keep your fairings clean and check them often. Share your results or questions with other riders. If you need help or want a quality replacement, reach out to Nicefairings for support.
Remember: Regular care keeps your ZX-14R Fairing Kit looking great for years.
FAQ
How long does it take to restore a ZX-14R fairing kit?
Most projects take one or two weekends. You can finish faster if you have all your tools and materials ready. Take your time for the best results.
Can you paint fairings without special equipment?
Yes, you can use spray cans for small jobs. For a smoother finish, use an HVLP spray gun. Always paint in a clean, dust-free area.
What should you do if a fairing panel does not fit?
Check the alignment and fasteners first. If the panel still does not fit, compare it to the original part. Contact your supplier if you find a defect.
Are aftermarket fairing kits as strong as OEM parts?
Many high-quality aftermarket kits use ABS plastic. This material is strong and flexible. You get good durability and a reliable fit with trusted brands.
See Also
A Clear Guide To Motorcycle Fairings For UK Riders
Best Aftermarket Fairings For ZX6R Thoroughly Evaluated
How To Install Honda CBR500R Fairing Kits Easily
