Yamaha R6 Fairings Explained with Installation Tips

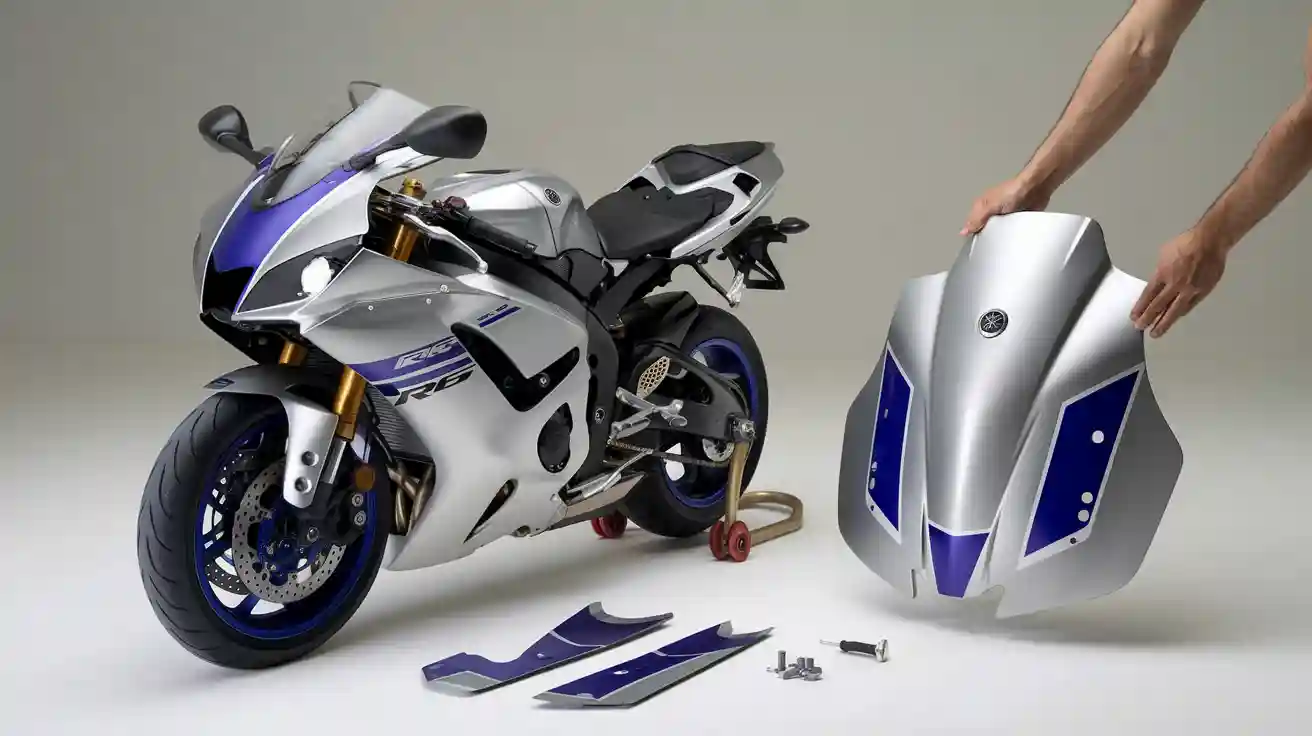
When you look at a Yamaha R6, the fairings are the sleek panels that shape its body. These parts do more than create a sharp style for your YZF-R6. You use yamaha r6 fairings to reduce wind drag, shield the engine, and protect important parts.
- Well-fitted yamaha r6 fairings help manage airflow, which improves stability at speed.
- They also guard against damage, making your ride safer and your bike last longer.
Poorly installed fairings can rattle or flap, which may affect how your yamaha r6 handles.
Types of Yamaha R6 Fairings
OEM Yamaha R6 Fairings
When you choose OEM Yamaha R6 fairings, you get panels made by the original manufacturer. These fairings fit your Yamaha R6 perfectly because the company designs them for your bike. You can expect high quality, strong paint, and a finish that matches the rest of your motorcycle. Many riders prefer OEM fairings because they last longer and keep their value.
Tip: If you want your bike to look like it just left the showroom, OEM fairings are the best choice.
You can find OEM fairings as new parts or as used sets from places like eBay or motorcycle forums. Even used OEM fairings keep their fit and durability. You will notice that the holes line up well, so you do not need to force or adjust anything during installation. Buyers often pay more for bikes with OEM fairings because they trust the quality and originality.
Here is a quick comparison between OEM and aftermarket options:
| Aspect | OEM Fairings | Aftermarket Fairings |
|---|---|---|
| Price | Used sets often sell around $1,000 to $1,250 | Much cheaper, often a few hundred dollars |
| Quality | Superior quality, thicker, better paint | Lower quality, fitment issues, may melt/crack |
| Fitment | Better fit, holes align without manipulation | Poorer fitment, may require adjustments |
| Durability | More durable, bendable without cracking | Less durable, prone to cracking or melting |
| Resale Value | Higher resale value, preferred by buyers | Lower resale value, less appealing |
| Buyer Perception | Preferred for originality and condition | Viewed as less desirable, may suggest rebuild |
Aftermarket Fairings for Yamaha R6
Aftermarket fairings give you a cost-effective way to change the look of your Yamaha R6 or replace damaged panels. Many companies make these fairings, and you can find a new fairing kit for much less than OEM parts. Some brands, like iFairings, use high-quality ABS virgin thermoplastic and advanced injection molding. This process helps the kit fit your bike closely, almost like OEM.
- Aftermarket fairings often come with pre-drilled holes, so you can install them with less effort.
- You can choose from many colors and designs, and some kits let you customize decals at no extra cost.
- The finish on good aftermarket fairings includes several layers of paint and a clear coat for shine and protection.
However, not all aftermarket fairings are the same. Some kits have poor mounting points and may break easily. You might need to adjust the panels during installation because the fitment is not always perfect. While aftermarket fairings save you money, they can have minor imperfections. Riders who want the best fit and finish usually stick with OEM, but aftermarket kits work well if you want to save money or try a new style.
Here is a table showing features of a popular aftermarket fairing kit:
| Feature | Aftermarket Fairings (iFairings) |
|---|---|
| Material | High-quality ABS virgin thermoplastic |
| Craftsmanship | Injection molding machine craft |
| Installation | Pre-drilled holes, ready for install |
| Finish | Show quality finish with six layers of paint and clear coat |
| Decals | Pre-installed under clear coat, customizable without extra cost |
| Warranty | 180-day warranty covering peeling, fading, cracking, bubbling |
| Fitment | Very close to OEM, compatible with 2017-2023 Yamaha YZF-R6 |
| Price | Less expensive than OEM fairings |
Note: Most aftermarket fairings use high-quality ABS plastic. This material is lightweight and resists impacts well. Some kits have a carbon fiber look, but this is usually a painted finish over ABS plastic.
Full Fairings vs. Partial Fairings
When you pick a fairing kit for your Yamaha R6, you need to decide between full fairings and partial (half) fairings. Full fairings cover almost the entire body of your motorcycle. They protect the engine, frame, and other important parts from wind, debris, and weather. You get better wind protection, which means less rider fatigue and noise on long rides. Full fairings also improve aerodynamics, so your bike can go faster and use less fuel.
- Full fairings help your engine last longer by improving airflow and reducing stress.
- You get more comfort on long trips because full fairings block wind and rain better.
- These fairings also let you add accessories, like extra lights or storage.
Partial fairings, or half fairings, only cover the upper part of your bike. They still reduce some wind and protect key parts like the radiator and exhaust. However, they do not offer as much protection or aerodynamic benefit as full fairings. You might feel more wind and noise, especially at higher speeds or in bad weather. Some riders choose partial fairings because they weigh less and give the bike a different look.
Tip: If you ride at high speeds or travel long distances, full fairings are the better choice. If you want a lighter bike and do not mind less protection, partial fairings may suit you.
Race Fairings vs. Street Fairings
When you look at Yamaha R6 fairings, you will notice two main types: race fairings and street fairings. Each type serves a different purpose and follows different rules.
Race fairings are built for the track. You use them when you want the best performance and safety during racing. These fairings often require you to remove or change street-legal parts. You will need to take off headlights, taillights, turn signals, and license plates. Race fairings focus on speed and safety, not on meeting road laws.
- Race fairings use special kits that fit the track’s needs.
- You often tape over lenses on headlights and turn signals.
- You must remove extra items like cell phone mounts and license plates.
- Some racing groups ask you to use safety wire on certain bolts.
- You may need to swap out coolant for water to meet track safety rules.
- Tire tread and pressure rules can also change for track use.
Street fairings, like oem or aftermarket street fairings, must follow strict laws. You need working headlights, brake lights, mirrors, and turn signals. Your bike must have a horn, DOT-approved tires, and a license plate bracket. You also need to pass inspections for your state. These fairings keep your Yamaha R6 legal and safe for public roads.
Tip: If you want to switch your race bike back to street use, you must reinstall all street-legal parts and pass inspections. This process can be hard or even impossible in some states.
Race fairings help you go faster and stay safe on the track. Street fairings keep you legal and visible on the road. Always choose the right kit for your riding style and needs.
Fairing Materials: ABS Plastic, Fiberglass, Carbon Fiber
The material you choose for your fairings affects weight, strength, cost, and how long they last. You will find three main materials: ABS plastic, fiberglass, and carbon fiber.
ABS plastic is the most common choice for oem fairings and many aftermarket kits. You get strong, flexible, and lightweight panels. ABS plastic resists scratches and impacts. It is easy to mold and paint, so you see it on many Yamaha R6 fairings. This material is affordable and reliable for daily use, but it does not handle heat as well as other options.
Fiberglass fairings are lighter than ABS and often used for racing. You can repair fiberglass if it cracks. It resists corrosion and holds up well over time. Some riders pick fiberglass for custom projects because it is easy to shape. However, fiberglass can be brittle and costs more than ABS.
Carbon fiber fairings give you the lightest and strongest panels. You see carbon fiber on high-end sport bikes and race machines. This material offers the best strength-to-weight ratio. Carbon fiber looks great and helps your bike perform at its best. You must pay more for carbon fiber, and repairs need special tools and skills.
Here is a table to help you compare these materials:
| Material | Advantages | Disadvantages | Cost Range | Lifespan & Durability |
|---|---|---|---|---|
| ABS Plastic | Strong, flexible, durable, lightweight, impact-resistant, easy to paint | Lower heat resistance | Most affordable | Good impact resistance; may need more replacements |
| Fiberglass | Lightweight, durable, repairable, corrosion-resistant | Can be brittle, more expensive | Affordable | Lightweight; less impact resistant than ABS |
| Carbon Fiber | Lightest, highest strength-to-weight ratio, looks premium | Most expensive, needs special care | Most expensive | Very durable; long lifespan with little maintenance |
Note: Fairings can cost between $500 and $2,500, depending on the material and design. With good care, carbon fiber fairings can last for decades, making the higher price worth it for some riders.
You should pick the material that matches your riding style, budget, and how much maintenance you want to do. OEM fairings often use ABS plastic for a balance of quality and price. Aftermarket street fairings may use ABS or fiberglass. Carbon fiber is best if you want the lightest and strongest option.
Buying Fairings for Yamaha R6
Factors to Consider When Buying Fairings
When you start buying fairings for your Yamaha R6, you need to think about several important factors. First, set your budget. Carbon fiber kits cost more but give you the best performance and durability. ABS plastic kits are more affordable and still last a long time. Fiberglass offers a good balance between weight and strength.
Next, look at the material type. ABS plastic is strong and easy to repair. Fiberglass is lightweight and helps with aerodynamics. Carbon fiber is the lightest and strongest, but it can be harder to install. Always check fitment compatibility. Make sure the kit matches your Yamaha R6 model year. Experts suggest reading product details or asking a mechanic to avoid problems.
You should also decide if you want better performance or a bold style. Some kits focus on speed, while others offer custom designs. Installation complexity matters too. ABS kits usually have pre-drilled holes and are easy to install. Carbon fiber and fiberglass may take more time or skill.
Here is a table to help you compare these factors:
| Factor | Details & Expert Insights |
|---|---|
| Budget | Carbon fiber is expensive but durable. ABS is budget-friendly. Fiberglass balances weight and strength. |
| Material Type | ABS: strong, affordable. Fiberglass: lightweight, strong. Carbon fiber: lightest, stylish, but costly. |
| Fitment Compatibility | Check if the kit fits your Yamaha R6 model. Read product details or ask a mechanic. |
| Performance vs Aesthetics | Choose speed (carbon fiber, fiberglass) or style (custom designs). Some kits offer both. |
| Installation Complexity | ABS: easy to install. Carbon fiber: harder to fit. Fiberglass: takes longer. |
| Customer Support & Customization | Read reviews. Custom kits allow unique designs and better fit. |
| User Feedback | Positive reviews highlight fit and strength. |
Popular Brands and Options
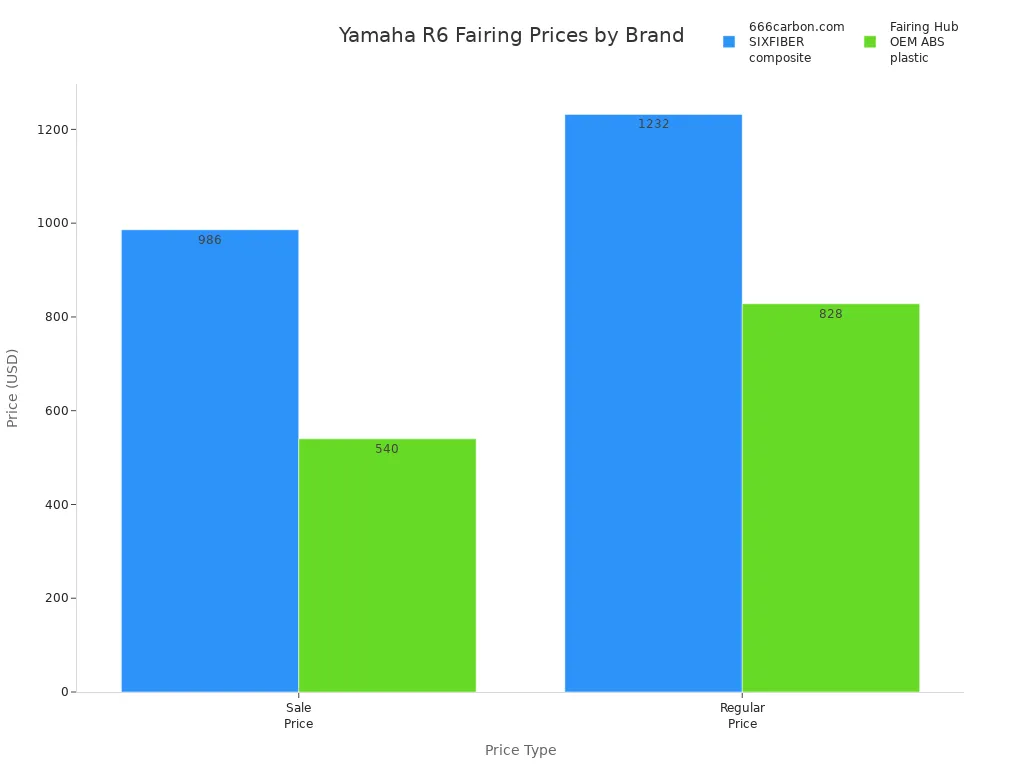
You can find many brands that offer fairings for your Yamaha R6. Some brands focus on racing, while others offer street-ready kits. For example, 666carbon.com sells SIXFIBER composite fairings. These are lightweight and flexible, made for track use. Fairing Hub offers OEM-quality ABS plastic kits with a matt black finish and pre-drilled holes. iFairings uses high-quality ABS thermoplastic and lets you customize decals at no extra cost.
Here is a table comparing popular brands and their features:
| Brand / Source | Material | Price Range (USD) | Key Features & Notes |
|---|---|---|---|
| 666carbon.com | SIXFIBER composite | $986 (sale) - $1,232 (regular) | Lightweight, flexible, handcrafted, track-only, raw finish. |
| Fairing Hub | OEM quality ABS plastic | $540 (sale) - $828 (regular) | Matt black, pre-drilled holes, quality paint, includes bolt kits and heat shields. |
| iFairings | High-quality ABS virgin thermoplastic | N/A | Injection molded, customizable decals, six-layer paint, 180-day warranty. |
Fitment and Compatibility Tips
Fitment is one of the most important things to check before you buy a kit. Always match the fairings to your exact Yamaha R6 model year. Even small changes in design can cause problems during installation. Read product descriptions carefully. Some brands, like nicefairings, get positive reviews for fit that is even better than OEM in some cases.
If you are not sure about compatibility, ask a mechanic or contact the seller. Look for kits with pre-drilled holes. These make installation much easier. Customer reviews can help you learn about real-world fitment and quality. Good fitment means your fairings will not rattle or shift while you ride.
Tip: Double-check your model year and read reviews before buying fairings. This helps you avoid costly mistakes and ensures a smooth installation.
Fairing Install: Step-by-Step Guide

Tools and Preparation for Fairing Install
Before you start working on your Yamaha R6, you need to gather the right tools and prepare your workspace. This helps you avoid mistakes and makes the process smoother. Here is a list of steps you should follow before you begin:
- Loosen the fuel tank so you can lift it. This step lets you install special supports that come with some kits.
- Install a rear subframe if your kit requires it. The new subframe is lighter and easier to replace than the original.
- Fit new aluminum holders to the frame. Use the original slots and screws to make sure the holders support the upper and lower panels.
- Attach the dashboard holder and air duct before you fit the upper panel. Secure the dashboard with three screws.
- Use the original screws and pre-drilled holes for all parts. This ensures everything lines up and fits well.
Tip: Keep your tools organized and lay out all the parts before you start. This helps you avoid losing small pieces and makes the job easier.
You should have a basic set of screwdrivers, Allen wrenches, and a socket set. Some kits may need special tools, so check the instructions that come with your fairing install kit.
Removing Old Fairings
Taking off the old panels from your Yamaha R6 can be tricky. You need to pay attention to each step so you do not damage any parts. Here are some common challenges you might face:
- You might lose bolts because many of them look the same. Keep them in labeled containers or use a magnetic tray.
- You need to disconnect electrical parts like indicators and headlights. Do this carefully to avoid breaking wires.
- Some panels use plastic rivets. Remove these by pushing or unscrewing them gently.
- You will find clips that hold panels in place. Unclip them slowly so they do not snap.
- Pull pins and washers may need to be replaced when you put the bike back together.
- Cables and clips can hold parts tightly. Loosen them before you try to remove the panels.
- The assembly has many bolts, rivets, clips, and wires. Take your time and work step by step.
Note: Take photos as you go. This helps you remember where each part belongs during reassembly.
Installing Side Fairings
When you start to install the side panels, you may think it will be quick. Some guides say it takes about two hours. In reality, you might spend much longer, especially if you run into problems. The Yamaha R6 has many body pieces and hardware. Each side can have four panels, and the whole bike may have up to 19 pieces.
You need to line up each panel with the correct holes. Use the original screws and check that everything fits before you tighten the bolts. Sometimes, you need to trim the bodywork if you use aftermarket parts. You may also need to remove the tail or headlights to reach certain areas.
🛠️ Tip: Work slowly and do not force any parts. If something does not fit, double-check the alignment and the instructions.
Many riders find that installing the side panels takes much longer than expected. You may need to deal with locks, electronics, and extra hardware. Stay patient and keep your workspace organized. This helps you avoid frustration and makes your fairing install a success.
Installing Lower Fairings
You need to install the lower fairings with care to keep your Yamaha R6 looking sharp and running well. Start by removing the old panels. Use a hex wrench to take out the four hex bolts on each side of the bike. Keep each bolt in a safe place so you do not lose them. Next, use a Phillips head screwdriver to undo the plastic rivet that holds the long strip fairing in place. Push the fairings toward the front of the bike to free them from their slots.
Before you remove the lower fairings, disconnect the indicators. This step keeps the wires safe and prevents damage. Find the four bolts that secure the lower fairings. Two bolts attach the fairing to the bike, and two bolts hold the sides together. Remove all four bolts. Look for a plastic rivet below the bolt near the front forks and toward the middle of the bike. Push in the center of this rivet with a screwdriver to release it.
When you reinstall the lower fairings, follow the removal steps in reverse order. Make sure you place all bolts and rivets in their correct spots. This keeps the panels aligned and prevents rattling while you ride.
🛠️ Tip: Take photos as you remove each part. These photos help you remember where each bolt and rivet goes during reassembly.
Installing Headlight Fairing
The headlight fairing, also called the upper cowl, protects your bike’s front and gives it a clean look. You need to keep track of every bolt and fastener. Losing even one can make reinstallation hard. Use the right tools for the job. A 4mm hex wrench, Phillips head screwdriver, and Allen keys work best. These tools help you avoid stripping bolts or damaging panels.
Begin by removing the hex bolts that hold the cowls in place. Take off the inner panel around the headlights and the yoke. Watch for clips and plastic rivets. Some panels have clips that you must unclip before you pull them off. This step prevents cracks and breaks.
Next, remove the windscreen by undoing its four bolts. Take off the mirrors, which each have two bolts. Disconnect the electrical cables to the headlights. Some cables use screws to stay in place, so loosen these carefully.
To install the headlight fairing, reverse the removal steps. Secure all clips, rivets, and bolts. Handle each part gently. Most fairings use ABS plastic, which is strong but can crack if you use too much force.
⚡ Note: Double-check every connection before you finish. A loose bolt or missed clip can cause rattling or even let a panel fall off while you ride.
Installing Tail Fairing
The tail fairing covers the back of your Yamaha R6 and protects the wiring and seat area. You start by removing the seat. Use the key to unlock and lift the seat off the bike. Find the bolts that hold the tail fairing in place. Most Yamaha R6 models use two or three bolts on each side. Remove these bolts with a socket wrench or Allen key.
Look for any hidden clips or plastic rivets. Some tail fairings use small tabs that slide into slots on the frame. Gently pull the fairing back and up to release it. If your bike has a rear light or turn signals attached to the tail fairing, disconnect the wiring before you fully remove the panel.
When you install the new tail fairing, line up the tabs and slots first. Slide the panel into place, then secure it with the bolts you removed earlier. Reconnect any wiring for the lights or signals. Replace the seat and lock it down.
🚦 Tip: Test the rear lights and turn signals before you finish. This step ensures all connections work and keeps your bike safe on the road.
Common Fairing Install Mistakes to Avoid
Installing fairings on your Yamaha R6 can seem simple, but many riders make mistakes that lead to problems later. You can avoid these issues if you know what to watch for. Here are some of the most common mistakes:
-
Forgetting to Organize Bolts and Clips
You might remove many bolts, screws, and clips during the process. If you do not keep them organized, you can lose track of which part goes where. This mistake can slow you down and cause rattling panels. -
Skipping the Reference Step
Some riders throw away the old bodywork too soon. If you keep your stock fairings nearby, you can use them as a guide. This step helps you line up holes and match hardware. -
Using the Wrong Tools
You need the right tools for the job. If you use the wrong screwdriver or wrench, you can strip bolts or crack the fairing. Always check your tool kit before you start. -
Overtightening Bolts
You may think tighter is better, but overtightening can crack plastic fairings or strip threads. Tighten bolts just enough to hold the panel securely. -
Forcing Panels to Fit
If a panel does not fit, do not force it. Forcing can break tabs or bend the fairing. Check alignment and make sure you have the right part for your model year. -
Ignoring Electrical Connections
You must disconnect and reconnect wires for headlights, indicators, and tail lights. If you forget to reconnect them, your lights will not work. Always double-check all connections before finishing. -
Skipping a Test Fit
Some riders install all the panels at once. If you test fit each piece before final tightening, you can catch problems early. This step saves time and prevents damage.
⚠️ Tip: Take photos as you remove each part. These photos help you remember where everything goes when you put your Yamaha R6 back together.
Tips for a Smooth Fairing Install
You can make your Yamaha R6 fairing install much easier if you follow a few expert tips. These steps help you avoid damage and get a clean, professional look.
-
Remove the Stock Bodywork Carefully
Start by taking off the old fairings with care. Work slowly and keep all bolts and clips in labeled containers. This step prevents scratches and makes reassembly easier. -
Use the Old Fairings as a Guide
Keep your stock bodywork close by. You can compare it to the new panels to check hole placement and hardware. This method helps you avoid mistakes and saves time. -
Gather the Right Tools
Use proper tools like screwdrivers, Allen wrenches, and socket sets. The right tools help you avoid stripping bolts or cracking panels. Always follow the instructions that come with your fairing kit. -
Follow Detailed Instructions
Read the installation guide before you start. Each kit may have special steps or order of assembly. If you follow the instructions, you reduce the risk of missing a step. -
Test Fit Each Panel
Before you tighten any bolts, place each panel on the bike to check alignment. This step lets you spot problems early and adjust as needed. -
Work in a Clean, Well-Lit Area
A tidy workspace helps you find small parts and keeps your panels free from dirt and scratches. -
Reconnect All Electrical Wires
Double-check all connections for headlights, indicators, and tail lights. Test the lights before you finish the install. -
Take Your Time
Rushing can lead to mistakes. Work slowly and check your progress after each step.
Here is a quick checklist to help you remember these tips:
| Step | Why It Matters |
|---|---|
| Remove old fairings carefully | Prevents damage and lost hardware |
| Use old fairings as reference | Ensures correct fit and alignment |
| Gather proper tools | Avoids stripped bolts and cracks |
| Follow instructions | Reduces errors and confusion |
| Test fit panels | Catches problems before final install |
| Keep workspace clean | Protects panels and parts |
| Reconnect all wires | Ensures lights and signals work |
| Take your time | Leads to a better final result |
🏍️ Note: If you get stuck, take a break and review your steps. Sometimes a fresh look helps you spot the problem.
By following these tips, you can install your Yamaha R6 fairings with confidence and enjoy a smooth, trouble-free process.
Maintenance and Care for Yamaha R6 Fairings
Cleaning and Washing Fairings
You keep your Yamaha R6 looking sharp by cleaning the fairings the right way. Use mild soap and warm water with a soft cloth or sponge. This method removes dirt without scratching the surface. Avoid abrasive cleaners or harsh solvents because they can cause fading or cracks. After washing, dry the panels with a microfiber towel to prevent water spots. You can apply a high-quality wax or polish to protect the fairings from UV rays. This step also makes future cleaning easier. Yamaha does not recommend any specific cleaning brands, so stick with gentle products. Store your bike indoors or use a cover to help maintain the condition of the panels.
🧽 Tip: Regular cleaning keeps your fairings looking new and helps you spot damage early.
Inspecting Fairings for Damage and Wear
You should inspect your fairings often. Look for cracks, scratches, or loose fasteners. Check around mounting points and edges, as these areas get the most stress. If you ride often or park outside, inspect more frequently. Early detection of damage helps you avoid bigger problems later. Use your hands to feel for rough spots or raised edges. If you find any issues, plan repairs soon to keep your bike safe and looking good.
Repairing Minor Fairing Cracks and Scratches
You can fix small cracks and scratches on your Yamaha R6 fairings at home. Follow these steps for best results:
1. Remove the fairings carefully and keep all screws and clips organized. 2. Clean the panels with a plastic cleaner or degreaser to remove dirt and oil. 3. Sand the damaged area, starting with 320-grit sandpaper and moving up to 2000 grit for a smooth finish. 4. Fill small scratches with a flexible filler like Polly-Flex. For larger cracks, use epoxy to bond the parts. 5. Sand the repair smooth after it dries. 6. Apply an adhesion promoter and a flexible primer made for motorcycle plastics. 7. Paint the area with color-matched flexible paint and finish with a clear coat. 8. Reinstall the fairings, making sure everything lines up and fits tight.
🛡️ Note: Wear safety gear when sanding and painting. Take your time for a professional finish.
Protecting Fairings from Sun and Weather
You want your Yamaha R6 to look great and last a long time. Sunlight, rain, and dust can damage the surface of your fairings if you do not protect them. Here are some simple steps you can follow to keep your bike looking new:
- Clean your fairings often with a soft cloth or sponge. Use mild soap and warm water. Stay away from harsh cleaners because they can scratch or fade the surface.
- Wax your fairings after each wash. A high-quality wax or polish adds a layer that blocks UV rays. This step helps stop the sun from fading the color and makes cleaning easier next time.
- Inspect your fairings for cracks or scratches. If you find any, fix them right away with a repair kit or ask a professional for help. Quick repairs stop small problems from getting worse.
- Cover your motorcycle with a good cover when you are not riding. A cover keeps out dust, rain, and sunlight. This simple step protects your bike from weather damage.
- Store your Yamaha R6 indoors if you can. A garage or shed shields your fairings from extreme heat, cold, and moisture.
- Use clear protective film on areas that get touched a lot. This film guards against scratches and small impacts, especially on the sides and front.
🛡️ Tip: Choose fairings made from strong materials like ABS plastic or fiberglass. These materials last longer and stand up better to weather.
By following these steps, you help your Yamaha R6 stay sharp and strong, no matter the weather.
When to Seek Professional Help for Fairing Install
Signs You Need a Professional for Fairing Install
You may want to install Yamaha R6 fairings by yourself, but some situations call for expert help. Watch for these signs that show you need a professional:
-
Visible cracks or structural damage
If you see cracks in your fairings, even small ones, you should not ignore them. Vibrations and wind can make these cracks worse. This can put your safety at risk. -
Broken or loose mounting points
Mounting points hold your fairings in place. If they break or feel loose, your panels may not fit right. This can cause your fairings to shake or even fall off while you ride. -
Loose or misaligned fittings
Panels that do not fit snugly can make noise and vibrate. Misaligned fairings can also affect how your bike handles. You want every panel to fit tight and look smooth. -
Persistent damage from accidents
If your bike has been in an accident, you may see dents, deep scratches, or stress marks. These problems are hard to fix at home. Damaged fairings can weaken over time. -
Upgrading your bike’s look or performance
When you want to upgrade your fairings for better aerodynamics or a new style, you need a perfect fit. Professionals know how to install these upgrades so they last and work well.
🛠️ Tip: If you notice any of these signs, you should let a trained technician handle the job. This keeps your Yamaha R6 safe and looking its best.
Finding a Qualified Fairing Technician
You want someone skilled and trustworthy to work on your Yamaha R6. Start by asking for recommendations from local motorcycle shops or other riders. Look for technicians who have experience with sport bikes and fairing installs. Check online reviews and ratings to see what others say about their work.
Ask the technician if they have worked on Yamaha R6 models before. A good technician will show you photos of past jobs or offer references. Make sure they use the right tools and follow the manufacturer’s instructions. You can also ask about warranties on their work.
👍 Note: Choosing a qualified technician helps you avoid future problems. Your fairings will fit better, last longer, and keep your ride safe.
You now know the basics of Yamaha R6 fairings. Choose the right material and style for your needs. Clean and inspect your fairings often to keep your bike looking sharp. Use the correct tools and follow each step during installation. If you see cracks or struggle with fitment, ask a professional for help.
🏍️ Tip: A well-installed fairing improves safety, performance, and style. Take your time and enjoy the process!
FAQ
How often should you clean your Yamaha R6 fairings?
You should clean your fairings every two weeks or after long rides. Use mild soap and a soft cloth. Regular cleaning helps you spot damage early and keeps your bike looking sharp.
Can you install aftermarket fairings by yourself?
Yes, you can install aftermarket fairings at home. Follow the instructions and use the right tools. Take your time and keep bolts organized. If you feel unsure, ask a professional for help.
What should you do if a fairing panel does not fit?
Check the model year and part number first. Test fit the panel before tightening bolts. If it still does not fit, contact the seller or manufacturer for advice. Do not force the panel into place.
Do fairings affect your Yamaha R6’s speed?
Yes, fairings improve aerodynamics. They help your bike cut through wind and reduce drag. This can increase your top speed and make your ride smoother, especially at higher speeds.
See Also
Essential Reasons To Choose Yamaha R6 Fairings Today
Easy Steps To Replace 2019 BMW S1000RR Fairings
Complete Installation Guide For Honda CBR500R Fairing Kits
Top Yamaha R6 Fairing Kits Compared For Style And Performance
