How to Replace and Maintain Fairing Bolts on Your 2008 Suzuki GSXR 750

When you work on your suzuki gsxr 750 2008 fairing bolts, you need the right details. Each bolt holds your motorcycle’s fairings securely. You will find different sizes and types of suzuki gsxr 750 2008 fairing bolts on your bike.
Always check the material and torque settings before you begin. Strong bolts protect your ride and keep you safe.
Suzuki GSXR 750 2008 Fairing Bolts Specifications
Bolt Sizes and Types for 2008-2009 Suzuki GSX-R
You need to know the exact bolt sizes and types for your 2008-2009 suzuki gsx-r. Suzuki used a consistent set of bolts for the fairings on these models. The table below shows the types of bolts you will find on your bike. This information helps you choose the right replacements and avoid confusion with other model years.
| Model Years Covered | Bolt Types Included | Notes |
|---|---|---|
| 2008-2010 Suzuki GSXR 750 (K8-L0 to K10) | Drilled bolts, race spec drilled bolts, flanged bolts, flanged cap head race spec bolts, flanged hex bolts, countersunk bolts, dome head bolts, dual drive bolts, fully threaded bolts, quick release ¼ turn bolts, nuts, washers | Bolt sizes and types are consistent across these years |
| Other model years (pre-2008 or post-2010) | N/A | No information available on bolt size/type differences |
Tip: Always match the new bolt to the original type and size for a secure fit.
Materials and Durability of Suzuki Fairing Bolts
You want your suzuki gsxr 750 2008 fairing bolts to last. The material of each bolt affects how well it holds up over time. Most aftermarket kits include aluminum bolts. These bolts offer several benefits:
- Aluminum bolts weigh less than steel bolts.
- They resist corrosion, so they do not rust easily.
- Aluminum bolts provide good durability for mounting the fairing.
You may find some universal aluminum bolts included as extras in aftermarket kits. Suzuki does not list the exact material for the original bolts, but aluminum is a common choice for fairing hardware. This material keeps your gsx-r light and helps prevent rust.
Fairing Bolt Locations on the GSX-R
You will see many bolts holding the fairing in place on your bike. Knowing the correct fairing bolt placement makes your work easier and safer. Here are the main locations you should check:
- Side fairings: These bolts run along the sides of your bike and keep the panels secure.
- Front fairing: Bolts here hold the nose and headlight area.
- Lower fairings: You will find bolts underneath, connecting the lower panels.
- Tail section: Some bolts secure the rear fairing and seat cowl.
- Inner panels: Smaller bolts may hold inner covers or trim pieces.
You should always check each placement before removing or replacing a bolt. This step helps you avoid missing any hidden fasteners and keeps your fairing secure after reassembly.
Torque Settings for Suzuki GSXR 750 2008 Fairing Bolts
When you install new fairing bolts on your Suzuki GSXR 750, you need to use the correct torque settings. Torque is the force you use to tighten a bolt. If you use too much force, you can strip the threads or crack the fairing. If you use too little, the fairing may come loose while you ride.
Why Correct Torque Matters
Tip: Always use a torque wrench when you work with fairing bolts. This tool helps you apply the right amount of force every time.
You want your fairings to stay secure. Using the right torque keeps your panels tight and prevents damage. It also makes future maintenance easier because you will not over-tighten or break the bolts.
Standard Torque Settings
Suzuki recommends specific torque values for fairing bolts. Most fairing bolts on the 2008 GSXR 750 need a torque of 3–5 Nm (Newton-meters). Some larger bolts, like those on the lower fairing or main mounting points, may require up to 10 Nm. Always check your service manual for the exact numbers.
Here is a quick reference table for common fairing bolt torque settings:
| Bolt Location | Typical Torque Setting |
|---|---|
| Side Fairings | 3–5 Nm |
| Front Fairing | 3–5 Nm |
| Lower Fairing | 5–7 Nm |
| Tail Section | 3–5 Nm |
| Main Mounting Points | 8–10 Nm |
How to Use a Torque Wrench
- Set your torque wrench to the correct value.
- Place the wrench on the bolt head.
- Turn the wrench until you feel or hear a click. This means you have reached the set torque.
- Stop tightening when you hear the click. Do not force the bolt any further.
Note: If you do not have a torque wrench, tighten the bolt until it feels snug, then give it a small extra turn. Never use too much force.
Common Problems from Incorrect Torque
- Over-tightening can strip threads or crack plastic fairings.
- Under-tightening can cause bolts to loosen and fall out.
- Uneven torque can lead to rattling panels or gaps in the fairing.
You should always double-check your work. If you follow the correct torque settings for your suzuki gsxr 750 2008 fairing bolts, you will keep your bike safe and looking sharp.
Step-by-Step Guide to Replacing Suzuki GSXR 750 2008 Fairing Bolts
Tools Needed for GSX-R Fairing Bolt Replacement
Before you start, gather all the tools you need. Having the right tools makes the job easier and helps you avoid damaging your motorcycle. Here is a list of basic tools you should prepare:
- Metric Allen wrench set (hex keys)
- Phillips and flathead screwdrivers
- Ratchet and socket set (metric sizes)
- Plastic trim removal tool
- Torque wrench (for correct tightening)
- Small container or tray (to keep fasteners organized)
- Clean cloth
Tip: Keep your tools close by. Place each fastener in a tray as you remove it. This step helps you remember where each bolt goes during reassembly.
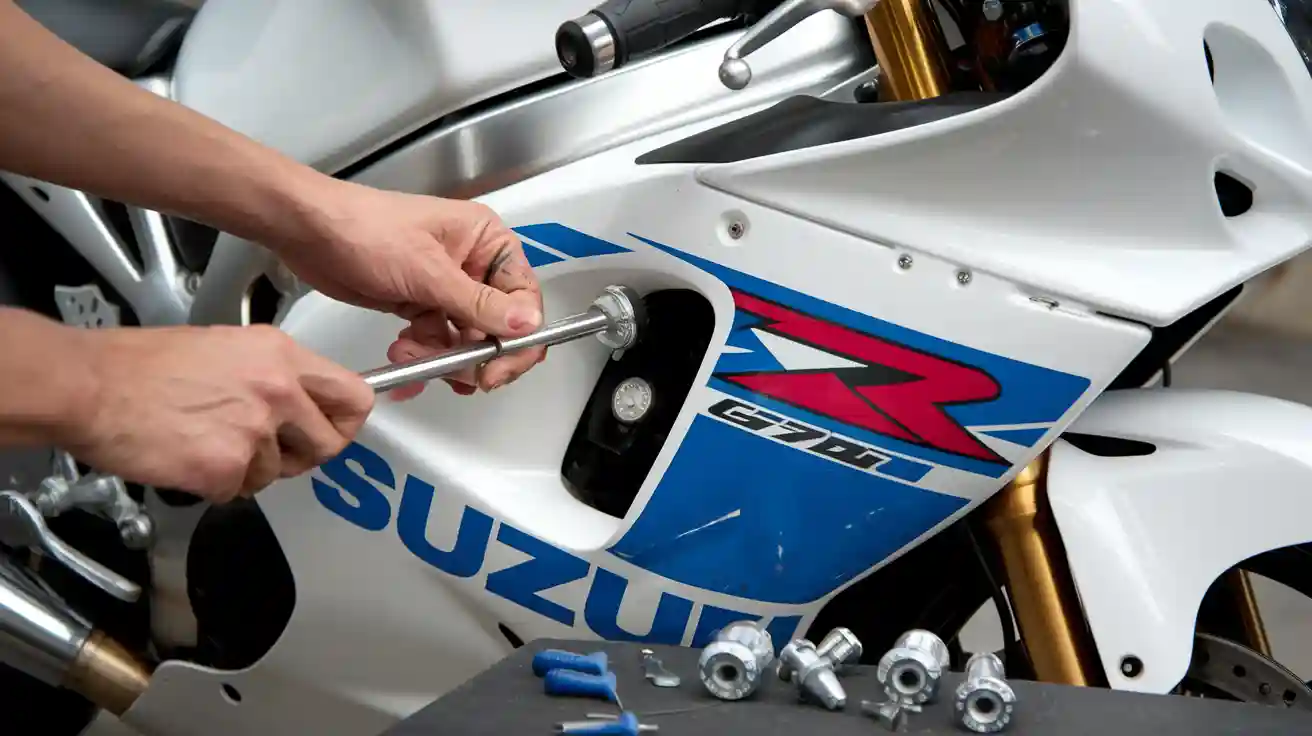
Removing Old Fairing Bolts on Suzuki GSXR 750
You need to remove the old fasteners before you can install new ones. Start by parking your motorcycle on a flat surface. Make sure the engine is cool. Use a rear stand if you have one for extra stability.
Follow these steps to remove the fairing bolts:
- Look at your bike and find all the fasteners holding the fairing panels.
- Use the correct size Allen wrench or screwdriver for each bolt.
- Turn each fastener counterclockwise to loosen it.
- Remove right side fairing first. This panel often comes off easier and gives you better access to other bolts.
- Place each fastener in your tray as you remove it.
- Repeat the process for the left side and lower panels.
- If you need to remove right side fairing again for any reason, check for hidden fasteners near the frame or under the seat.
Note: Some fasteners may be hidden behind trim pieces. Use a plastic trim tool to gently pry off covers without scratching your fairing.
Check each bolt for rust or damage as you remove it. If you see stripped threads or broken heads, replace those fasteners right away.
Installing New Fairing Bolts on 2008-2009 Suzuki GSX-R
Now you are ready to install new fasteners. Make sure you use the correct size and type for each location. Match each bolt to the original one you removed.
Follow these steps to install the new bolts:
- Line up the fairing panels with the mounting holes on your gsx-r.
- Insert each fastener by hand to avoid cross-threading.
- Start with the main mounting points, then move to the smaller bolts.
- Use your torque wrench to tighten each bolt to the recommended setting. This step keeps your fairing secure and prevents damage.
- Work in a pattern, tightening bolts on one side, then the other. This method helps the panels fit evenly.
- Double-check that all fasteners are snug and none are missing.
Always check your work before riding. A loose bolt can cause rattling or even let a panel fall off while you ride.
Replacing your suzuki gsxr 750 2008 fairing bolts keeps your motorcycle looking sharp and safe. When you use the right tools and follow these steps, you protect your fairing and make future maintenance easier.
Applying Correct Torque to Suzuki Fairing Bolts
Applying the correct torque to your Suzuki GSXR 750 fairing bolts keeps your motorcycle safe and your fairings secure. If you use too much force, you can damage the fairing or strip the threads. If you use too little, the bolts may loosen while you ride. You need to use a torque wrench for this job.
How to Apply the Correct Torque:
-
Set the Torque Wrench:
Find the recommended torque value for each bolt. Most fairing bolts on your 2008 GSXR 750 need 3–5 Nm. Some larger bolts may need up to 10 Nm. Set your torque wrench to the correct number. -
Insert the Bolt by Hand:
Start each bolt by hand. This step helps you avoid cross-threading. If you feel resistance, stop and check the alignment. -
Tighten with the Torque Wrench:
Place the torque wrench on the bolt head. Turn the wrench slowly. When you hear or feel a click, stop tightening. The click means you have reached the set torque. -
Follow a Pattern:
Tighten bolts in a crisscross or alternating pattern. This method helps the fairing panels fit evenly and prevents stress on one side. -
Double-Check Each Bolt:
After tightening all bolts, check each one again with the torque wrench. Make sure none are loose.
Tip: Always use a clean, dry bolt. Dirt or oil can change the torque reading and make the bolt slip.
Torque Reference Table:
| Bolt Location | Torque Setting (Nm) |
|---|---|
| Side Fairings | 3–5 |
| Front Fairing | 3–5 |
| Lower Fairing | 5–7 |
| Tail Section | 3–5 |
| Main Mounting Points | 8–10 |
Using the correct torque keeps your fairings tight and your ride safe. You also make future maintenance easier because you avoid over-tightening or damaging the bolts.
Common Mistakes to Avoid When Replacing GSX-R Fairing Bolts
You want your Suzuki GSXR 750 to look great and stay safe. Avoiding common mistakes during bolt replacement helps you achieve both. Here are some errors you should watch for:
-
Using the Wrong Bolt Size or Type:
Always match the new bolt to the original. Using the wrong size can cause loose panels or stripped threads. -
Skipping the Torque Wrench:
Tightening bolts by feel can lead to over-tightening or under-tightening. Always use a torque wrench for accuracy. -
Cross-Threading Bolts:
If you force a bolt into the hole at an angle, you can damage the threads. Start each bolt by hand and make sure it turns smoothly. -
Forgetting to Clean Bolts and Threads:
Dirt or debris can affect how the bolt tightens. Clean each bolt and the mounting hole before installation. -
Missing Hidden Fasteners:
Some fairing bolts hide behind trim pieces or under the seat. Check all locations before pulling on the fairing. -
Over-Tightening Plastic Panels:
Too much force can crack or deform plastic fairings. Use the correct torque and stop when you feel resistance. -
Not Organizing Removed Bolts:
Mixing up bolts can lead to confusion during reassembly. Use a tray or label each bolt as you remove it.
⚠️ Alert: If you notice a bolt spinning freely or not tightening, stop and inspect the threads. Damaged threads need repair before you install a new bolt.
By avoiding these mistakes, you keep your GSX-R fairings secure and your motorcycle looking sharp. You also save time and prevent costly repairs in the future.
Maintenance Tips for Suzuki GSXR 750 2008 Fairing Bolts
Inspection Frequency for GSX-R Fairing Bolts
You should check your fairing bolts often to keep your motorcycle safe. Inspect the bolts every month if you ride your GSX-R regularly. If you ride in wet or dusty conditions, check them more often. Look at the bolts before and after long rides. This habit helps you catch loose or missing fasteners early.
Tip: Make a checklist for your regular maintenance. Add fairing bolt inspection to your list so you never forget.
Cleaning and Lubricating Suzuki Fairing Bolts
Clean bolts last longer and work better. Use a soft brush or cloth to wipe away dirt from each bolt. For stubborn grime, use mild soap and water. Dry the bolts well before putting them back. You can use a small amount of anti-seize or light oil on the threads. This step helps prevent rust and makes future removal easier.
- Remove each bolt one at a time for cleaning.
- Clean the bolt and the hole.
- Apply a thin layer of lubricant to the threads.
- Reinstall the bolt and tighten it to the correct torque.
Note: Do not use too much oil. Too much can attract dirt and cause problems.
Identifying Wear or Damage on 2008-2009 Suzuki GSX-R Fairing Bolts
You need to spot damage early to keep your fairing secure. Look for these signs:
- Rust or corrosion on the bolt head or threads
- Stripped or worn threads
- Cracks in the bolt or the area around it
- Bolts that spin freely or do not tighten
If you see any of these problems, replace the bolt right away. Damaged bolts can cause panels to come loose while you ride.
Always use the right size and type of replacement bolt. This step keeps your fasteners working as they should.
When to Replace Suzuki GSXR 750 2008 Fairing Bolts
You want your Suzuki GSXR 750 to stay safe and look sharp. Knowing when to replace your fairing bolts helps you avoid problems on the road. Old or damaged bolts can cause your fairings to rattle, loosen, or even fall off. You should check your bolts often and look for signs that tell you it is time for new ones.
Replace your fairing bolts if you notice:
- Rust or Corrosion:
If you see orange or brown spots on the bolt heads or threads, the bolts have started to rust. Rust weakens the metal and makes bolts hard to remove. - Stripped Threads:
When you turn a bolt and it spins without tightening, the threads may be stripped. Stripped bolts cannot hold the fairing panels tight. - Cracked or Broken Bolts:
If a bolt head snaps off or you see cracks along the shaft, you need a new bolt right away. - Bent or Warped Bolts:
Sometimes, a bolt bends if you over-tighten it or if the bike falls. Bent bolts do not fit well and can damage the fairing holes. - Missing Bolts:
If you find an empty bolt hole, replace the missing bolt as soon as possible. Missing bolts make your fairing loose and unsafe.
Tip: Always replace bolts after a crash or tip-over, even if they look fine. Hidden damage can make them fail later.
You should also replace your bolts if you upgrade your fairings or repaint your bike. New panels need fresh hardware for the best fit. If you buy a used GSXR 750, check all the fairing bolts. Replace any that look worn or do not match the others.
Here is a quick reference table to help you decide:
| Condition | Replace Bolt? |
|---|---|
| Rust or corrosion | ✅ |
| Stripped threads | ✅ |
| Cracked or broken | ✅ |
| Bent or warped | ✅ |
| Missing | ✅ |
| After crash/tip-over | ✅ |
| Upgrading fairings | ✅ |
By watching for these signs, you keep your Suzuki GSXR 750 fairings secure and your ride safe. Regular checks and timely replacements protect your bike and give you peace of mind.
Recommended Replacement Bolt Kits for 2008-2009 Suzuki GSX-R Fairing
Top Suzuki GSXR 750 2008 Fairing Bolt Kit Options
You have many choices when you look for a fairing bolt kit for your Suzuki GSXR 750. Some kits stand out because they fit well and last a long time. Here are some top options you can trust:
- Suzuki OEM Fairing Bolt Kit
This kit matches the original bolts on your bike. You get the same fit and finish as the factory parts. - MC Motoparts Complete Fairing Bolt Kit
This kit includes all the bolts, washers, and clips you need. The bolts resist rust and look sharp. - Pro-Bolt Aluminum Fairing Kit
You get lightweight bolts in many colors. These bolts help you customize your bike and keep it light.
Tip: Always check that the kit covers every panel in your set of fairings.
Where to Buy Quality Suzuki GSX-R Fairing Bolt Kits
You want to buy from a trusted source. Good places to shop include:
- Authorized Suzuki Dealers
These stores sell genuine parts that fit your bike. - Motorcycle Parts Websites
Sites like RevZilla, BikeBandit, and Partzilla offer many kits. You can read reviews and compare prices. - Local Motorcycle Shops
Some shops carry bolt kits for popular bikes. You can ask for advice and see the parts before you buy.
Note: Avoid very cheap kits from unknown sellers. Low-quality bolts may rust or break.
What to Look for in a Suzuki GSXR 750 2008 Fairing Replacement Kit
You need a kit that fits your bike and lasts a long time. Look for these features:
| Feature | Why It Matters |
|---|---|
| Correct Bolt Sizes | Ensures a snug and safe fit |
| Rust-Resistant Material | Keeps bolts strong in all weather |
| Complete Hardware | Includes washers, clips, and spacers |
| Clear Instructions | Makes installation easy |
| Good Reviews | Shows other riders trust the kit |
Choose a kit that lists your bike’s year and model. Check that it covers every bolt you need for your fairings. This step saves you time and trouble during installation.
Using the correct fairing bolt specifications for your 2008 Suzuki GSXR 750 keeps your motorcycle secure and looking sharp. Regular inspection and maintenance help you ride safely. You should check your bolts often because vibrations and daily use can loosen or remove them.
- Tight bolts prevent fairings from rattling or falling off.
- Secure fairings protect you from distractions and accidents.
- Good hardware shields important parts from dirt and weather.
Choose quality replacement kits to keep your GSX-R strong for every ride.
FAQ
How often should you check your Suzuki GSXR 750 fairing bolts?
You should check your fairing bolts every month. If you ride often or in rough conditions, inspect them more often. This habit helps you catch loose or missing bolts before they cause problems.
Can you reuse old fairing bolts after removing them?
You can reuse old bolts if they look clean and undamaged. If you see rust, stripped threads, or bent bolts, replace them. New bolts keep your fairings secure and safe.
What happens if you over-tighten a fairing bolt?
Over-tightening can crack the fairing or strip the threads. This damage makes the bolt loose and unsafe. Always use a torque wrench to apply the correct force.
Do you need special tools to replace fairing bolts?
You need basic tools like Allen wrenches, screwdrivers, and a torque wrench. A small tray helps you keep bolts organized. You do not need expensive or rare tools for this job.
Are aftermarket fairing bolt kits as good as OEM kits?
Many aftermarket kits work well if you choose a trusted brand. Look for rust-resistant materials and correct sizes. OEM kits match your bike exactly, but quality aftermarket kits can save you money.
See Also
A Complete Guide To Repairing And Replacing Motorcycle Fairings
Effective Methods For Cleaning And Maintaining Motorcycle Fairings
Easy Replacement Tips For 2019 BMW S1000RR Fairings
Key Advantages Of Upgrading Suzuki GSXR Fairings From 2006 2007
