DIY Motorcycle Painting Made Easy for Enthusiasts

You can transform your motorcycle with a diy motorcycle paint job that reflects your unique style. Painting motorcycle parts gives you a chance to showcase your personality and create a professional finish. Many riders choose motorcycle painting to build a distinct identity, pay tribute to racing traditions, and boost confidence. A diy approach to motorcycle painting connects you with the racing community and preserves the spirit of the sport. Professional techniques help you achieve a paint job that lasts and makes your motorcycle stand out.
- Personal expression and style
- Unique motorcycle identity
- Honoring team or racing history
- Emotional encouragement
- Connection to motorcycle culture
- Preserving history and tradition
- Enhancing fan engagement
Essential Tools and Materials for DIY Motorcycle Painting
Must-Have Painting Supplies and Equipment
You need the right supplies to achieve a professional finish on your motorcycle. Start by gathering these essential items:
- Sandpaper grits: Use medium grit (80-100) for removing old paint from motorcycle parts, fine grit (150-220) for smoothing, and extra fine grit for wet sanding clear coats.
- Sanding blocks and sponges: Blocks help you sand flat surfaces, while sponges work well on curved areas like rims.
- Cleaning supplies: Degreasers remove oil and contaminants from motorcycle surfaces. Microfiber cloths prevent scratches.
- Painting tools: Airbrushes offer precision for detailed work on motorcycle painting. Spray paint cans provide a budget-friendly option for larger parts.
- Masking materials: Painter’s tape creates clean edges. Masking paper or plastic protects areas you do not want to paint.
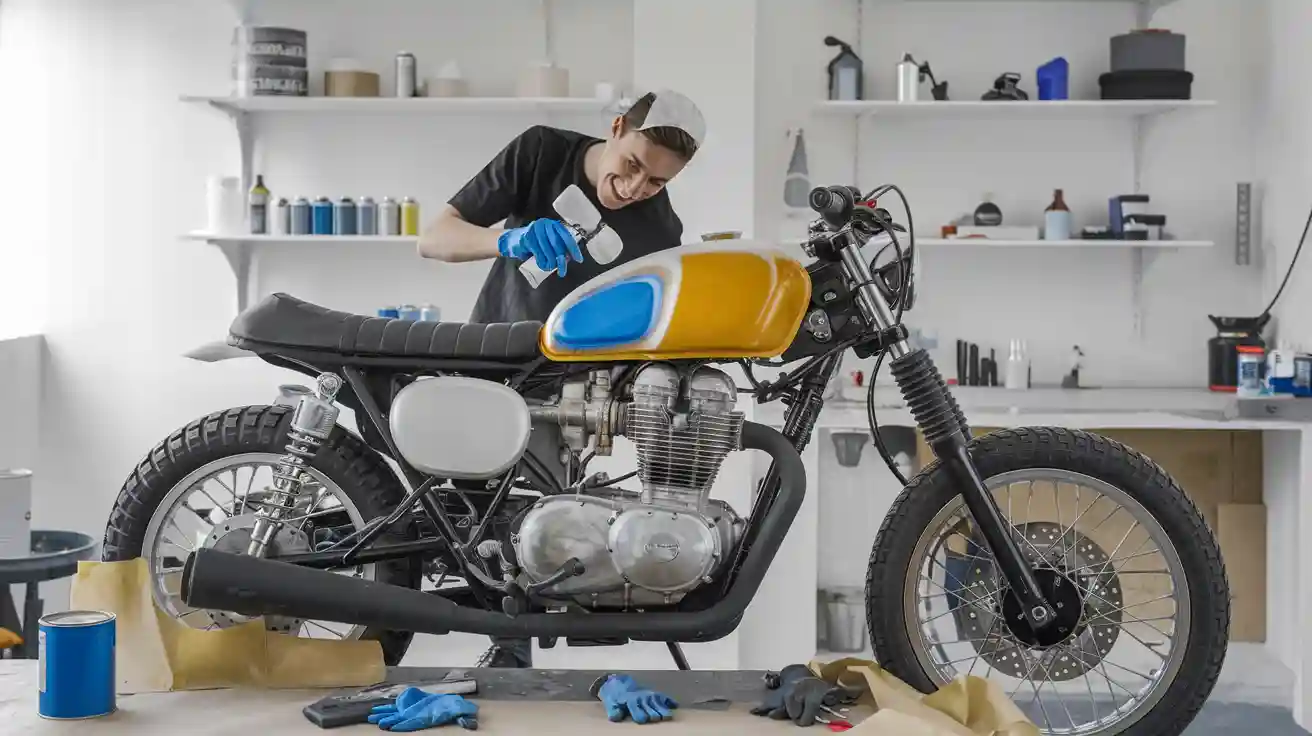
- Safety gear: Respirator masks and gloves keep you safe from fumes and chemicals.
- Paint types: Choose acrylic, urethane, automotive, or vinyl paint for different motorcycle parts.
- Clear coats: Use acrylic or urethane clear coats for lasting protection.
| Tool/Material | Description/Use |
|---|---|
| Paint Spray Gun | Smooth application and control for motorcycle painting. |
| Compressor | Consistent paint pressure for spray guns. |
| Sandpaper (various grits) | Prepares motorcycle parts for painting. |
| Respirator Mask | Protects you from paint fumes. |
| Painter's Tape | Masks off motorcycle rims and other parts. |
| Primer | Seals and prepares surfaces for paint. |
| Paint Types | Polyurethane, acrylic, urethane, automotive, vinyl. |
| Clear Coat Spray | Adds shine and durability to motorcycle painting. |
| Cleaning Supplies | Degreasers and microfiber cloths for prepping parts. |
| Disassembly Tools | Remove motorcycle parts to avoid overspray. |
Choosing the Best Paints and Primers for Motorcycle Painting
You want your motorcycle painting project to last. Urethane and acrylic paints stand out for their durability and vibrant color. These paints resist chipping and scratching, even on exposed parts like rims. Begin with a primer to help paint stick and protect the motorcycle surface. Apply base coats for color, then finish with a clear coat to shield against sun, rain, and road debris. UV-resistant paints keep your motorcycle looking fresh. Restoration enthusiasts often use single-stage paints, such as lacquer and enamel, for their scratch-proof and chip-proof qualities. These paints allow easy spot repairs and maintain protection over time.
Safety Gear and Creating a Clean Workspace
You must protect yourself during motorcycle painting. Wear a respirator mask to avoid inhaling fumes. Use nitrile or latex gloves to keep chemicals off your skin. Set up your workspace in a well-ventilated area. Clean the space before you start to prevent dust from settling on motorcycle parts or rims. Cover nearby surfaces with masking paper or plastic. Good lighting helps you see every detail, ensuring a flawless finish on your motorcycle.
Tip: Always test your paint on a small motorcycle part before painting larger areas like rims or panels.
Preparation Techniques for Painting Motorcycle Parts
Cleaning and Degreasing Motorcycle Surfaces
You must start every motorcycle painting project with a spotless surface. Dirt, oil, and old wax can ruin your finish. Begin by using an air compressor to blow off loose debris from the motorcycle chassis. This step removes leaves, sand, and gravel that might scratch the paint. Next, spray the motorcycle with water at low pressure. Wetting the surface helps loosen dirt without pushing it deeper into crevices.
Wash the motorcycle with soapy water and a sponge. Use organic dish soap for best results. Start at the front and work toward the back, covering the wheels, engine, gauges, fenders, and subframe. Wipe plastics and painted parts gently with a separate sponge. For rims and the chain, use a second sponge and spin the rear wheel in neutral to reach every spot. Clean the engine area carefully, avoiding electrical connections.
Rinse the motorcycle thoroughly to remove all soap. Dry painted parts and engine components with different towels to prevent cross-contamination. When you need to degrease, use a commercial degreaser on metallic parts like axles. Spray, wait about 30 seconds, and wipe dry. Always avoid aggressive cleaning, especially near sensitive materials. This careful approach ensures you are preparing your motorcycle for painting with a clean, safe surface.
Tip: Never rush the cleaning process. Impatience can lead to scratches or missed spots that affect the final result.
Disassembly Tips for DIY Enthusiasts
Disassembling your motorcycle before painting helps you reach every part and prevents overspray. Start by removing the parts you want to paint. The gas tank is usually the first part to come off because it is large and flat, making it ideal for motorcycle tank painting. Gather all necessary tools before you begin. You will need Allen keys, a ratchet, Phillips and flat screwdrivers.
Follow these steps for a smooth disassembly:
- Remove the seat and gas tank to access the frame.
- Before taking off the tank, turn off the fuel supply by switching the petcock knob and disconnect the fuel pipes.
- Take off additional parts such as the headlight, instruments, and wheels. This gives you better access to the frame and other surfaces.
- Removing the rear wheel helps you reach the swingarm and rims.
Keep all screws and small parts organized in labeled containers. This habit saves time during reassembly and prevents lost pieces. Careful disassembly protects your motorcycle and ensures a professional finish when you start painting.
Sanding and Smoothing for Professional Results
Sanding is a key step in motorcycle painting. It creates a smooth surface that helps paint stick and look even. Wet sanding works best for motorcycle parts. Start with coarser sandpaper, around 300-400 grit, to sand the primer. Move to medium grits like 600-800 for further smoothing. Finish with very fine grits, between 1000-1200, to smooth color coats.
- Rinse your sandpaper often and change it when it clogs.
- Use high-quality brands like 3M for better results.
- Sand between coats and clean the surface with alcohol before applying the next layer.
- Use fluorescent lights to check for smooth reflections. This step helps you spot uneven areas before painting.
| Common Mistake | Cause(s) | How to Avoid / Fix |
|---|---|---|
| Contamination | Water, oil, or dirt on the surface or in the air stream | Use clean rags, water/oil separators, and keep the area clean; remove wet paint with solvent or sand and repaint if dry |
| Flaking and Peeling | Poor surface prep, thin paint, not following instructions | Prepare surfaces well, apply enough paint, follow instructions; sand and repaint if needed |
| Cracking | Bad prep, wrong materials, incorrect mixing, bad environment, too much paint | Prep correctly, use proper materials, control environment, avoid over-application; sand out cracks and repaint |
| Orange Peel | Too much paint, wrong reducer, bad spray gun setup, poor technique | Use correct reducer, set up spray gun properly, practice technique; sand and polish or repaint if severe |
| Runs and Sags | Too much reducer, thick paint, not enough drying time, low air pressure, poor technique | Use correct reducer, allow drying time, maintain air pressure, practice technique; remove wet paint or sand and repaint if dry |
| Fisheyes | Contamination on surface or in air stream | Use clean rags, separators; remove wet paint with solvent or sand and repaint; use fisheye eliminator products |
You avoid common mistakes by following each step carefully. Sanding between coats and keeping the workspace clean leads to a professional finish. Your motorcycle will look smooth and ready for the next stage of painting.
Step-by-Step Motorcycle Painting Techniques
Priming Motorcycle Panels and Parts
You start every diy motorcycle paint job by priming the panels and parts. This step creates a strong foundation for your motorcycle paintwork and ensures the paint sticks well. Follow this motorcycle repaint tutorial for priming:
- Clean each motorcycle panel with warm soap and water. Wipe the surface with a clean cloth to remove dirt, grease, and debris.
- Sand the entire area using 400 grit sandpaper. This rough texture helps the primer bond to the motorcycle parts.
- Remove all sanding dust. Use a tack cloth or compressed air to keep the surface spotless.
- Mask off any areas you do not want to paint. Press masking tape firmly to prevent paint bleed.
- Apply a plastic primer to the panels. This step enhances adhesion and creates a smooth base for painting motorcycle surfaces.
- Wipe down the surface again with a tack cloth before priming.
- Use a quality primer, such as urethane epoxy primer. Apply one or two coats to create a strong bond between the metal and paint.
- If you need to sand the primer for a smoother finish, reapply primer after sanding.
- For minor scratches, use spray putty. Apply several coats and sand as directed by the product instructions.
- Sand between primer coats if needed. This process fills microscopic gaps and prepares the motorcycle for flawless paintwork.
Tip: Always mask off the motorcycle tank and other sensitive parts before priming. This step prevents overspray and keeps your motorcycle paint job clean.
Applying Base Coats with Spray Painting Techniques
You move to base coats after priming. This stage of motorcycle painting sets the color and depth for your motorcycle paintwork. Use these techniques for a professional finish:
| Technique Aspect | Recommendation |
|---|---|
| Spray Gun Distance | Hold the spray gun about 6 inches from the motorcycle parts. |
| Coat Application | Apply 1-2 medium coats with 50% pattern overlap. Avoid dry spraying to maintain adhesion. |
| Movement | Walk long objects, such as the motorcycle tank, during spraying for even coverage. |
| Flake Basecoat Tip Size | Use a 1.5 tip to prevent clogging when spraying flake basecoats. |
| Flake Basecoat Mixing | Continuously mix flakes to ensure even distribution across the motorcycle paintwork. |
| Flash Time Between Coats | Wait 10-15 minutes between coats for proper drying. |
| Dry Time Before Topcoat | Allow 30-45 minutes before applying the next layer. If you wait longer than 4 hours, lightly sand before recoating. |
| Sanding Grit | Use 280-320 grit for dry sanding, 400-500 grit for wet sanding, or a maroon scuff pad. |
| Paint Preparation | Strain paint before spraying to remove impurities. |
| Equipment Cleaning | Clean spray equipment with lacquer thinner or urethane reducer. |
You achieve a smooth motorcycle paint job by following these steps. Always strain your paint before spraying. Hold the spray gun at the correct distance and overlap each pass by 50%. Walk the length of the motorcycle tank or other long parts to avoid uneven coverage. Wait for the recommended flash time between coats. Clean your spray gun after each use to keep your motorcycle painting process professional.
Note: Practice your spray technique on a test panel before painting motorcycle parts. This step helps you avoid common mistakes in your motorcycle repaint tutorial.
Layering Color Coats for Even Coverage
You build up color coats to create a vibrant and even motorcycle paintwork. This step in your motorcycle repaint tutorial requires patience and attention to detail. Apply 2-4 coats of basecoat paint for most motorcycle surfaces. Lighter colors, such as yellow, may need more coats, while darker colors require fewer. Each coat should be light and even. Allow each layer to dry before adding the next.
For special effects, such as chameleon colors, apply 2-3 coats of black base coat first. After it settles, spray 2-3 light coats of the chameleon color. You can add more coats to enhance the iridescent effect, but avoid heavy layers. Thick coats can cause runs and ruin your motorcycle paint job.
- Use light, even strokes with your spray gun.
- Let each coat dry fully before spraying the next.
- Check for even coverage under good lighting.
- Sand lightly between coats if needed for a smooth finish.
Tip: Always inspect your motorcycle tank painting and other parts after each coat. This habit helps you catch imperfections early and keeps your diy motorcycle paint job looking professional.
You complete this step-by-step motorcycle repaint tutorial by layering color coats with care. Your motorcycle paintwork will look smooth, vibrant, and ready for clear coating.
Clear Coating for Protection and Shine
You reach the final step in your motorcycle repaint tutorial when you apply the clear coat. This stage locks in your color, adds depth, and protects your motorcycle paintwork from the elements. A high-quality clear coat gives your project a professional shine and helps your paint last for years.
You have several options when choosing a clear coat for your motorcycle paintwork. Many riders trust 2K automotive clear coats for their toughness and long-lasting finish. Eastwood's S-2K Aerospray High Gloss Clear stands out as a top choice. It creates a smooth, glossy surface that resists chips and scratches. If you work with bare aluminum parts, Eastwood's Exo Armour offers extra protection. Some riders use Rustoleum clear coat because it keeps its shine and resists yellowing, even after years of exposure to sun and saltwater.
Tip: Avoid clear coating polished billet aluminum. Some users report yellowing and peeling over time. For these parts, regular polishing with a product like Mothers billet polish works better.
You can also find alternatives to traditional clear coats. Clear anodizing provides a durable finish, but it requires special equipment. Some riders use "liquid glass" for extra protection, though details about this product remain limited. Most DIY enthusiasts stick with high-quality 2K clear coats or Rustoleum clear for the best results.
Steps for Applying Clear Coat
Follow these steps to achieve a flawless finish on your motorcycle paintwork:
- Wipe down all painted surfaces with a tack cloth to remove dust.
- Shake the clear coat can or mix your 2K clear thoroughly.
- Hold the spray gun or can about 6-8 inches from the surface.
- Apply the first coat in light, even passes. Overlap each pass by 50% for full coverage.
- Wait 10-15 minutes for the first coat to flash off.
- Apply 2-3 more coats, letting each layer dry before adding the next.
- Inspect the surface under bright light to check for runs or dry spots.
- Let the clear coat cure for at least 24 hours in a dust-free area.
| Clear Coat Type | Best For | Key Benefits |
|---|---|---|
| 2K Automotive Clear | Most motorcycle paintwork | Tough, glossy, long-lasting protection |
| Eastwood Exo Armour | Bare aluminum surfaces | Extra durability for exposed metal |
| Rustoleum Clear | General motorcycle paintwork | Maintains shine, resists yellowing |
| Clear Anodizing | Specialized metal parts | Extremely durable, professional finish |
| Liquid Glass | Additional protection | Extra shine, details limited |
You want your motorcycle paintwork to look deep and glossy. The clear coat creates that "wet look" finish that stands out at any event. It also shields your paint from UV rays, rain, and road debris. If you follow each step in this motorcycle repaint tutorial, you will see a dramatic improvement in your results.
Note: Always wear a respirator and gloves when spraying clear coat. Good ventilation keeps you safe and helps your motorcycle paintwork cure properly.
You complete your painting motorcycle project with a clear coat that shines and protects. This final step in your tutorial ensures your motorcycle paintwork stays beautiful and strong for years.
Custom Motorcycle Paint and Design Techniques
Masking, Stenciling, and Creating Patterns
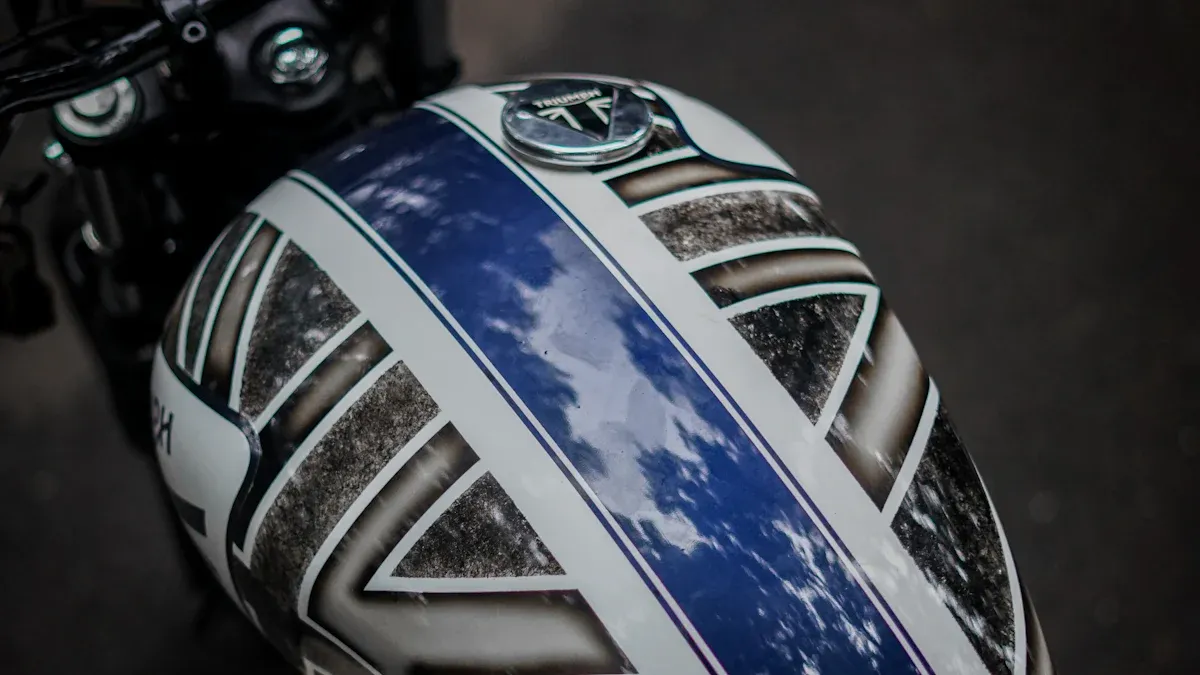
You can achieve sharp lines and creative patterns on your motorcycle with the right masking and stenciling materials. Masking tape works well for straight lines and blocking off areas you do not want to paint. For intricate shapes, you can use vinyl friskets made by sign shops. These offer precision and can be reused. Durable stencils made from low-density polyethylene (LDPE) plastic resist paint and solvents, making them ideal for repeated use on custom motorcycle paint projects.
When you apply paint, always wait at least 20 minutes before masking or stenciling. This prevents the paint from pulling away. After painting, allow at least two hours before removing masking tape to avoid damaging your motorcycle’s finish. For tricky spots, thick grease or even toothpaste can act as a barrier. You can create patterns like flames, two-tone paint, or pinstriping using these techniques for custom motorcycle paint designs.
Tip: Cut and weed your stencils carefully to avoid scratching the surface. Practice on scrap before working on your motorcycle.
Airbrushing Basics for Unique Effects
Airbrushing lets you add unique effects and detailed artwork to your custom motorcycle paint. Start by working in a clean, well-ventilated area. Lightly sand and clean the surface before you begin. Always wear a respirator when using solvent-based paints. Practice your airbrush technique on scrap panels first. Focus on one part at a time, such as a side panel or helmet, to build your skills.
Apply thin, light layers of paint. Avoid heavy coats, which can cause runs. Use masking and stencils to create patterns or graphics. Let each layer dry before adding the next. Finish with a clear coat rated for UV and weather resistance to protect your custom design. Airbrushing can help you create effects like ghost flames, multilayered graphics, or even realistic murals on your motorcycle.
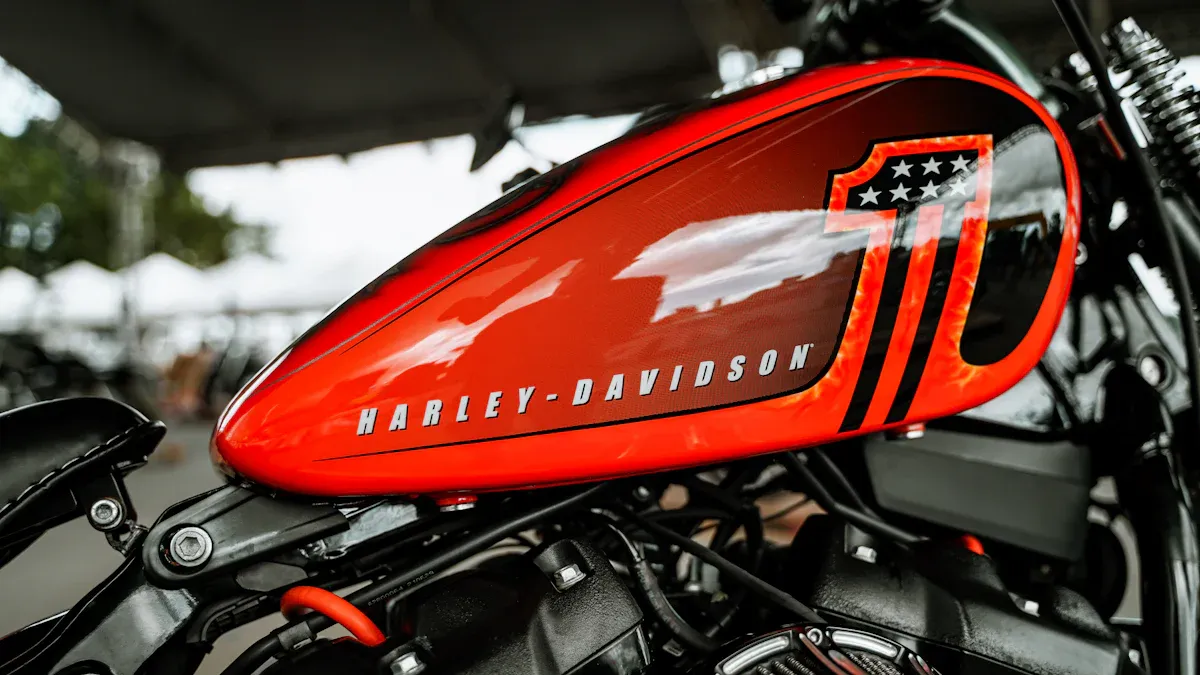
Adding Decals and Graphics to Your Motorcycle
Decals and graphics give your motorcycle a professional, custom look. Choose high-performance cast vinyl decals for the best durability. These last up to eight years outdoors when applied and maintained correctly. You can select from glossy or matte finishes to match your custom motorcycle paint. Use abrasion-resistant and UV-protective laminates to keep your graphics looking new in any weather.
| Material / Laminate | Key Features | Durability / Use Case |
|---|---|---|
| CONVEX Vinyl Media | Conforms to curves, strong adhesion, abrasion resistant | Motocross graphics, curved surfaces |
| Pro-Shield Laminate | Glossy, abrasion resistant, heat applied | High durability for rough riding |
| High-Bond Adhesive | Strong, designed for power sports | Keeps decals secure under tough conditions |
| CONVEX Supreme UV Laminate | UV inhibitors, long-lasting clarity | Protects graphics from sun damage |
You can apply decals to smooth, non-porous plastic or metal surfaces. Always clean the area before application. Use a squeegee to remove bubbles and ensure a tight bond. These techniques help your custom motorcycle paint job stand out and last.
Avoiding Common DIY Motorcycle Painting Mistakes
Preventing Paint Runs and Drips
You want your motorcycle paintwork to look smooth and professional. Paint runs and drips can ruin your finish. To prevent these problems, always apply many light coats instead of a few heavy ones. Hold the spray gun or can at the correct distance from the surface. This helps you avoid drips and uneven coverage. Trust the drying and curing times listed on the paint can before adding more layers or clear coats. If you see a drip, let the paint dry first. Then, use fine grit sandpaper, such as 1500 grit, to wet sand the area smooth. You can also use a razor blade to carefully remove drips before the paint fully cures. Avoid masking off areas when sanding drips unless you need to protect a two-tone design. This prevents hard paint lines that are difficult to blend.
Tip: Many DIY painters make mistakes like using the wrong finish, not allowing enough curing time, or spraying in poor ventilation. These issues can cause paint imperfections and uneven gloss.
Fixing Surface Imperfections
You may notice small flaws in your motorcycle paintwork after painting. Fixing these imperfections takes patience and the right steps:
- Let the painted parts cure fully. This may take days or even weeks.
- Wet sand the surface with ultra-fine grit sandpaper to remove tiny bumps or orange peel.
- Buff and polish the area in stages to bring out a glossy shine.
- Polish out minor scratches without repainting.
- Use touch-up paint for deeper chips or scuffs.
You can restore your motorcycle paintwork to a mirror-like finish by following these steps. Always allow enough curing time before sanding or polishing.
Timing, Drying, and Curing Tips
Proper timing is key for lasting motorcycle paintwork. High temperatures help paint dry and cure faster, while cold slows the process. Dust can settle on wet paint, so keep your workspace clean and free from debris. Avoid direct sunlight or heaters, which can cause uneven curing. Each layer of paint needs to cure fully before you add the next. This ensures strong adhesion and a durable finish. Use gentle cleaning products and soft cloths during the curing period. Protect your motorcycle from harsh weather and inspect the surface often for any problems.
Here are some important tips and advice: Always follow the recommended curing times, keep your workspace ventilated, and avoid rushing the process. These steps help you achieve flawless motorcycle painting results.
Finishing Touches for a Professional Motorcycle Painting Result
Polishing and Buffing for Maximum Shine
You want your paint job to stand out with a deep, mirror-like shine. Start by using a random orbital dual-action polisher. A small 3-inch model works best for motorcycle panels. Begin with an aggressive polishing step. Use a fast gloss compound and a firm foam pad to remove swirl marks and defects. Work in small sections, applying firm pressure and overlapping your passes at high speed. Wipe off polish residue right away with an ultra-soft microfiber towel to prevent scratches.
Next, switch to a finer polish and a softer pad. This step removes haze and levels the finish for maximum gloss. After polishing, wash your motorcycle again to remove dust and polish residue. Pay close attention to bolts and fasteners. Buffing uses coarser pads and compounds to correct deeper imperfections. Polishing follows buffing and enhances the gloss, removing fine scratches. Both steps are essential for a flawless custom motorcycle paint finish.
Protective Waxing and Final Inspection
Protect your new paint job with a finishing wax designed for fresh paint. Finishing waxes seal the surface without harsh chemicals. Apply the wax by rubbing it on, spreading it evenly, and wiping off the excess. Avoid cleaning waxes right after painting, as they can damage the finish. For even greater protection, consider a ceramic coating. Ceramic coatings provide long-lasting defense against UV rays and environmental contaminants. They help your custom motorcycle paint stay flawless for years.
Inspect your motorcycle carefully after waxing. Look for missed spots, streaks, or residue. A thorough inspection ensures your paint job looks professional and lasts longer.
Detailing for a Custom Look
Professional detailing brings out the best in your custom motorcycle paint. Begin with a gentle pre-wash using a garden hose and mild soap. Clean wheels and spokes separately to avoid tire damage. Use a soft brush for the engine and a gentle cleaner for controls and the dashboard. Rinse with soft water to protect the paint job. Dry your motorcycle with a microfiber cloth or air blower to prevent water spots.
Polish chrome parts twice and apply wax for extra shine. Treat leather seats and grips with the right cleaners and protectants. For a truly custom finish, use a clay bar treatment before applying wax or sealant. Advanced options like paint protection film or ceramic coatings add durability and a unique look to your custom motorcycle paint. These steps help your paint job stand out and keep your motorcycle looking its best.
Care and Maintenance of Your Custom Motorcycle Paint Job
Cleaning and Protecting Your New Paint
You want your motorcycle to look its best after completing a diy motorcycle paint job. Cleaning the tank, rims, and panels with safe products preserves the shine and prevents scratches. Use Turtle Wax Bug & Tar Remover to clear bugs and residue from painted surfaces. Wash the motorcycle with Turtle Wax Ice Car Wash and a scratch-resistant mitt. Simple Green Pro HD Heavy-Duty Cleaner works well for removing grease and grime without harming paint, plastic, or rubber. Always dry the tank and rims with a microfiber towel to avoid water spots. Apply Meguiar's Carnauba Wax using a microfiber pad to protect the clear coat and maintain gloss. Lucas Oil Speed Wax gives quick shine between washes. For extra shine, use Meguiar's Hot Shine only on tire sidewalls, keeping it away from painted areas. Glass cleaner helps keep paint clean between detailed washes. Avoid harsh chemicals like vinegar or bleach, which can damage the paint job and motorcycle parts.
Important tips and advice: Always use non-corrosive cleaners and soft towels to protect your custom paint job from scratches and chemical damage.
Long-Term Maintenance Tips for DIY Enthusiasts
You extend the life of your motorcycle paint job with regular care. Wash the motorcycle at least once a week with water and once a month with mild, pH-balanced shampoo. Rinse the tank and rims before washing to remove debris. Use soft microfiber cloths or lambswool mitts for gentle cleaning. Dry the motorcycle immediately to prevent water spots. Apply high-quality wax or sealant every three months to shield the paint job from UV rays, dirt, and contaminants. Spray wax works for quick touch-ups, while ceramic coatings offer long-term protection and hydrophobic effects. Buff the tank and rims with microfiber cloths to enhance gloss. Polish chrome and metal parts regularly with non-abrasive polish to prevent rust. Never park the motorcycle in direct sunlight to avoid fading and peeling. Store the motorcycle in a garage or use a quality cover for extra protection. Promptly fix chips or scratches to maintain the integrity of your diy motorcycle paint job.
| Maintenance Routine | Benefit |
|---|---|
| Weekly water wash | Removes dust and dirt |
| Monthly shampoo wash | Maintains high-gloss finish |
| Regular waxing | Protects against UV and grime |
| Ceramic coating | Long-term hydrophobic shield |
| Immediate chip repair | Prevents further damage |
| Covered storage | Shields from weather and sun |
Touch-Up Techniques for Motorcycle Painting
You keep your motorcycle looking flawless by repairing chips and scratches quickly. Start by cleaning the damaged area with a motorcycle cleaner and a microfiber cloth. Sand the old paint around the chip or scratch, beginning with coarse grit and moving to finer grits. Shake the touch-up paint tube well. Apply thin layers of paint, letting each coat dry before adding the next. Make the paint slightly thicker than the surrounding area so you can sand it smooth later. Once dry, wet sand the repaired spot with very fine grit sandpaper wrapped around a block. Finish by polishing the area with wax or lacquer polish using a variable-speed polisher. Always work in good lighting and protect the drying paint from dust. Avoid painting in windy or rainy conditions to ensure a smooth finish on the tank, rims, and other motorcycle parts.
Tip: Prompt touch-ups and careful technique help your paint job last for years and keep your motorcycle looking new.
You now have the knowledge to paint your motorcycle with confidence. Careful preparation leads to a smooth motorcycle finish. Each step, from cleaning to clear coating, helps your motorcycle stand out. You control the look and feel of your motorcycle. Attention to detail ensures your motorcycle paint job lasts. Take time to inspect your motorcycle after each stage. When you ride, you show off your motorcycle with pride. Your motorcycle reflects your skill and dedication.
Take pride in your motorcycle project and enjoy the satisfaction of a job well done.
FAQ
How long does a DIY motorcycle paint job usually take?
You can finish a basic motorcycle paint job in two to three days. Drying and curing times for each layer may extend the process. Plan for extra time if you want custom designs or need to fix imperfections.
What is the best way to avoid dust during painting?
You should clean your workspace before starting. Use plastic sheets to cover nearby surfaces. Work in a well-ventilated area. Wait for calm weather if painting outdoors. Dust can ruin your finish, so keep the area as clean as possible.
Can I use regular car paint for my motorcycle?
You can use automotive paint on motorcycle parts. Choose high-quality products for durability. Always follow the steps in your tutorial for priming and clear coating. Automotive paints offer strong protection and vibrant color for motorcycle surfaces.
Do I need special tools for painting motorcycle rims?
You need a spray gun or airbrush for even coverage. Use masking tape to protect tires. Sand the rims before painting. A compressor helps maintain consistent pressure. Specialized tools make the job easier and improve your results.
How do I fix small chips or scratches in my paint job?
You should clean the damaged area first. Use touch-up paint and apply thin layers. Let each layer dry before sanding smooth. Finish with polish or wax. Quick repairs keep your motorcycle looking new and prevent further damage.
Tip: Always inspect your paint job after each ride to catch chips early.
See Also
Effortless Custom Motorcycle Fairing Designs For Every Rider
Key Advice To Help You Build Your Perfect Motorcycle
Step By Step Guide To Making Custom Motorcycle Fairings
