Kit Motorcycle Building Guide for Enthusiasts and First-Timers

You dream about building a custom motorcycle, but the process seems overwhelming. With a kit motorcycle, you get a chance to turn that dream into reality. A diy approach helps you learn every step. You can make a home-built motorcycle that fits your style. Many riders find their first build exciting and rewarding. You do not need a fancy shop. You need passion, basic tools, and a good diy kit motorcycle. Building a custom motorcycle teaches patience and skill. Your diy custom motorcycle journey starts with one bold step.
Tip: Stay patient during your first build. Every diy custom project takes time, but the results feel worth it.
Kit Motorcycle Basics and Getting Started
What is a Kit Motorcycle?
A kit motorcycle gives you the chance to build your own custom ride from the ground up. You get a box with all the main parts you need, like the frame, wheels, and engine. You follow clear motorcycle guides and step-by-step instructions. This makes it easier for beginners to start diy motorcycle projects. You do not need to design every part yourself. Instead, you put the pieces together and add your own style. Kit motorcycles help you learn motorcycle basics for beginners while letting you create something unique.
Tip: Start with a kit motorcycle if you want to learn how bikes work without feeling lost.
Benefits of Building Your Own Custom Motorcycle
When you build a custom motorcycle, you get more than just a cool ride. Many people say the process brings big rewards:
- You can sell your custom motorcycle for a higher price because it is unique and well-kept.
- You learn a lot about motorcycle mechanics, parts, and diy customization.
- You pick the best parts for your needs, so your motorcycle fits your style and rides better.
- You can adjust the seat, handlebars, and controls for comfort.
- You feel proud when you finish your first build. You get to tell your own story and show off your creative side.
- You gain skills that can help you with future diy motorcycle projects or even start a small business.
Building a custom motorcycle also helps you meet other diy fans. You join a community that shares tips and stories. The journey gives you memories and new skills that last a lifetime.
Who Should Consider Motorcycle DIY Kits?
You do not need to be a pro to start with motorcycle diy kits. Many people begin with little experience. You just need a willingness to learn and some basic tools. Most builders pick up skills as they go, using online videos or forums. Some practice on scrap parts before working on their kit motorcycle. If you enjoy hands-on diy work, want a custom ride, or love learning new things, motorcycle diy kits are a great choice. Even if you need help with tough jobs like welding, you can ask local experts or join online groups. The diy path welcomes beginners, hobbyists, and anyone who wants a custom motorcycle built their way.
Choosing the Right Kit Motorcycle and Donor Bike
Types of Motorcycle DIY Kits Available
You have many choices when you start looking at motorcycle diy kits. Some kits focus on classic styles, like bobbers or cafe racers. Others let you build a modern custom motorcycle with sleek lines. You can find motorcycle assembly kits that include everything from the frame to custom motorcycle parts. Some motorcycle diy kits need a donor bike for the engine and main components. Others come with high-quality motorcycle parts ready for assembly. If you want to try motorcycle customization kits, you can pick kits that let you change just the bodywork or add custom touches. Each kit gives you a chance to learn diy skills and build a custom motorcycle that fits your vision.
Tip: Check what each kit includes before you buy. Some motorcycle diy kits need extra parts or tools.
How to Select the Best Kit for Your Build
Picking the right kit helps you enjoy the diy process and get the custom motorcycle you want. Think about your skill level and the tools you have. Some motorcycle diy kits are simple and great for beginners. Others need more advanced skills, like welding or electrical work. Look for motorcycle assembly kits that match your experience. You should also consider the style you want. Do you dream of a classic custom motorcycle or a modern look? Make sure the kit supports your design goals. Read reviews and join diy forums to see what other builders say. Good motorcycle diy kits come with clear instructions and support. If you want to use custom motorcycle parts, check if the kit allows upgrades.
Finding and Evaluating a Donor Bike
A donor bike gives you the base for your custom motorcycle build. You want a bike that is easy to work on and fits your diy skills. Here are some things to check:
- Older bikes are simpler. You can fix them more easily.
- Common models have lots of parts and info online.
- Rare bikes make finding parts hard. Beginners should avoid them.
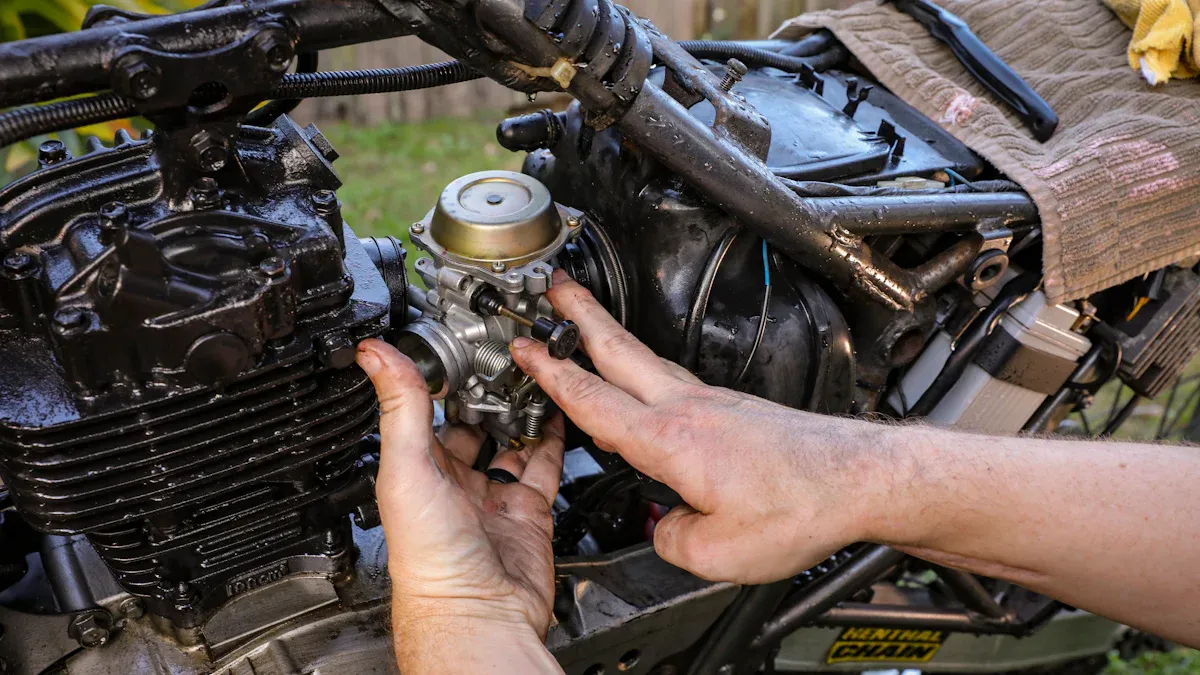
- Carbureted bikes are less complex than fuel-injected ones.
- Check the engine, drivetrain, mileage, and rust. These matter most.
- Pick a donor bike that matches your skill and custom goals.
- Balance price and condition. Cheap bikes may need costly repairs.
- Inspect the engine when cold and look for hidden rust.
You want a donor bike that helps you build a reliable custom motorcycle. Good choices make your diy project smoother. You can use custom motorcycle parts to upgrade as you go. Always look for high-quality motorcycle parts when you shop for motorcycle diy kits or motorcycle customization kits.
Tools and Workspace for Your Custom Motorcycle Build
Essential Tools for a Step-by-Step Guide
You need the right tools to make your diy motorcycle project smooth and fun. A good set of tools helps you handle every step, from tightening bolts to fixing tires. Here are some must-have tools for your diy motorcycle build:
- Wrenches: open-end, combination, hex, and Torx in several sizes
- Screwdrivers: both Phillips and flat heads, with reversible bits
- Pliers and vice grips for gripping and loosening bolts
- Tire repair kit: sealant, plugs, and a pump (electric, hand, or CO2)
- Tire pressure gauge for checking air
- Dead-blow hammer for gentle tapping
- Chemicals: degreaser, chain lube, multi-purpose lube, and waterproof grease
- Nitrile gloves to keep your hands safe
- Rags or shop towels for cleaning up
- Specialty tools: strap wrenches and oil filter wrenches
- Zip ties, duct tape, and magnets for quick fixes
- A shop manual for your motorcycle
You can find budget diy tool kits for under $30, but a full set with everything you need may cost up to $500. Some brands, like CruzTOOLS and Hyper Tough, offer kits made just for motorcycle diy projects. A tool organizer, like a Grypmat, keeps your tools in place and easy to find.
Tip: Always start your diy build with a shop manual for your specific motorcycle. It saves time and prevents mistakes.
Setting Up Your Workshop for Safety and Efficiency
A safe and tidy workspace makes your diy motorcycle build easier and safer. Start by picking a spot with enough room for your motorcycle and tools. Good lighting helps you see small parts and avoid mistakes. If you plan to lift your motorcycle, choose a lift that fits your bike and space. Hydraulic, pneumatic, and electric lifts each have pros and cons, so pick what works best for your diy needs.
Follow these steps for a smart diy workshop:
- Keep your tools organized and within reach.
- Use a sturdy workbench for small parts and repairs.
- Make sure the floor stays clean and free of oil or clutter.
- Anchor your motorcycle firmly if you use a lift.
- Check your lift and tools often for wear or damage.
A well-organized diy workshop helps you work faster and keeps you safe.
Safety Gear and Best Practices
Safety comes first in any diy motorcycle project. You need the right gear to protect yourself from cuts, burns, and other injuries. Always wear gloves, safety glasses, and sturdy shoes when working on your motorcycle. If you weld or cut metal, use a face shield and long sleeves.
For riding, pick a helmet that meets DOT or SNELL standards. Jackets and pants should have armor for your back, shoulders, elbows, and knees. Gloves and boots protect your hands and feet from injury. Replace your helmet every 5-7 years or after any hard impact.
Note: Good safety gear keeps you building and riding your diy motorcycle for years to come.
Step-by-Step Guide to Building a Kit Motorcycle
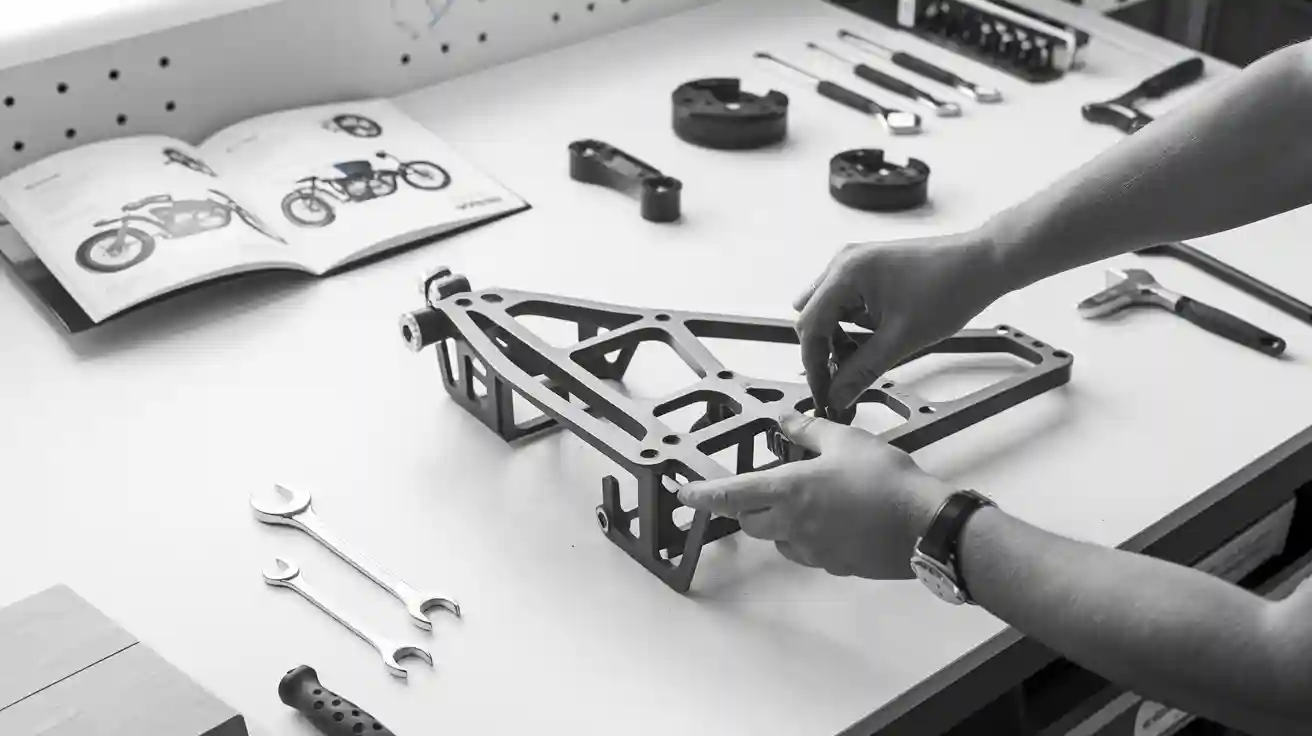
Unboxing and Organizing Your Motorcycle DIY Kit
You just got your motorcycle diy kit. This is an exciting moment in your custom motorcycle journey. You want to start building and customizing right away, but taking time to organize everything will save you trouble later. Here’s a step-by-step guide to help you get started:
- Open the box carefully. Lay out all the parts from your motorcycle diy kit.
- Remove extra packaging and protective wraps. Keep your workspace clean.
- Plan where you will put each part. Group similar items together for easy access.
- Check every part for damage or missing pieces. If you find a problem, contact the supplier before you start your custom motorcycle build.
- Pick out connectors, triggers, and wiring parts. Set them aside for later steps.
- Organize wires so they don’t get tangled. Use zip ties or small bins.
- Think about how you will route the wiring. Make sure wires won’t get pinched or rub against sharp edges.
- Leave a little extra wire length. This helps when you adjust or move parts during building and customizing.
- Cut wires to the right length. Strip the jackets if needed.
- Double-check where each wire will connect. This keeps your custom motorcycle safe and reliable.
- Trim wires for neat connections. Install fuses if your motorcycle diy kit includes them.
- Connect ground and positive wires securely. Make sure trigger wires are ready for later.
- When you finish organizing, do a final check. Power up the system to see if everything works.
Tip: Take photos of your layout. This helps you remember where each part goes during your custom motorcycle build.
Preparing the Frame and Key Components
Now you’re ready to work on the frame and main parts. This step is key for building and customizing your custom motorcycle. You want a strong base for your motorcycle diy kit. Many builders face challenges here, but you can avoid problems with good planning.
- Sometimes parts like tanks or handlebars don’t fit the frame. You may need to modify or adjust them. Always check fitment before you start building a custom motorcycle.
- Cutting or changing the frame can weaken it. Reinforce any areas you modify. Ask an expert if you’re unsure.
- Costs can go up fast. You might need extra tools or help with welding. Set aside extra money for surprises during your custom motorcycle build.
- If you don’t have welding or electrical skills, practice first. Mistakes can slow down your diy project. You can also hire a pro for tough jobs.
You want your custom motorcycle to be safe and look great. Research each step. Talk to other builders in forums. Take your time with building and customizing. If you run into trouble, ask for help. Many motorcycle diy kits come with support or guides.
Note: Always measure twice before you cut or drill. This keeps your custom motorcycle build on track.
Engine Installation and Wiring Setup
You’re getting closer to seeing your custom motorcycle take shape. Installing the engine is a big step in building and customizing. You want to follow your motorcycle diy kit instructions closely. Place the engine in the frame. Make sure all mounts line up. Tighten bolts evenly. Check for any gaps or misalignment.
Next, focus on wiring. Lay out all wires from your motorcycle diy kit. Plan the route so wires stay away from hot parts or moving pieces. Use zip ties to keep wires neat. Leave a little slack for adjustments. Cut and strip wires as needed. Connect ground and positive wires first. Attach trigger wires last. Install fuses if your motorcycle assembly kits include them.
When you finish wiring, double-check every connection. Look for loose wires or missed steps. Power up the system for a test. If something doesn’t work, check your layout and connections. Building and customizing a custom motorcycle takes patience. You learn new skills with every step.
Tip: If you feel stuck, watch online videos or join a builder forum. Many motorcycle diy kits have community support.
Building a custom motorcycle is a journey. You get to see your hard work pay off as your custom motorcycle comes together. Every step in this step-by-step guide brings you closer to riding your own diy creation.
Suspension, Wheels, and Brake Assembly
You are getting close to the heart of your diy custom motorcycle. The suspension, wheels, and brakes make your ride safe and smooth. You want to build a motorcycle that handles well and stops when you need it.
Start with the suspension. You need to check the forks and shocks from your motorcycle diy kit or donor bike. Clean each part and look for leaks or damage. If you see worn bushings or seals, replace them before you continue building a custom motorcycle. Use your shop manual for torque specs and assembly order. When you install the forks, make sure they sit straight in the triple clamps. Tighten bolts evenly so the suspension works as it should.
Next, focus on the wheels. Lay out the axles, spacers, and bearings. Clean the bearings and add fresh grease. Slide the wheels into place and check for smooth rotation. Spin each wheel and listen for grinding or clicking. If you hear noise, stop and fix the problem. You want your custom motorcycle to roll without trouble.
Now, move to the brakes. Your diy motorcycle kit may include calipers, rotors, and pads. Mount the calipers and rotors first. Make sure the rotors sit flat and the calipers line up with the pads. Install the brake lines and fill the system with fresh fluid. Bleed the brakes until you feel a firm lever or pedal. Test the brakes before you ride. Good brakes keep your custom motorcycle safe.
Tip: Always double-check torque specs and alignment. A small mistake can affect your ride and safety.
Electrical System and Controls Installation
You are ready to tackle the electrical system. This step brings your diy custom motorcycle to life. You want every wire and switch to work right, so take your time and follow a step-by-step guide.
Start by mounting all electrical parts. Put the coils, lights, and speedometer on the motorcycle before you run any wires. Install the battery and plan where to put the electrics tray. This tray holds the starter relay, control modules, CDI, flasher unit, and fuses. Place the regulator/rectifier where it gets good airflow. This keeps it cool and working well.
When you wire your custom motorcycle, avoid running one long wire with many taps. Use a terminal strip to join positive wires in neat sections. This makes switching, lights, and charging easier to manage. Choose quality connectors or solder joints. Cover every connection with heat shrink tubing for insulation and durability.
Draw a wiring diagram before you start. Follow it closely to make installation and troubleshooting simple. Use accessories like terminal strips and fuse holders for a tidy, reliable system. Separate circuits into running/ignition and accessories. This helps you trace faults and keeps your diy motorcycle build organized.
Here are some best practices for wiring your custom motorcycle:
- Isolate ignition wires from high-current or magnetic field sources to reduce electrical noise.
- Support wires well to handle vibration, especially if you ride rough roads.
- Use heat shrink tubing on all terminals for insulation and support.
- Pick cable lengths that fit—too short causes poor connections, too long leads to damage.
- Select high-quality cables and connectors for long-term reliability.
- Route wires away from heat and moving parts to prevent damage.
- Secure bundles with strong zip ties, like stainless-barb types.
- Make sure wires are free from pressure when forks or parts move.
- Wrap harnesses with insulation tape or split plastic tubes for protection.
| Product Name | Key Features | Pros | Cons | Notes |
|---|---|---|---|---|
| Eastern Beaver PC-8R PDM | Power distribution module with 6 switched + 2 direct fused circuits, fuse holder | Simplifies accessory power management; splash-proof; high reliability | Limited switched circuits; bulky; cost can increase with accessories | Suitable for motorcycles, ATVs, snowmobiles |
| Exile Cycles 5x4 Switch Module | Compact handlebar control for 5 functions using 4 momentary buttons | Small size; reduces handlebar clutter; plug'n'play for Harley models 1996-2013 | Limited to momentary buttons; Harley-specific; relatively expensive | Ideal for custom Harley builds |
| ST-Net Electrical Switch Interface | Integrates stock and aftermarket switches; supports LED lighting; robust design | Versatile; vibration, water, and temperature resistant; supports LED button lighting | Compatibility checks needed; installation complexity; cost consideration | Suitable for various powersports vehicles |
Note: A neat wiring job makes your custom motorcycle easier to fix and safer to ride.
Bodywork, Paint, and Final Touches
You want your diy custom motorcycle to look as good as it rides. The bodywork and paint set your build apart. You can follow a step-by-step guide to get a professional finish.
Start with bodywork prep. Remove old paint down to bare metal for best results. Use automotive body filler mixed with hardener to fill dents or imperfections. Apply filler in thin layers, no more than 3mm thick. Let each layer cure before adding more. Sand the filler with 80 grit aluminum oxide paper using a flexible block. Move to finer grits—120, 240, then 400—to smooth the surface and remove scratches. Clean the surface with wax and grease remover before you add filler or primer.
Apply primer recommended by your paint supplier. Mask off areas you do not want painted with quality tape. Clean the surface with a tack cloth before priming to remove dust. If your primer has filler, sand it with 240 and then 400 grit paper to level it. Use spray putty to fill minor scratches, applying multiple coats and sanding smooth.
Pick a paint system that fits your diy project. Many builders use a 1K base coat with a 2K clear coat. If you want to practice, use enamel aerosol paints on spare parts. Spray paint in thin, even coats. Let each coat dry before adding the next.
Finish with a clear coat that matches your paint system. For plastic parts, use a clear coat made for plastics. Two coats of clear enamel give a glossy, durable finish. Clean parts with a tack cloth or microfiber cloth and air blower between coats to remove dust. Let each coat dry completely before adding the next.
Tip: Take your time with bodywork and paint. Careful prep and layering make your custom motorcycle stand out.
You can add final touches like custom graphics, badges, or pinstripes. These details show off your style and make your diy motorcycle unique. When you finish, step back and admire your custom motorcycle build. You turned a box of parts into a ride that reflects your vision.
Custom Motorcycle Personalization and Upgrades

Paint, Graphics, and Unique Finishes
You want your custom motorcycle to stand out. Paint and graphics give you endless ways to customize your ride. Many builders find inspiration in bold colors, wild patterns, or even subtle matte finishes. You can choose glossy, metallic, or pearlescent paint to match your vision. Some riders work with expert designers to create a look that fits their personality. Others use motorcycle customization kits for a quick change.
Decals have become a favorite for diy builders. Brave Wolf Customs offers weatherproof vinyl decals in gloss or matte. These decals let you customize your motorcycle without the high cost of a full paint job. You can swap them out when you want a new design. Custom painted helmets also add a personal touch. Many riders see their helmet as a canvas for art and inspiration.
Tip: Look for design inspiration in magazines, online galleries, or at local bike shows. Your custom motorcycle should reflect your style.
Upgrading Components and Accessories
You can boost both performance and style with the right upgrades. Many diy builders start with exhaust systems. A new exhaust changes the sound and gives your custom motorcycle more power. Air intake upgrades and high-flow filters help your engine breathe better. Engine tuning lets you get the most from these changes.
Suspension upgrades make your ride smoother and safer. Custom wheels, tires, and brakes improve handling and stopping power. Lighting upgrades, like LEDs, add style and help you see at night. You can also customize your motorcycle with new handlebars, grips, and seats. These changes make your ride more comfortable and unique.
- Popular upgrades for building and customizing:
- Exhaust systems
- Air intake and filters
- Engine tuning
- Suspension
- Wheels and tires
- Lighting
- Custom seats and handlebars
Custom bodywork, powder coating, and chrome finishes give your motorcycle a fresh look. Use custom motorcycle parts to match your design inspiration. Every upgrade brings you closer to your dream custom motorcycle.
Adjusting Ergonomics for Comfort
Comfort matters when you spend hours on your custom motorcycle. You can customize your ride to fit your body and riding style. Adjustable footpegs and handlebars let you find the perfect position. Some new bikes use technology that lets you change settings on the fly. This helps you stay comfortable and in control.
Check out this table for ergonomic ideas:
| Adjustment | What It Does | Why It Helps |
|---|---|---|
| Seat modifications | Changes shape and padding | Better support and comfort |
| Handlebar risers | Raises or moves handlebars | Less strain on wrists and back |
| Wind protection | Adds windscreen or fairing | Reduces fatigue on long rides |
| Adjustable footpegs | Moves pegs for more legroom | Less knee and leg strain |
| Lever angle and reach | Adjusts levers for your hand size | Easier control, less wrist pain |
You can also rotate handlebars or change lever positions for a better grip. Aftermarket levers and controls give you even more ways to customize your motorcycle. Use design inspiration from other builders to find what works for you. Building and customizing for comfort makes every ride more fun.
Note: Try small changes first. Test each adjustment until your custom motorcycle feels just right.
Safety Checks and First Ride Preparation
Inspection and Testing Before Your First Ride
You finished your diy motorcycle build. Now, you want to make sure everything works before you hit the road. Start with a careful inspection. Look at the frame and body for cracks or damage. Check that footpegs feel secure. Move on to the tires. Use a gauge to check air pressure and make sure it matches the specs for your motorcycle. Look at the tread and see if there is any uneven wear.
Next, check the wheels for dents or loose spokes. Spin them and listen for odd sounds. Test the brakes. Squeeze the levers and make sure they feel firm. Look at the brake pads for even wear. Check all the fluids—engine oil, brake fluid, and coolant. Top them off if needed.
Now, look at the battery. Clean the terminals if you see any corrosion. Test the charge. Turn on the lights, indicators, and horn. Make sure every electrical part works. Rotate the handlebars and test the throttle and clutch. They should move smoothly. Wear your helmet and protective gear to stay safe.
Tip: Take a short ride in a safe area. Listen for strange noises and test the brakes again.
Legal Requirements and Registration for Custom Motorcycles
Before you ride your diy motorcycle on public roads, you need to follow the law. Gather all your paperwork. You need the Manufacturer’s Statements of Origin for the frame and engine. Your motorcycle must pass an inspection by local law officers. They will check the VIN numbers and record the odometer reading.
After the inspection, fill out the application for an assigned ID number. Pay the fee and send your documents to the DMV. When you get your ID plate, attach it to your motorcycle. Then, apply for a Certificate of Title. Bring all your papers and pay the title fee. Your motorcycle will be listed as “Homemade” with the year you finished your diy build.
Your motorcycle must meet safety rules. It needs a seat, working lights, brakes, horn, muffler, and the right stickers. Wear a helmet unless you have a legal waiver. Make sure your diy motorcycle follows all local and federal rules before you ride.
Pre-Ride Checklist for Kit Motorcycle Builds
You want every ride to be safe and fun. Use this checklist before you take your diy motorcycle out:
- Helmet (DOT or ECE-certified)
- Riding gear: jacket, pants, boots, gloves
- First aid kit and water bottle
- Sunglasses or goggles
- Tool kit: screwdrivers, pliers, wrenches, spark plug wrench, duct tape
- Tire pressure gauge and cable ties
- Rain gear and extra layers
- Insurance card and roadside help info
- Wallet, phone charger, spare keys, map or GPS
Check your tire pressure and chain lube. Make sure the brakes work and all bolts are tight. Test the lights and horn. Look at the suspension and drivetrain. Bring what you need for comfort and safety.
Note: A good pre-ride check keeps your diy motorcycle running strong and helps you enjoy every mile.
Common Mistakes to Avoid When You Build a Kit Motorcycle
Skipping Steps in the Step-by-Step Guide
You might feel excited to finish your diy motorcycle project fast. Sometimes, you skip steps or rush through the instructions. This can cause big problems later. If you miss a step, you could end up with loose connections or faulty wiring. Your motorcycle might ride rough, lose power, or even break down. Small mistakes add up and put stress on parts like the motor and controller. This shortens their lifespan and can lead to expensive repairs. Overlooking details can trigger a chain reaction of failures and safety risks. Always follow the guide and use the right tools. If you get stuck, check the manual or ask a pro for help.
Tip: Take your time and double-check each step. Careful work keeps your diy motorcycle safe and reliable.
- Faulty installations from skipped steps
- Jerky rides or breakdowns
- Damaged parts and costly repairs
- Safety risks from overlooked details
Overlooking Safety and Quality Checks
You want your diy motorcycle to look cool and run well. Sometimes, you forget to check important things. Many builders skip testing the charging system or ignore the limits of the drivetrain and suspension. If you add new parts, make sure they fit with your motorcycle and do not cause problems. Always read the instructions for aftermarket parts. If you use cheap or imitation parts, your motorcycle may not be safe or reliable. Talk about your long-term plans and maintenance needs. Good communication helps you avoid costly rework and keeps your motorcycle running strong.
- Check if the charging system can handle extra electrical loads
- Test drivetrain and suspension strength
- Verify compatibility with aftermarket parts
- Choose high-quality components over discount options
Underestimating Time, Budget, or Skill Requirements
Building a diy motorcycle takes more time and money than you might think. You need to plan your budget for all parts, tools, and labor. Most projects cost around $4,800, including the donor bike, parts, and tools. Set aside extra money for surprises. Be ready to spend months or even years on your motorcycle build. Skills like welding, painting, and engine tuning are important. If you are new, start with simple kits and small changes. Ask for help from other builders or online communities. A clean, organized workspace helps you avoid lost parts and stress. Set realistic goals and keep steady progress.
| Aspect | Details |
|---|---|
| Budget | About $4,800 total; add 20-30% for unexpected costs |
| Time Commitment | Months to years; patience is key |
| Skill Level | Start simple; advanced builds need welding, painting, and engine tuning |
| Tools & Workspace | Specialized tools and a tidy space keep you on track |
| Support | Get advice from forums, workshops, or pros for tough jobs |
Note: Planning ahead and asking for help makes your diy motorcycle journey smoother and more fun.
Resources and Support for Motorcycle DIY Kits
Where to Find Quality Parts and Kits
You want your motorcycle build to last and perform well. Trusted suppliers make a big difference. RCC Turbos stands out for high-quality turbo systems and reliable performance. Many experienced builders praise their customer service and honest advice. You get strong technical support and custom recommendations. RCC Turbos invests in research and development, so you know their parts will hold up on the road.
Magics Custom Cycle in Spanaway, WA, is another favorite among custom builders. You find a wide range of OEM and aftermarket motorcycle parts, including rare vintage pieces. Their team gives hands-on help and real-world guidance. They focus on compatibility and quality, making your DIY project smoother. Local shops like Magics Custom Cycle help you with custom-fit builds and honest advice.
- RCC Turbos: Turbo systems, expert support, durability
- Magics Custom Cycle: OEM and aftermarket parts, vintage options, hands-on help
Tip: Always ask questions before you buy. Good suppliers want you to succeed with your motorcycle project.
Online Communities and Builder Forums
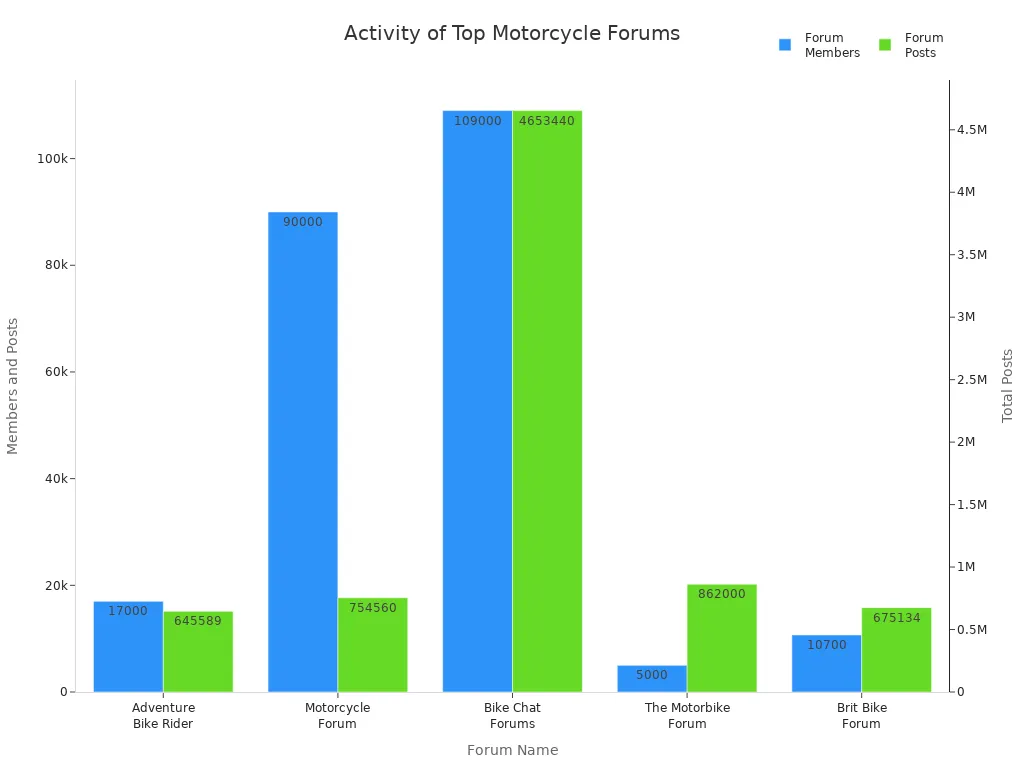
You never build alone. Online communities give you advice, support, and friendship. Reddit’s r/motorcycles brings together riders from around the world. You can ask questions, share photos, and get tips for your motorcycle build. Adventure Rider (ADVrider) has long threads on touring and custom builds. Motorcycle Forum covers every topic you can imagine, from repairs to upgrades.
Meetup’s Motorcycle Riding Groups help you connect offline. Harley Owners Group (HOG) offers organized rides and member benefits. Chop Cult and Custom Fighters focus on custom bikes, which is perfect for kit motorcycle builders. These forums keep you motivated and help you solve problems fast.
| Forum Name | Members | Posts/Threads/Topics | Focus Area / Notes |
|---|---|---|---|
| Adventure Bike Rider | 17,000+ | 48,803 topics, 645,589 posts | Adventure bikes, active discussions, custom builds relevant |
| Motorcycle Forum | 90,000+ | 754,560 posts, 61,569 threads | Wide range of motorcycle topics, global audience |
| Bike Chat Forums | 109,000+ | 4,653,440+ messages | Large active user base, diverse topics |
| The Motorbike Forum | 5,000+ | 53,000+ topics, 862,000+ posts | UK based, active rideouts and events sections |
| Brit Bike Forum | 10,700+ | 675,134 posts, 67,443 topics | Classic bikes, strong community engagement |
| Chop Cult | N/A | 49,663 threads, 802,569 posts | Custom bikes, closely related to kit motorcycle building |
| Custom Fighters | N/A | N/A | Custom bike community, relevant to kit builders |
| Manufacturer Forums | Varies | Varies | Brand-specific forums with large memberships and active discussions |
Note: You can find answers to almost any motorcycle question in these forums.
Recommended Books, Tutorials, and Build Series
You want to learn more about motorcycle building. Books and tutorials help you master new skills. Many motorcycle guides offer step-by-step instructions for beginners. You find detailed tutorials online that show you how to install parts, wire systems, and paint your bike. Popular build series on YouTube let you watch real builders work on their motorcycles. These videos make tough jobs easier to understand.
Some books cover classic motorcycle restoration. Others focus on custom builds and upgrades. You can pick up tips from experienced builders and see what works best. Tutorials and motorcycle guides help you avoid mistakes and finish your project with confidence.
Tip: Try watching a build series before you start your own motorcycle project. You learn tricks and get inspired.
Cost-Saving Tips for Your Custom Motorcycle Build
Budget Planning and Tracking Expenses
You want to keep your motorcycle build on track and within budget. Start by setting a realistic spending limit. Use a simple spreadsheet or a budget app to record every purchase. This helps you see where your money goes and spot any overspending early. Many builders find it helpful to break down costs into categories like parts, tools, and paint. Always leave a little extra in your budget for surprises. Motorcycle projects often come with unexpected expenses, so planning ahead saves stress later.
Tip: Prioritize safety and performance upgrades before spending on looks. This keeps your ride safe and your wallet happy.
Sourcing Used or Discounted Parts
You can save a lot by shopping smart. Salvage yards, online marketplaces, and motorcycle swap meets offer great deals on used parts. Focus on non-critical items like body panels or seats when buying used. For important parts like brakes or tires, choose new or high-quality aftermarket options. Many builders trade or swap parts with friends or other enthusiasts. This gives you access to unique components without spending extra cash. Bundling online orders helps you save on shipping fees. Watch for sales, holiday promotions, and clearance events to score discounts.
Here’s a quick list of smart sourcing tips:
- Buy used parts for non-safety items.
- Trade or swap with other builders.
- Bundle online purchases to cut shipping costs.
- Look for sales and promotions.
- Join forums to find deals and advice.
DIY vs. Professional Help: When to Seek Assistance
Doing the work yourself saves money and builds your skills. You can handle jobs like installing grips, swapping exhausts, or painting panels with basic tools. Many builders learn from online tutorials or community forums. However, some tasks need a pro’s touch. If you face complex wiring, welding, or engine tuning, consider hiring an expert. This keeps your motorcycle safe and reliable. Always weigh the cost of professional help against the risk of costly mistakes. Sometimes, paying for expert work saves you money in the long run.
Note: Don’t be afraid to ask for help. The motorcycle community loves to share advice and lend a hand.
Tips for a Successful Kit Motorcycle Build
Staying Organized and Motivated Throughout the Build
You want your custom motorcycle project to go smoothly. Staying organized helps you avoid stress and mistakes. Start by sorting all your custom parts and tools before you begin. Use bins or trays to keep small pieces together. Label everything so you can find it fast. Make a checklist for each step of your custom build. Cross off tasks as you finish them. This keeps you on track and gives you a sense of progress.
Motivation can fade during a long custom project. Set small goals and celebrate when you reach them. Take breaks if you feel stuck. Look at photos of finished custom bikes for inspiration. Share your progress with friends or online groups. Their feedback can boost your energy and give you new ideas for customization.
Tip: Keep a vision board with your favorite design inspiration. It reminds you why you started and helps you stay focused on your custom dream.
Documenting Your Step-by-Step Guide Progress
You should document your custom motorcycle build from start to finish. Take photos at every stage. Write notes about what you did and any problems you solved. This record helps you remember how you customized each part. If you want to share your build online, your story can inspire others.
Try using a simple table to track your progress:
| Step | Date Completed | Notes on Customization |
|---|---|---|
| Frame prep | 03/01 | Custom paint, new welds |
| Engine install | 03/10 | Custom mounts, wiring tweaks |
| Bodywork | 03/20 | Custom design, new graphics |
Your notes and photos can help you if you need to fix or upgrade your custom motorcycle later. They also show how your design ideas changed over time.
Learning from Other Custom Motorcycle Builders
You can learn a lot from other custom motorcycle builders. Join online forums or local clubs to meet people who love to customize bikes. Ask questions and share your own design ideas. Watch build videos for tips and finding inspiration for your build. Many builders post their design inspiration and show how they solve problems.
Look for builders who share your style or have done the type of customization you want. Their advice can save you time and help you avoid mistakes. You might even find a mentor who gives you direct feedback on your custom project.
Note: Every custom builder started as a beginner. Use their stories for inspiration and keep pushing your own design forward.
Building a kit motorcycle is something you can do, whether you are just starting out or already love working on bikes. You learn new skills, meet other builders, and create a ride that shows your style.
- Start with a good plan.
- Stay organized and patient.
- Ask for help when you need it.
Remember, every expert builder started as a beginner. Take that first step and enjoy your motorcycle DIY kit journey!
FAQ
How long does it take to build a kit motorcycle?
Most people finish their kit motorcycle in a few months. If you work on weekends, you might need three to six months. Take your time and enjoy each step. You learn more when you do not rush.
Do I need special tools for a kit motorcycle build?
You need basic hand tools like wrenches, screwdrivers, and pliers. Some jobs need special tools, such as a torque wrench or a motorcycle lift. Check your kit instructions for any extra tools before you start.
Can I build a kit motorcycle if I have no experience?
Yes, you can! Many first-timers start with no experience. Follow the instructions, watch videos, and ask questions in forums. You will learn as you go. Take it one step at a time.
What should I do if I get stuck during the build?
Ask for help in online forums or local motorcycle groups. Share photos and describe your problem. Someone will offer advice or a solution. Do not be afraid to reach out. The motorcycle community loves to help.
Is it cheaper to build a kit motorcycle than to buy a new one?
Sometimes you save money, but not always. You control your budget and pick your parts. If you want a unique bike, building can cost less than buying a custom one. Track your spending to avoid surprises.
See Also
Key Advice To Construct The Motorcycle Of Your Dreams
A New Rider’s Handbook For Maintaining Their First Bike
Cost-Saving Motorcycle Maintenance Tips Every Rider Should Know
Important Safety Guidelines For Your Initial Motorcycle Journey
Best Advice When Selecting Motorcycle Maintenance Training Courses
