Easy Steps to Achieve a Fresh Look with White Fairings on ZX6R

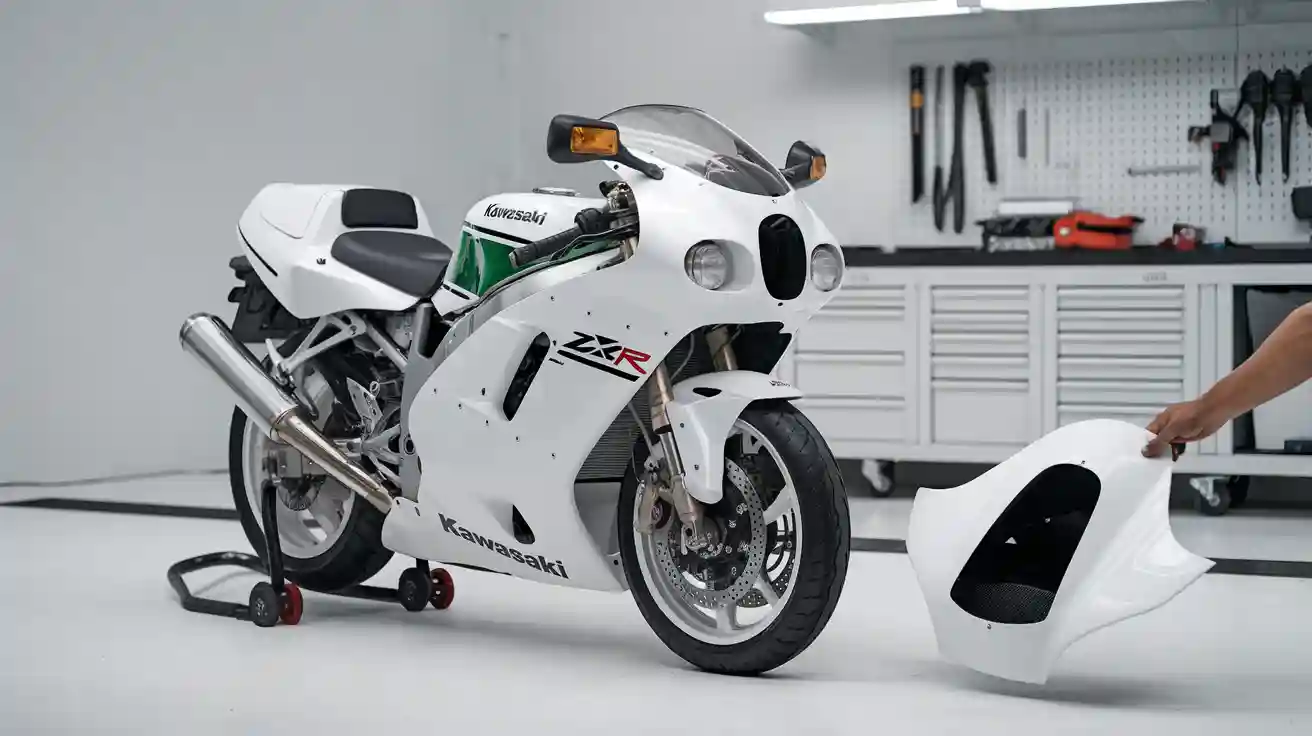
Ready to give your motorcycle a fresh look? Installing kawasaki zx6r white fairings can instantly transform your bike. You do not need special skills or a big garage. With basic tools, you can change the style of your zx6r at home. Many riders choose kawasaki fairings because they look clean and modern. When you see your motorcycle with new fairings, you will notice a bold look. The bright white style will make your zx6r stand out. Your kawasaki will look sharp and unique. You will love how this upgrade changes the way your motorcycle looks and feels.
Why Kawasaki ZX6R White Fairings Make a Difference
Visual Impact and Style Upgrade
When you choose kawasaki zx6r white fairings, you give your motorcycle a whole new style. The bright white color stands out on any road. You will notice how your zx6r looks cleaner and more modern. Many riders want their motorcycle to look unique. White fairings help you do that. Your zx636 will catch eyes at every stoplight.
You can see the difference right away. The new fairings make your motorcycle look fresh and bold. If you want to upgrade your ride, this is one of the best ways. The style of your zx6r changes from basic to custom. You get a sharp, sporty look that matches your personality.
Tip: Take a before-and-after photo. You will love seeing how much your motorcycle changes with this upgrade.
Benefits Beyond Aesthetics
White motorcycle fairings do more than just change the look of your zx636. They protect your motorcycle from dirt, rocks, and weather. When you install new fairings, you help keep your kawasaki in top shape. The fairings also make cleaning your motorcycle easier. Dirt shows up less on white, so your zx6r stays looking good longer.
You can also use this upgrade as a chance for customization. Add decals or stickers to your new fairings. Make your zx636 truly yours. The right fairings can even help with aerodynamics. Your motorcycle may feel smoother at higher speeds.
- Protects your motorcycle’s parts
- Makes cleaning simple
- Lets you show off your own style
- Can improve how your zx636 rides
Choosing kawasaki zx6r white fairings is more than a style choice. It is a smart upgrade for any motorcycle lover who wants to upgrade their ride and enjoy a fresh, standout look.
What You Need for ZX6R Fairings Installation
Required Motorcycle Fairings and Kits
Before you start, make sure you have all the right motorcycle fairings for your zx6r. You need a full set that covers the front, sides, and tail. Most kits come with the main bodywork, side panels, front cowl, rear cowl, and inner trim pieces. Some kits also include small hardware like screws and clips. Always check that your kit matches your zx636 model year. If you want a custom look, you can pick quality motorcycle fairings with special designs or decals. Kawasaki fairings in white give your motorcycle a clean and bold style.
Tip: Lay out all the fairings and parts before you begin. This helps you see if anything is missing.
Essential Tools for ZX6R Fairings
You do not need a huge toolbox to install motorcycle fairings on your zx6r. Here are the tools you should have ready:
- Ratchets (3/8 or 1/2 inch drive)
- Extensions for your ratchets
- 14mm socket
- 8mm, 4mm, and 5mm hex keys
- Small pointed screwdriver
- Short Phillips screwdriver
- Torque wrench
These tools help you remove and install fairings without breaking tabs or clips. Use the torque wrench to tighten bolts to the right level. Small screwdrivers work best for push pins and trim screws. You will use these tools for both taking off old motorcycle fairings and putting on new ones.
Compatibility and Fitment Tips
Not all motorcycle fairings fit every zx636. Always check the year and model of your kawasaki before you buy. Some fairings look similar but have small differences. If you want the best fit, choose fairings made for your exact zx6r year. Test fit each piece before you tighten any bolts. This helps you spot any problems early. If a fairing does not line up, do not force it. Adjust the position or check for hidden clips. Good fitment makes your motorcycle look sharp and keeps the fairings secure.
Note: Taking your time with fitment gives your zx636 a pro look and helps your new fairings last longer.
Preparing Your ZX6R for White Fairings
Cleaning and Workspace Setup
You want your motorcycle to look its best with new white fairings. Start by giving your motorcycle a good wash. Use a soft sponge and gentle soap. Clean off all the dirt and dust. Pay extra attention to the spots where the fairings attach. Dirt in these areas can make it hard to fit the new parts.
After cleaning, dry your motorcycle with a soft towel. Make sure there is no water left on the surface. Water can cause rust or make the new fairings slip during installation.
Set up your workspace before you begin. Pick a spot with plenty of light. A clean garage or driveway works well. Lay out all your tools and fairings on a soft mat or blanket. This keeps your motorcycle parts safe from scratches.
Tip: Keep a small container nearby for screws and clips. You do not want to lose any small pieces while working on your motorcycle.
Safety Precautions for Motorcycle Fairings
Safety comes first when you work on your motorcycle. Always turn off your motorcycle and remove the key. Let the engine cool down before you touch any parts. Hot surfaces can burn your hands.
Wear gloves to protect your skin from sharp edges on the motorcycle fairings. Safety glasses help keep dust and small bits out of your eyes. If you use any sprays or cleaners, make sure your workspace has good airflow.
Keep your tools organized. This helps you avoid accidents and makes the job easier. Never rush when working on your motorcycle. Take your time and double-check each step.
Note: If you feel unsure about any part of the process, ask a friend who knows about motorcycle repairs or check your owner’s manual.
With a clean motorcycle and a safe workspace, you are ready to start installing your new white fairings. This careful prep helps your motorcycle look great and keeps you safe.
Removing Old ZX6R Fairings
Step-by-Step Removal Process
You want to start with a cool motorcycle, so make sure your bike is off and stable. Removing old fairings is not hard, but you need to go slow. Begin at the front of your motorcycle. Look for screws or bolts that hold the fairings in place. Use your tools to loosen each one. Put every screw in a small container so you do not lose them.
Move to the side fairings next. These panels often have more fasteners. Take your time and check for hidden screws near the bottom or under the seat. Gently pull the fairings away from your motorcycle. If you feel resistance, stop and look for another fastener you missed. Never force the fairings off. You want to keep both your motorcycle and the fairings in good shape.
After you remove the side fairings, go to the rear. The tail section may have clips or bolts under the seat. Remove the seat if needed. Keep all the parts together. When you finish, your motorcycle will look bare, but you are ready for the next step.
Tip: Take photos as you go. These pictures help you remember where each fairing and screw belongs when you put everything back.
Handling Fasteners and Clips
Clips and fasteners can be tricky, but you can handle them with care. Start by reaching under the fender to find the clips. Push straight in, right where the clip splits. This frees one side of the clip so it can slide out. Then, push the other side in the opposite direction. The clip will open up, and you can pull it out gently.
Use your fingers instead of pliers. This keeps the clips from breaking. Try squeezing the clip a little, then push the front part in with your thumb. Pull the back part out with your index finger. This method works fast and keeps your motorcycle clips safe. Never cut the clips unless you have no other choice.
If you keep the clips and fasteners in good shape, you can reuse them when you install your new fairings. Good clips help your motorcycle fairings fit tight and look great.
Prepping New Kawasaki ZX6R White Fairings
Inspecting for Damage or Defects
Before you put your new fairings on your motorcycle, take a close look at each piece. Lay out all the parts on a clean surface. Check every panel for cracks, scratches, or dents. Run your hand along the edges. You want to feel for any sharp spots or rough areas. Sometimes, shipping can cause small chips or marks. If you spot anything wrong, contact the seller right away. You do not want to install damaged fairings on your motorcycle.
Look at the mounting holes and tabs. Make sure nothing is bent or broken. These spots help the fairings fit tight on your motorcycle. If you see loose paint or missing clips, fix them before you start. A careful check now saves you time later. Your kawasaki zx6r white fairings should look perfect before you move on.
Tip: Use a flashlight to check inside corners and dark spots. Small cracks can hide in these areas.
Test Fitting and Adjustments
Now you get to see how the new fairings look on your motorcycle. Do a test fit before you tighten anything. This step helps you spot problems early. Place each fairing on your motorcycle and check the fit. Some panels may need a little wiggle to line up just right.
Here are some steps to help you adjust your fairings for the best fit:
- Install the right side frame slider so it sits snug but can still move. This lets you adjust it once the fairing is in place.
- Take off the rear seat and all mounting screws. This makes it easier to slide the rear cowl back and fit the rear fairing.
- Make sure all mounting bolts for the right-side frame slider line up with the frame holes. Use a thread locker to keep them from coming loose.
- Check that all clips and fasteners on the rear fairing are in good shape and seated well. This keeps your motorcycle from rattling or looking crooked.
- Do not overtighten screws. Tight screws can crack the plastic fairings.
- Take your time. Use the right tools and be patient. This helps you protect your motorcycle and get a smooth finish.
Note: If a fairing does not fit right away, do not force it. Try adjusting the position or check for hidden clips.
Test fitting helps you see how your motorcycle will look with the new fairings. You can make small changes now for a perfect fit later. When you finish, your motorcycle will be ready for the next step.
Installing White Fairings on ZX6R
Aligning and Securing Motorcycle Fairings
You have your new motorcycle fairings ready. Now, you get to see your zx6r start to look fresh and new. Begin by picking up the first fairing panel. Hold it close to your motorcycle and line up the mounting holes. You want each piece to fit snug against the frame. Sometimes, you need to wiggle the fairing a little to get it just right. Do not rush this step. If you force a panel, you might crack the plastic or bend a tab.
Once you have the fairing in place, grab the correct screws or clips. Start by hand-tightening each fastener. This helps you adjust the panel if it looks crooked. When all the fasteners are in, use your tools to tighten them. Do not overtighten. You want the fairings secure, but not so tight that you damage the plastic.
Tip: Work from the front of your motorcycle to the back. This order helps each panel line up with the next one.
Check the gaps between each fairing. The lines should look even. If you see a big gap, loosen the fasteners and adjust the panel. Take your time. Good alignment makes your zx6r look like it just rolled out of the showroom.
Reconnecting Wiring and Accessories
Your motorcycle needs more than just fairings. You also need to reconnect the wiring and accessories you unplugged earlier. This step is important for your headlights, turn signals, and other lights to work.
Follow these steps to reconnect everything:
- Find the wiring connectors for your headlights, marker lights, turn signals, and the regulator/rectifier.
- Plug each connector back into its matching socket. Make sure you hear a click or feel it snap into place.
- If you removed the mirrors or the headlight assembly, bolt them back onto the fairing.
- Double-check each connection. Loose wires can cause lights to flicker or not work at all.
- Use your kawasaki service manual if you feel unsure about any connector. The manual shows you the right order and location for each wire.
Take your time with this part of the installation. Rushing can lead to mistakes. When you finish, test each light and accessory before you move on. You want your motorcycle to be safe and ready for the road.
Note: If you see a wire that does not fit or looks damaged, stop and check it before you finish the installation.
Ensuring Proper Fit and Finish
You want your kawasaki zx6r white fairings to look perfect. After you secure all the panels and reconnect the wiring, step back and look at your motorcycle. Check the lines and edges. Each fairing should sit flush against the frame. The gaps between panels should look even and smooth.
Run your hand along the surface of the motorcycle fairings. You should not feel any sharp edges or loose spots. If you find a spot that feels off, loosen the fasteners and adjust the panel. Sometimes, you need to shift a fairing just a little to get the best fit.
Look at the paint and finish. White fairings show dirt and fingerprints, so wipe them down with a clean cloth. Make sure you did not leave any tools or parts inside the panels. Listen for rattles by gently tapping each fairing. If you hear a noise, check for a loose screw or clip.
Callout: A perfect fit makes your zx6r look sharp and helps the fairings last longer.
When you finish, your motorcycle will look brand new. You will feel proud every time you see your kawasaki on the road. This careful installation gives your motorcycle a custom, professional look.
Final Assembly and Checks for ZX6R Fairings
Tightening Bolts and Fasteners
You have your new fairings on your motorcycle. Now, you need to make sure every bolt and fastener is tight. Grab your tools and start with the bolts at the front of your motorcycle. Work your way to the back. Use your hand to tighten each bolt. You want the bolts snug, but not too tight. Most fairings on the ZX6R use rubber well-nuts. These do not need a torque wrench. If you use too much force, you can strip the threads or damage the rubber. That makes it hard to remove the bolts later.
- Hand-tighten all bolts and fasteners.
- Do not use a torque wrench on fairings.
- Stop turning when the bolt feels snug.
- Never force a bolt if it feels stuck.
Tip: If you feel the bolt spinning or the rubber moving, stop right away. Check the fit and try again.
You want your motorcycle fairings to stay in place, but you do not want to break anything. A gentle touch works best. This step keeps your motorcycle looking sharp and makes future work easier.
Double-Checking Alignment
After you finish tightening, step back and look at your motorcycle. Check the lines where the fairings meet. The panels should line up with each other. Look for even gaps between each piece. If you see a spot that looks off, loosen the bolts a little and adjust the fairing. Then, tighten the bolts again by hand.
Run your hand along the edges of the motorcycle fairings. You should not feel any sharp spots or loose panels. Make sure every part sits flat against your motorcycle. Check the front, sides, and tail. Look at your motorcycle from different angles. Good alignment makes your motorcycle look like it just left the showroom.
Callout: Taking a few extra minutes to check your fairings now saves you time later. You will ride with confidence, knowing your motorcycle fairings are secure and straight.
When you finish, your motorcycle will look fresh and ready for the road. You can enjoy your new fairings and show off your motorcycle with pride.
Tips for a Flawless Kawasaki ZX6R White Fairings Installation
Common Mistakes to Avoid
You want your motorcycle to look amazing with new fairings, but some mistakes can ruin the process. Many riders rush and skip important steps. If you hurry, you might scratch your motorcycle or crack the fairings. Always take your time. Double-check every part before you start.
Some people forget to test fit the motorcycle fairings. If you skip this, you may find gaps or crooked panels later. Always place each fairing on your motorcycle before tightening anything. This helps you spot problems early.
Another mistake is using the wrong screws or mixing up fasteners. Keep all your hardware organized. Use a small tray or cup for bolts and clips. If you lose a fastener, your fairings might not stay secure.
Tip: Never force a fairing into place. If it does not fit, check for hidden clips or wires in the way.
Some riders forget to reconnect the wiring for lights and signals. Always check your motorcycle’s lights before you finish. This keeps you safe on the road.
Pro Tips for a Professional Look
You want your motorcycle to stand out with a next-level look. Start by cleaning your hands and tools before touching the white fairings. Dirt and oil can leave marks on the panels. Use a soft cloth to wipe down each fairing as you install it.
Work in a bright area. Good lighting helps you see every detail. If you see a gap, loosen the fasteners and adjust the fairing. Even small changes can make your motorcycle fairings line up perfectly.
Use a torque wrench for bolts that need a specific tightness. Most motorcycle fairings only need to be hand-tight, but check your manual for special spots. If you want a custom touch, add decals or stickers after you finish. This makes your motorcycle unique.
Callout: Take a step back and look at your motorcycle from different angles. You will spot things you might miss up close.
Keep your motorcycle fairings clean and check them often. A little care keeps your motorcycle looking sharp for years.
The Visual Transformation with White Motorcycle Fairings
Before and After Comparison
You want your motorcycle to stand out. When you install new white fairings on your zx6r, you see a bold new look right away. The old panels might have scratches or faded spots. The new motorcycle fairings shine bright and clean. Your motorcycle gets a next-level look that grabs attention.
Before the upgrade, your motorcycle may blend in with others. The old style can look tired. After you add the white fairings, your zx6r looks sharp and fresh. The lines of the motorcycle become smooth. The panels fit tight. You notice the bold new look every time you walk up to your motorcycle.
Many riders take photos before and after the upgrade. You can see the difference in every shot. The white style makes your motorcycle look modern. The fairings give your zx6r a bold new look that feels like a brand-new ride.
Tip: Show your friends the before and after photos. They will see how much a fairings upgrade can change the style of a motorcycle.
Personalizing Your ZX6R’s New Look
You can make your motorcycle even more special. After you install the white fairings, you have many ways to add your own style. The fairings give you a blank canvas for your ideas. You can use decals, stickers, or even custom paint to create a bold new look.
Monster Fairings offers a 'Customize Now' service. This lets you personalize your fairings’ design. You can choose the style that matches your taste. The service makes it easy to get a bold new look that no one else has. Your zx6r will show off your personality and stand out from the crowd.
Try adding small touches to your motorcycle fairings. Use colored bolts or special graphics. Change the look of your mirrors or add a seat cover. Every upgrade brings more style to your motorcycle. You control the final look. Your zx6r becomes a true reflection of your style and love for motorcycles.
Callout: Personalization turns your motorcycle into something unique. Every ride feels special when you see your bold new look.
Cost and Time Considerations for ZX6R Fairings
Budgeting for Parts and Tools
When you plan to upgrade your motorcycle with new fairings, you want to know how much you will spend. The price for a full set of white fairings for your motorcycle can range from $350 to $800. Some brands cost more, but you can find good deals if you shop around. Always check that the fairings fit your motorcycle model before you buy.
You also need to think about tools. Most of the tools you need for your motorcycle are basic. You might already have a ratchet, screwdrivers, and a torque wrench in your garage. If you need to buy tools, you can expect to spend about $30 to $60. Here is a simple table to help you plan your budget:
| Item | Estimated Cost |
|---|---|
| Fairings Kit | $350 - $800 |
| Basic Tools | $30 - $60 |
| Extra Fasteners | $10 - $20 |
Tip: Set aside a little extra money for small parts or fasteners. Sometimes you lose a clip or need a new bolt for your motorcycle.
Estimated Installation Time
You do not need to spend all day working on your motorcycle. Most riders finish the fairings installation in about 3 to 5 hours. If you have never worked on a motorcycle before, you might need a little more time. Take breaks and check your progress as you go.
Here is a quick breakdown of the time you might spend on each step:
- Removing old motorcycle fairings: 45 minutes
- Prepping and test fitting new motorcycle fairings: 1 hour
- Installing and aligning new motorcycle fairings: 1.5 hours
- Final checks and cleaning your motorcycle: 30 minutes
Note: If you work slowly and carefully, you will get a better result. Your motorcycle will look great, and you will feel proud of your work.
You can save money by doing the job yourself. You also learn more about your motorcycle. This project gives you a fresh look and a fun way to spend time with your motorcycle.
Maintaining Your Kawasaki ZX6R White Fairings
Cleaning and Care Tips
You want your motorcycle to look sharp every time you ride. Keeping your motorcycle fairings clean helps them stay bright and fresh. Here’s a simple routine you can follow:
- Wash your motorcycle fairings with mild soap and warm water. Use a soft cloth or sponge that is safe for plastics. Stay away from harsh cleaners or high-pressure washers. These can damage the fairings.
- Dry the fairings with a clean microfiber cloth. This step keeps scratches away.
- After washing, apply a good motorcycle wax or polish. Buff the fairings gently. This adds a layer of protection against scratches and sunlight.
- Use detailing sprays between washes. Spray them on and wipe with a microfiber towel. This keeps dirt and water off your motorcycle fairings.
- Check your motorcycle fairings often for scratches or cracks. If you find a small scratch, use a scratch remover or kit right away.
- Store your motorcycle indoors when you can. If you keep it outside, use a breathable cover that fits well. This protects your motorcycle from dust and rain.
- Park your motorcycle away from other vehicles. This lowers the risk of bumps or tipping.
Tip: A regular cleaning routine makes your motorcycle fairings last longer and keeps your motorcycle looking like new.
Protecting Against Scratches and Fading
White motorcycle fairings look amazing, but they need care to stay that way. Sunlight can fade the color over time. Try to park your motorcycle in the shade or inside a garage. If you must leave it outside, always use a cover. This simple step blocks UV rays and keeps your motorcycle fairings bright.
Scratches can happen fast, especially if you ride every day. Always use soft cloths when you clean your motorcycle. Never use rough towels or brushes. Waxing your motorcycle fairings adds a shield that helps stop small scratches. If you spot a scratch, fix it soon. Small repairs keep your motorcycle looking smooth.
Note: Taking a few minutes to protect your motorcycle fairings saves you time and money later. Your motorcycle will turn heads every time you ride.
When you install white fairings on your motorcycle, you give it a fresh, standout look that turns heads. With the right tools and a little patience, you can make your motorcycle look like new. Riders say high-quality fairings protect your motorcycle’s vital parts and keep the finish bright for years. Regular care, like gentle washing and using a cover, helps your motorcycle keep that sharp look. Enjoy every ride knowing your motorcycle looks amazing and stays protected.
FAQ
How long does it take to install white fairings on my ZX6R?
Most riders finish the job in 3 to 5 hours. If you take your time and follow each step, you can get a great result. You might finish faster if you have experience.
Can I install ZX6R fairings by myself, or do I need help?
You can do it yourself at home. The process uses basic tools. If you feel unsure, ask a friend to help hold panels or check alignment. Teamwork can make things easier.
Will white fairings get dirty quickly?
White fairings show dirt more than darker colors. You can keep them looking fresh with regular cleaning. Use a soft cloth and gentle soap. A quick wipe after each ride helps a lot.
Do I need special tools for this installation?
You only need basic tools like screwdrivers, ratchets, and hex keys. A torque wrench helps with bolts. Most tools come from a standard home toolkit. You do not need anything fancy.
What should I do if a fairing does not fit right?
Stop and check the alignment. Make sure you have the correct part for your model year. Try a gentle adjustment. If it still does not fit, contact the seller for advice or a replacement.
See Also
Best Replacement Fairings For Kawasaki ZX6R Examined
Comparing Race And Street Fairings For ZX6R Bikes
Complete Installation Instructions For Honda CBR500R Fairings
