Honda XR650R Supermoto Fairings Installation and Performance Tips

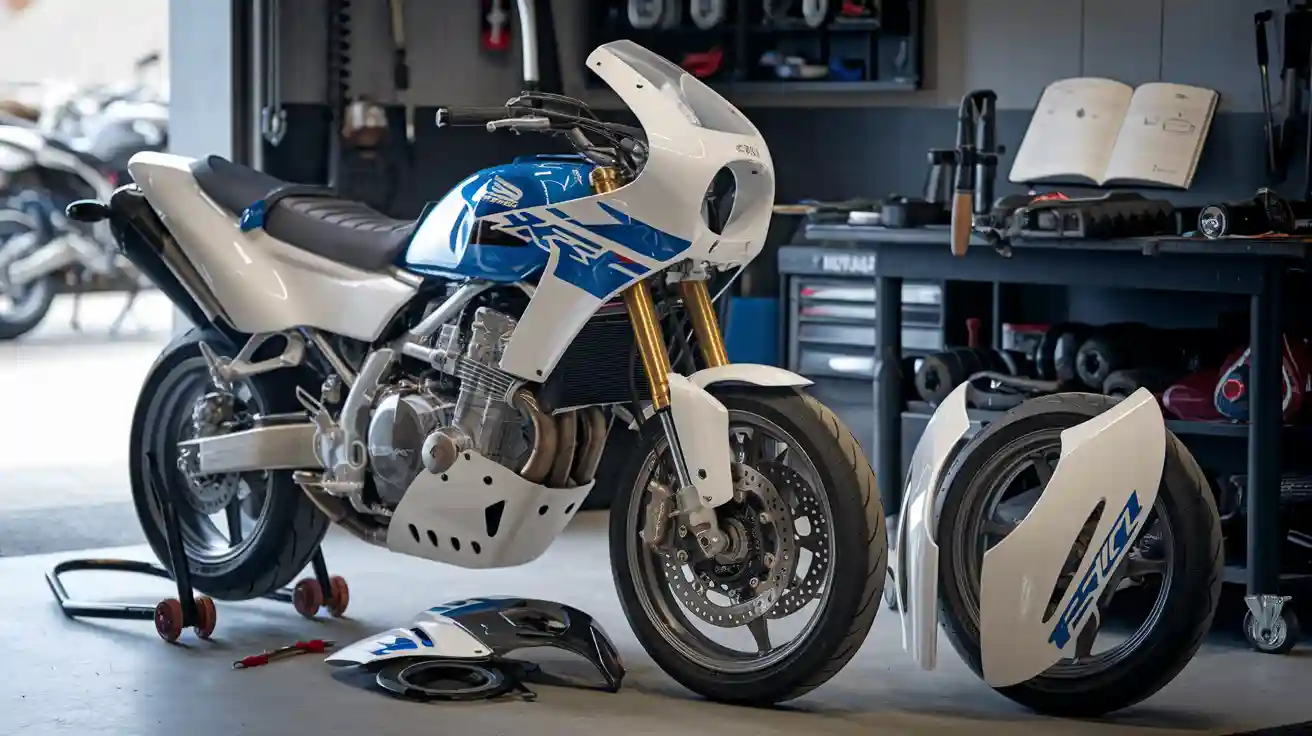
You can transform your Honda XR650R by installing bodywork designed for supermoto riding. When you fit Honda XR650R supermoto fairings, you change the look and boost the performance of your motorcycle. Expect bodywork to improve wind flow and protect key parts. Riders in the Honda XR series often choose these upgrades for better control and appearance. Installing bodywork gives your ride a fresh style and helps you stand out on the road.
Preparing for Installing Bodywork
Required Tools and Materials for Honda XR650R Supermoto Fairings
Before you start working on your Honda XR650R, you need to gather all the tools and materials for the bodywork. You want to make sure you have everything ready so you do not stop in the middle of the job. Here is a list of what you need:
- Screwdrivers (Phillips and flathead) for removing and installing bodywork
- Socket set and wrenches for bolts and fasteners
- Drill and drill bits for making new holes in the bodywork if needed
- Rubber mallet for gentle adjustments
- Clean rags to wipe down the bodywork and parts
- Zip ties and extra fasteners for securing loose bodywork
- The new supermoto fairings and all included accessories
- The recommended parts from your fairing kit
You should check that all parts and accessories match your Honda XR650R. Some bodywork kits come with extra fasteners, but you may need to buy more. Always keep extra fasteners on hand. You want to avoid delays if you lose any during the installation.
Tip: Lay out all bodywork, fasteners, and accessories on a clean table. This helps you see if you have every part before you start.
Workspace Setup and Safety Gear
Set up your workspace before you begin installing bodywork. Choose a flat, stable surface with good lighting. You want enough space to move around your Honda XR650R and organize all the parts and fasteners.
Wear safety gear to protect yourself. Use gloves to avoid cuts from sharp bodywork edges. Wear safety glasses when you drill or handle fasteners. Keep your tools and fasteners organized in trays or small containers. This keeps your workspace safe and helps you find each part quickly.
A clean workspace protects your new bodywork and accessories from scratches. You also lower the risk of losing small fasteners or parts. Good preparation makes the installation smoother and helps you enjoy your upgraded Honda XR650R sooner.
Step-by-Step Guide to Installing Honda XR650R Supermoto Fairings
Removing Stock Bodywork Components
You need to start by taking off the old bodywork from your Honda XR650R. Use your screwdrivers and socket set to loosen and remove the fasteners holding the stock panels. Work slowly and keep track of each fastener. Place them in a small container so you do not lose any. Remove the upper fairing first. This part usually covers the headlight and front area. Next, take off the lower fairing and side panels. You may find some hidden fasteners near the seat or under the tank. Check every spot to make sure you do not miss any. If you see any clips or rubber grommets, pull them out gently. You want to avoid breaking these parts because you might reuse them during installation.
Tip: Take photos of each step as you remove the bodywork. These pictures help you remember where each fastener goes when you install the new fairings.
Test Fitting New Supermoto Fairings
After you remove the old bodywork, you need to test fit the new Honda XR650R supermoto fairings. Hold the upper fairing in place and check if the mounting holes line up with the frame. Do the same with the lower fairing and side panels. You want to see how each piece fits before you start drilling or making modifications. Sometimes, the fairing kit may not match perfectly. You may need to adjust the position or trim a small edge. Use clean rags to protect the paint and finish while you handle each fairing. Make sure the bodywork sits flush against the frame and does not wobble. If you notice gaps or uneven spots, mark them with tape. This step helps you plan your mounting and avoid mistakes during installation.
- Check alignment of mounting points for each fairing
- Look for any interference with cables or controls
- Confirm that fasteners will reach the mounting holes
Note: Do not rush the test fitting. Careful checking now saves you time and trouble later.
Drilling and Modifying Mounting Points
You may need to drill new holes or make small modifications to fit the supermoto fairings on your Honda XR650R. Use a drill with the correct bit size for your fasteners. Mark the spots where you need new mounting holes. Double-check your marks before you drill. Hold the fairing steady and drill slowly to avoid cracking the bodywork. If you need to enlarge a hole, use a file or sandpaper. Make sure each mounting point is smooth and free of sharp edges. You want the fasteners to sit flat and hold the fairing securely. Some fairing kits include rubber washers. Use these to reduce vibration and protect the bodywork. After you finish drilling, clean the area with a rag. Remove any dust or plastic shavings. Test the fit again to make sure the mounting points line up. If you need more modifications, repeat the process until everything fits well.
Safety Alert: Always wear safety glasses when you drill or file the bodywork. Protect your hands with gloves to avoid cuts from sharp edges.
Securing and Mounting the Bodywork
You have finished test fitting and drilling. Now you can start mounting the bodywork on your Honda XR650R. Begin with the upper fairing. Hold the upper fairing in place and line up the holes you drilled earlier. Insert the fasteners through the fairing and into the frame. Tighten each fastener by hand first. This step helps you avoid cross-threading. Use your socket set or screwdriver to finish tightening. Do not overtighten. You want the bodywork secure but not cracked.
Move to the side panels next. Hold each piece of bodywork against the frame. Insert the fasteners and check that the mounting points match up. If you see any gaps, adjust the position before tightening. Repeat this process for the lower fairing. Make sure every piece of bodywork sits flush with the frame. Use rubber washers if your kit includes them. These washers help reduce vibration and protect the bodywork from damage.
Tip: Work in a pattern. Start with the upper fairing, then move to the side panels, and finish with the lower fairing. This order helps you keep the bodywork aligned.
Check all mounting points as you go. If you notice a loose spot, remove the fastener and try again. Sometimes you need to shift the bodywork slightly to get a perfect fit. Use zip ties for extra support if you see any loose edges. Zip ties work well for temporary fixes until you can get more fasteners.
Here is a quick checklist for mounting bodywork:
- Align each piece of bodywork with the frame.
- Insert fasteners and tighten by hand.
- Use tools to finish tightening.
- Check for gaps or loose spots.
- Add rubber washers where needed.
- Use zip ties for extra support.
You want every part of the bodywork to feel solid. When you finish mounting, give each fairing a gentle shake. If it moves, check the mounting points again. A secure fit keeps your Honda XR650R looking sharp and riding safely.
Final Fitment and Stability Checks
After mounting bodywork, you need to check the final fitment. Walk around your Honda XR650R and look at every angle. The upper fairing should sit straight and not tilt to one side. The side panels and lower fairing must line up with the frame. Run your hand along the edges of the bodywork. You should not feel any sharp edges or loose spots.
Start the engine and let the bike idle. Watch the bodywork as the engine vibrates. If you see any movement, stop the engine and check the mounting points. Tighten any loose fasteners. Sometimes, you need to adjust the mounting bodywork to get a perfect fit. Do not ignore small gaps. Even a small gap can cause rattling or damage over time.
Note: Take your Honda XR650R for a short ride after mounting bodywork. Listen for rattles or squeaks. If you hear anything unusual, stop and check the mounting points again.
Here is a table to help you with your final fitment checks:
| Area | What to Check | Action Needed |
|---|---|---|
| Upper fairing | Alignment and tightness | Adjust or tighten |
| Side panels | Flush with frame | Reposition if needed |
| Lower fairing | No gaps or movement | Add support or tighten |
| All bodywork | No rattles or squeaks | Check mounting points |
You want the bodywork to stay stable at all speeds. A good fit helps the fairing protect your bike and gives you a clean look. When you finish these checks, you can feel confident in your mounting bodywork job. Your Honda XR650R now has strong, secure bodywork ready for the road.
Safety Tips for Installing Bodywork
Safe Handling of Tools and Fairings
You need to handle your tools and bodywork with care during installation. Always choose the right tool for each job. A screwdriver that fits the fastener prevents slipping and damage. When you use a drill, keep your hands steady and wear safety glasses. You protect your eyes from flying bits. Gloves help you avoid cuts from sharp edges on the bodywork.
Here are some safety tips for handling tools and bodywork:
- Keep your workspace clean and free of clutter.
- Place tools in a tray so you can find them quickly.
- Hold the bodywork with both hands when you move it.
- Use a rubber mallet for gentle adjustments.
- Never force a fastener if it does not fit.
Tip: If you drop a tool, pick it up right away. You reduce the risk of stepping on it or damaging the bodywork.
Protecting the Honda XR650R and New Fairings
You want to keep your Honda XR650R and new bodywork safe during installation. Lay a soft cloth or mat under the bike. This protects the paint and frame from scratches. When you set down the bodywork, use a clean surface. Dirt and grit can scratch the finish.
Check each mounting point before you attach the bodywork. Make sure there are no sharp edges or leftover debris. If you see any, clean the area with a rag. You prevent damage to the bodywork and the bike. Use rubber washers where possible. These washers absorb vibration and keep the bodywork secure.
Here is a table to help you remember how to protect your bike and bodywork:
| Step | What to Do | Why It Matters |
|---|---|---|
| Lay down a mat | Protects paint and frame | Prevents scratches |
| Clean surfaces | Removes dirt and grit | Keeps bodywork looking new |
| Use rubber washers | Absorbs vibration | Stops damage and noise |
Safety Alert: Always check your work as you go. You catch problems early and keep your bodywork in top shape.
Performance Benefits of Honda XR650R Supermoto Fairings

Aerodynamics and Wind Protection
When you install honda xr650r supermoto fairings, you change how air moves around your bike. The fairing helps you cut through the wind. You feel less drag when you ride at higher speeds. This makes your ride smoother and more stable. The windshield on your fairing blocks wind from hitting your chest and face. You stay more comfortable, even on long rides.
A good windshield also keeps bugs and small debris away from you. You do not have to worry about wind noise as much. Many riders notice they can ride longer without feeling tired. The fairing and windshield work together to protect you from harsh weather. Rain and cold air do not hit you as hard. You get better control of your Honda XR650R because the wind does not push you around.
Tip: If you want the best wind protection, choose a windshield that matches your height. You can find different sizes in many fairing kits.
Enhanced Protection for Internal Components
Your Honda XR650R has important parts that need protection. The fairing covers the engine and other internal components. Rocks, dirt, and water cannot reach these parts as easily. The windshield also helps by keeping dust and rain away from the controls and gauges.
When you ride off-road or on city streets, you face many hazards. The fairing acts like a shield. It blocks flying debris and keeps your bike cleaner. You spend less time cleaning and fixing your Honda XR650R. The fairing also helps keep the wiring and electronics dry. This means fewer problems with your lights and signals.
A well-designed fairing can even help your bike stay cooler. It directs airflow to the engine and radiator. Your Honda XR650R runs better and lasts longer. You protect your investment with the right fairing and windshield.
Aesthetic Upgrades and Street-Legal Appearance
Honda xr650r supermoto fairings do more than protect your bike. They give your motorcycle a sharp, modern look. You stand out on the road with new bodywork. The fairing and windshield make your bike look fast and ready for action.
Many riders want their bikes to look street-legal. The fairing helps you meet local laws. Some places require a windshield or certain accessories for street use. When you add a fairing and windshield, you make your Honda XR650R look complete. You can choose colors and styles that match your taste.
A new fairing can also help you add more accessories. You can mount mirrors, lights, or even a GPS on the fairing or windshield. This makes your ride safer and more fun. You get a bike that looks great and works better every day.
Note: A clean, well-fitted fairing can increase the value of your Honda XR650R if you ever want to sell it.
Impact on Handling and Rider Comfort
When you install supermoto fairings on your Honda XR650R, you notice changes in how your bike handles. The new bodywork helps you control your motorcycle better. The fairings direct airflow around your bike, which makes it easier to steer at different speeds. You feel more stable when you ride through corners or on straight roads.
The fairings also affect how your bike responds when you use the brakes. You get a smoother stop because the bodywork reduces wind resistance. This means you can slow down quickly and safely. You notice that your brakes work more efficiently, especially at higher speeds. The fairings help keep your bike balanced when you press the brakes hard. You avoid sudden jerks or skids, which keeps you safe.
Rider comfort improves with supermoto fairings. You feel less wind hitting your body, so you stay relaxed during long rides. The fairings block cold air and rain, which helps you focus on the road. You sit in a better position because the bodywork supports your posture. Your hands and arms do not get tired as fast, even when you use the brakes often.
Here is a table that shows how supermoto fairings impact handling and comfort:
| Feature | Handling Benefit | Comfort Benefit |
|---|---|---|
| Aerodynamic design | Easier steering | Less wind on rider |
| Stable mounting | Better balance with brakes | Reduced vibration |
| Windshield | Smoother cornering | Protection from weather |
Tip: Test your brakes after installing new fairings. You want to make sure they respond well and feel smooth.
You also notice that your brakes stay cleaner because the fairings block dirt and water. Clean brakes last longer and work better. You spend less time on maintenance and more time riding. The fairings help you ride with confidence, knowing your brakes and bodywork work together.
When you ride with supermoto fairings, you enjoy a safer and more comfortable experience. You control your Honda XR650R with ease, and your brakes help you stop quickly when you need to. You feel proud of your bike’s new look and improved performance.
Troubleshooting and Maintenance for Installed Bodywork
Common Installation Issues and Solutions
You might face some problems after installing your Honda XR650R supermoto bodywork. Sometimes, the panels do not line up or feel loose. If you see gaps, check if you missed a fastener or used the wrong size. Tighten all screws and bolts, but do not overtighten. If the bodywork rattles, add rubber washers or use zip ties for extra support. When you notice that the bodywork touches moving parts, adjust the position or trim the edge with a file.
Tip: Take a short ride and listen for any strange noises. Stop and check the bodywork if you hear rattling or rubbing.
Adjustments and Fine-Tuning for Fitment
You want your bodywork to fit perfectly. Start by checking each mounting point. If a panel sits uneven, loosen the fasteners and shift the bodywork until it lines up. Sometimes, you need to make small cuts or sand the edges for a better fit. Use a marker to note where you need to adjust. After each change, test the fit again. Repeat this process until every panel sits flush and secure.
Here is a quick checklist for fine-tuning:
- Check all mounting points for tightness.
- Look for gaps or uneven edges.
- Adjust or trim as needed.
- Test the fit after each change.
Maintenance Tips for Honda XR650R Supermoto Fairings
Keep your bodywork clean to help it last longer. Wash it with mild soap and water. Dry it with a soft cloth to avoid scratches. Check the fasteners every month to make sure they stay tight. If you ride off-road, inspect the bodywork for cracks or damage after each trip. Replace any broken parts right away. Store your bike in a garage or cover it to protect the bodywork from sun and rain.
Note: Clean and inspect your bodywork often. This helps you spot problems early and keeps your Honda XR650R looking great.
You have learned how to install supermoto fairings on your Honda XR650R. These steps help you improve your bike’s look and performance.
- Check your tools and workspace before you start.
- Test fit each fairing and make adjustments for a secure fit.
- Inspect your bodywork often to keep it in top shape.
Enjoy your upgraded Honda XR650R. You will notice better comfort and style every time you ride.
FAQ
How long does it take to install Honda XR650R supermoto fairings?
You can finish the installation in about two to three hours. If you prepare your tools and workspace before you start, you save time. Test fitting and drilling may take extra time if you need adjustments.
Do I need special skills to install supermoto fairings?
You do not need advanced skills. You follow the instructions and use basic hand tools. If you read the guide and take your time, you can complete the job safely.
Will the fairings fit with aftermarket parts?
Most supermoto fairings fit with popular aftermarket parts. You should check the mounting points and test fit before drilling. Some parts may need small adjustments or trimming for a perfect fit.
Tip: Always test fit your fairings with any accessories before final installation.
How do I keep my fairings looking new?
Wash your fairings with mild soap and water. Dry them with a soft cloth. Check fasteners every month. Store your bike in a garage or use a cover to protect the bodywork from sun and rain.
| Maintenance Step | How Often | Benefit |
|---|---|---|
| Wash fairings | Weekly | Prevents dirt |
| Check fasteners | Monthly | Stops rattling |
| Inspect for damage | After rides | Avoids cracks |
See Also
Complete Instructions For Installing Honda CBR500R Fairings
Best Aftermarket Fairings For ZX6R Thoroughly Evaluated
Comprehensive Analysis Of Kawasaki Ninja 650 Fairing Performance
