Finishing Touches That Complete Your Motorcycle Customization

You know that the final touches make your custom motorcycle truly stand out. These small details in motorcycle customization do more than just look good—they help you ride safer and feel more comfortable. When you customize motorcycle controls or add new panels, you boost both your confidence and satisfaction. Good finishing touches, like easy-to-read gauges or better grips, can improve your reaction time and help you focus on the road. Every choice you make, from paint to seat shape, lets you customize motorcycle to match your style and make your custom motorcycle one of a kind.
Setting Goals for Your Custom Motorcycle
Identifying Your Customization Style
When you start planning your custom motorcycle project, you want your ride to stand out. Think about what makes you excited about motorcycle customization. Do you love the look of a classic cafe racer, or do you want something bold and modern? Many riders choose a custom build to show off their personality. Popular styles include scramblers, bobbers, and even electric motorcycles with sleek designs. You can mix retro and modern touches or go for a unique paint job. Customization lets you express yourself, so pick a style that feels right for you.
Tip: Look at motorcycle events and online communities for inspiration. You might find a style that matches your vision.
Planning Your Custom Build Budget and Timeline
Planning your custom motorcycle project means thinking about money and time. Set a budget before you start. This helps you avoid surprises and keeps your custom build on track. Many riders focus on upgrades like paint, seats, or performance parts. Make a list of what you want to change. Decide which parts matter most. Some people start with small changes and add more over time. If you want your motorcycle customization to last, choose quality parts and plan for future maintenance. Remember, building a custom motorcycle is a journey, not a race.
- Make a budget and stick to it
- List your must-have upgrades
- Plan for maintenance and support
Balancing Aesthetics, Comfort, and Function
You want your custom build to look great, but it should also feel good to ride. When planning your custom motorcycle project, think about how you use your motorcycle. Some riders focus on aesthetics, adding custom paint or stylish seats. Others care more about comfort, changing handlebars or seats for a better fit. Performance upgrades, like new brakes or suspension, can make your ride safer and smoother. Try to balance these choices. A good custom build combines style, comfort, and function. Always use quality parts and check that everything fits well. This way, your motorcycle customization will look amazing and ride even better.
Customize Motorcycle with Fairings
Types of Fairings and Their Impact
When you start motorcycle customization, fairings can change the way your bike looks and feels. You have several types to choose from, and each one brings its own benefits:
- Full fairings cover the whole front and lower part of your motorcycle. They give you the best wind and weather protection. You get higher speeds, better fuel efficiency, and less noise. Full fairings also keep your electronics safe.
- Half fairings only cover part of your bike. You still get some wind protection, but not as much as full fairings. You might want extra gear for cold or wet rides.
- Handlebar fairings protect your hands from wind and rain. They help with aerodynamics and make long rides easier on your shoulders and wrists.
- Wheel fairings cover the wheels and nearby parts. They cut down on drag, boost fuel efficiency, and keep your brake lines safe from dirt.
Fairings do more than just look cool. They help your motorcycle stay stable at high speeds by cutting through the air. They also protect important parts from damage and make your ride more comfortable.
Choosing Materials for Custom Fairings
You have lots of choices when it comes to materials for your fairings. Each one affects your modifications in a different way:
- Fiberglass, carbon fiber, and ABS plastic are all lightweight. They make your bike easier to handle and help with speed and braking.
- ABS plastic, especially when made with injection molding, fits your bike perfectly and lasts a long time.
- Hard plastic, fiberglass, and aluminum are tough. They protect your motorcycle from bumps and crashes.
- Aluminum gives extra strength if you want more protection.
These materials help you reduce weight, improve aerodynamics, and keep your modifications looking sharp. You can also customize the fit and design to match your style.
Matching Fairings to Your Riding Style
Not every fairing works for every rider. You want to pick the right one for your needs. Here’s a quick guide:
| Fairing Style | Features & Benefits | Suitable Riding Styles |
|---|---|---|
| Full Fairings | Cover whole front and lower bike; best aerodynamics; top weather protection | Sport, Racing, Touring |
| Half Fairings | Cover handlebars to engine; balance wind protection and easy handling | Commuting, Sport-Touring |
| Quarter Fairings | Small, light; just around the headlight; sleek look | Urban riding, Café Racers |
| Belly Pan Fairings | Under the engine; better airflow and cooling; no rider protection | Racing, Performance mods |
| Touring Full Fairings | Strong, adjustable; storage; less wind fatigue; made for long trips | Long-distance Touring |
If you love long rides, you might want touring full fairings for comfort and storage. If you race or ride fast, full or belly pan fairings help with speed and stability. For city rides, quarter fairings keep things light and stylish. Think about your riding habits before you make modifications. The right fairings make your motorcycle customization stand out and fit your lifestyle.
Custom Motorcycle Paint and Graphics
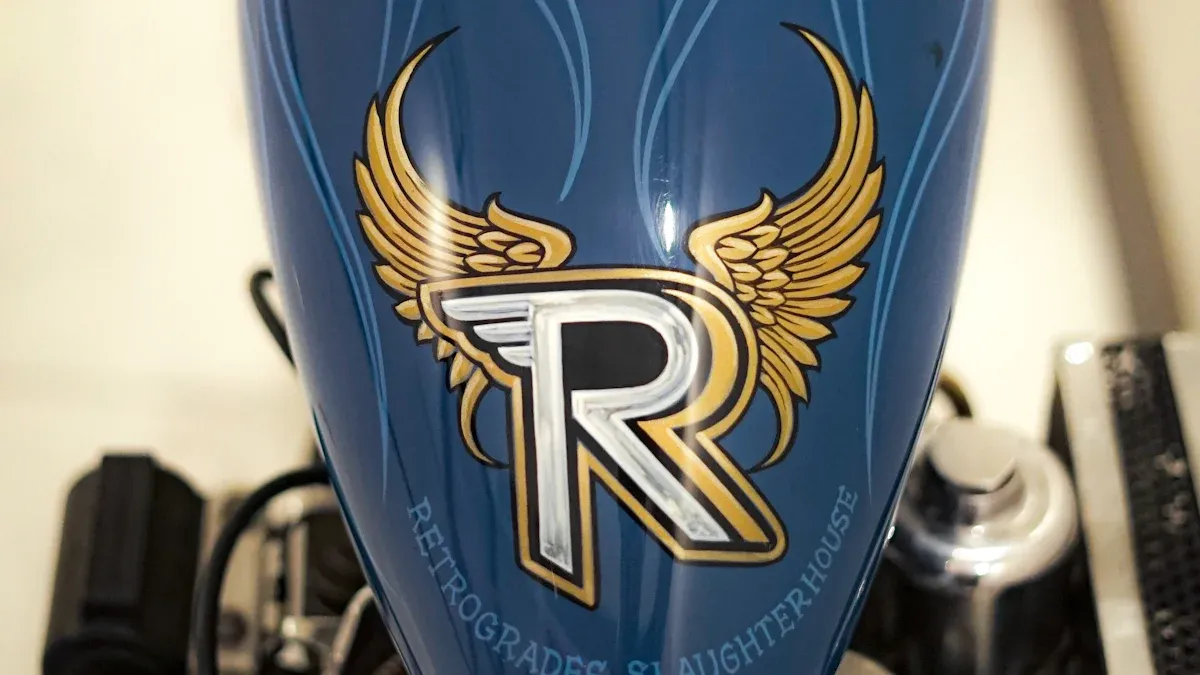
Selecting Paint and Finishes
Choosing the right paint and bodywork can make your motorcycle stand out in any crowd. You have many options for finishes. Some riders love airbrushed flames with bold colors like teal green. Others go for metalflake or candy finishes that sparkle in the sun, inspired by the cool bikes from the 1960s and 1970s. Shops like French Kiss Kustoms and DuSold DeSigns treat custom paint as an art form, using glittery flakes and retro styles. You can also pick powder coating, ceramic coating, or high temperature coatings for a tough, long-lasting finish. These finishes protect your motorcycle and keep it looking sharp for years. Custom airbrush graphics, flames, and even Harley-Davidson’s CVO colors are popular choices. You can match aftermarket parts to your theme, making your motorcycle customization truly unique.
Tip: Think about how you want your bike to look in the sunlight. Some finishes shine bright, while others give a cool, matte look.
Applying Decals, Wraps, and Pinstriping
You can add even more personality to your motorcycle with decals, wraps, or pinstriping. Each method has its own pros and cons. Vinyl wraps protect your original paint from the sun and scratches. They come in endless colors and designs, and you can remove them without damage. Wraps install quickly, but you need skill to avoid bubbles and rough edges. Decals and pinstriping add sharp lines or cool graphics. They work well for small details or bold statements. Paint jobs last longer and look flawless, but they take more time and cost more. Here’s a quick look at your options:
| Customization Method | Pros | Cons |
|---|---|---|
| Vinyl Wraps | Many colors and designs, protects paint, quick to install, easy to remove | Can peel, needs skill, moisture can cause damage |
| Paint Jobs | Glossy, durable, boosts value, perfect finish | Takes longer, costs more, mistakes are hard to fix |
| Decals/Pinstriping | Easy to apply, great for details | Not as durable, can fade or peel |
Note: If you want to change your look often, wraps and decals are a smart choice. For a lasting finish, paint jobs work best.
DIY vs. Professional Paint for Motorcycle Customization
You might wonder if you should paint your motorcycle yourself or hire a pro. DIY paint jobs cost less because you skip labor charges. You get to learn new skills and control every step. But you need the right tools and lots of patience. Mistakes can happen, and fixing them adds to your cost. Professional painters use special equipment and have years of experience. They deliver a flawless finish and save you time. You pay more, but you get peace of mind. Here’s a quick comparison:
| Aspect | DIY Motorcycle Paint Jobs | Professional Motorcycle Paint Jobs |
|---|---|---|
| Cost | Lower, but tools and mistakes add up | Higher, includes labor and expertise |
| Quality | Depends on your skill, can have flaws | High-quality, smooth, and durable |
| Time | Takes longer, lots of learning | Faster, done by experts |
| Risk | More mistakes possible | Fewer errors, reliable results |
| Satisfaction | High if you enjoy hands-on work | High if you want a perfect finish |
If you love working on your motorcycle and want to learn, try a DIY project. If you want a show-stopping look with no stress, go with a pro.
Lighting Upgrades for Motorcycle Customization
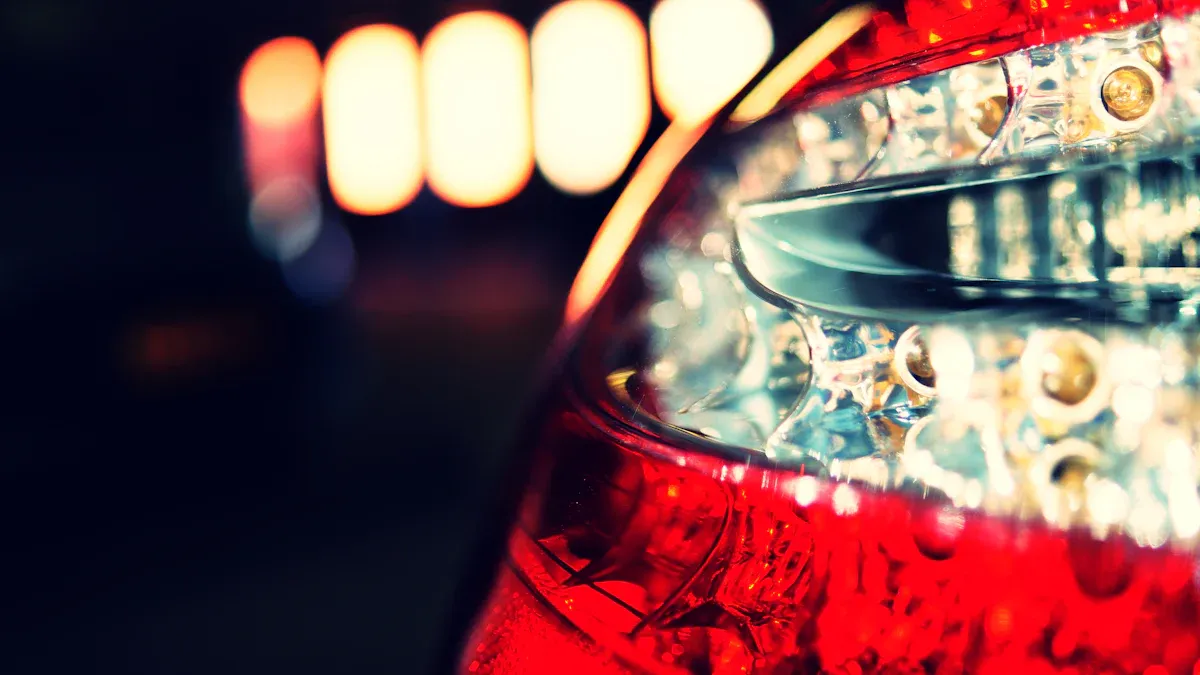
LED Headlights and Taillights
Upgrading your motorcycle with LED headlights and taillights gives you a big boost in safety and style. You get brighter, higher-quality light that helps you see the road better at night. Other drivers spot you more easily, which lowers your risk of accidents. LED lights use less energy than old halogen bulbs, so your battery lasts longer. They also last for tens of thousands of hours, so you do not have to worry about changing bulbs often. Adaptive LED headlights even move with your turns, lighting up corners and making night rides safer. LEDs handle bumps and vibrations well, which is perfect for motorcycle modifications. You can find sealed beam options that give you a sharp, steady beam every time you ride.
- Brighter light for better visibility
- Lower power use and longer lifespan
- Quick response for brake lights
- Tough against shocks and vibration
Accent and Underglow Lighting Options
You can take your motorcycle customization to the next level with accent and underglow lighting. Most riders pick LED kits because they shine bright and use little power. Many kits let you control colors and patterns with your phone. You can pick from over 28 themes or make your own. Some lights even sync with your music or change color when you hit the brakes. Flexible LED strips and small pods fit almost anywhere, so you can get creative with your modifications. Top brands like Custom Dynamics and Ciro offer kits that are easy to install and look great. These lighting upgrades help your motorcycle stand out, day or night.
Tip: Look for low-profile lights that blend in during the day but pop at night.
Ensuring Legal Compliance with Lighting
Before you finish your lighting modifications, check the rules in your area. In the US, your motorcycle lights must meet Federal Motor Vehicle Safety Standards. Headlights need to shine white and have a DOT mark on the lens. In the EU, look for ECE marks and make sure your turn signals are amber. Using the wrong lights can lead to tickets, fines, or even bigger problems if you get in an accident. Always pick lighting kits that meet these standards. This keeps your motorcycle customization safe and legal.
| Region | Main Lighting Rules | Compliance Mark | Notes |
|---|---|---|---|
| US | White headlights, DOT standards | DOT | Federal law overrides state rules |
| EU | ECE certified, amber signals | ECE | Special wiring and design needed |
Custom Seats and Upholstery for Your Motorcycle
Choosing Seat Shapes and Materials
Picking the right seat shape and material can change your whole riding experience. You want a seat that fits your body and matches your style. Here are some popular choices:
- Solo seats work great for long rides if you ride alone. They give you more comfort and support.
- Two-up seats let you bring a passenger, but they might feel less comfy for the rider.
- Leather seats look premium and last a long time if you care for them. They breathe well and mold to your shape.
- Vinyl seats cost less and handle rain better. They are easy to clean but may not feel as soft as leather.
- Marine-grade materials fight mildew and stand up to harsh weather. They work well if you ride in wet places.
For the inside, you have choices too. Memory foam molds to your body and helps on long trips. Some seats use a mix of open-cell and closed-cell foam for the best comfort and support. Gel pads can also help by taking pressure off your tailbone and soaking up bumps. If you want your motorcycle customization to last, pick a steel seat pan instead of plastic. Steel gives better support and holds up over time.
Comfort Versus Style in Custom Builds
You might want a seat that looks cool, but comfort matters too. A stylish seat can catch eyes at a show, but it might not feel good after an hour on the road. Think about how you use your motorcycle. If you ride far, you need good padding and maybe a backrest for your lower back. More padding does not always mean more comfort. The shape, height, and firmness of the seat make a big difference. Suspension seats can help smooth out rough roads. When you plan your customization, try to balance looks with how the seat feels. You want your motorcycle customization to turn heads and keep you happy on every ride.
Tip: Test different seats before you buy. What feels good in the shop might feel different after a long ride.
Installation Tips for Custom Seats
Installing a custom seat can be simple if you follow a few steps. First, check that the seat fits your motorcycle model. Some seats need special brackets or hardware. Use the right tools and take your time. If your seat has a steel pan, it will be heavier but stronger. Make sure all bolts are tight and nothing moves when you sit down. If you add gel pads or extra foam, keep the seat height in mind so you can still reach the ground. After you finish, take a short ride to test the fit. Adjust as needed for the best comfort and style. Good installation makes your customization safe and keeps your motorcycle looking sharp.
Upgrading Grips, Levers, and Controls on Your Motorcycle
Selecting Hand Grips and Levers
When you start your motorcycle customization, swapping out hand grips and levers is a quick way to boost comfort and style. You have lots of choices for aftermarket grips and levers. Some of the most popular options include:
- Heated grips for Harley models, perfect for chilly rides
- Custom Harley grips and chopper grips for a unique look
- Chrome levers and hand controls that shine on choppers, bobbers, and baggers
- Internal throttles and clutches, which many riders say feel smooth and precise
- Special levers for brands like Honda Fury, Big Dog, and Victory
These motorcycle customization parts not only look great but also help you control your ride better. You can pick grips that fit your hands and levers that match your riding style.
Custom Foot Pegs and Pedals
Foot pegs and pedals might seem small, but they make a big difference in how your motorcycle feels. Custom foot pegs let you adjust the height and angle, so you stay comfortable and stable, even on long trips. Many pegs have extra grip, which helps keep your feet in place. Adjustable brake pedals and gear levers let you fine-tune the fit for your shoe size and riding style. Some pedals even have extensions and non-slip surfaces for safer braking. Most of these motorcycle customization parts use strong, high-quality materials, so they last a long time. You can also find universal controls that fit many bikes, giving you more options for your customization.
Tip: Try different peg and pedal setups to see what feels best for your feet and riding position.
Ergonomics and Control Placement
Getting the right fit for your controls is key to a comfortable ride. You want your wrists, elbows, and shoulders to stay relaxed. Place your handlebars so your arms have a slight bend and your wrists stay flat. Make sure your knees bend a little and your feet reach the pegs without stretching. The seat height should let you reach both foot and hand controls easily. Many riders follow the "triangle of comfort"—hands on the grips, hips on the seat, and feet on the pedals. This setup helps you stay balanced and reduces fatigue. You can use handlebar risers or custom seats to fine-tune your fit. Always check local rules about handlebar height before you finish your motorcycle customization.
| Control Placement Tips | Why It Matters |
|---|---|
| Keep wrists flat | Reduces strain |
| Slight bend in arms | Improves control |
| Knees slightly bent | Boosts comfort |
| Triangle of comfort | Best balance |
With the right grips, levers, and controls, your motorcycle customization will feel just right—safe, stylish, and built for you.
Mirrors and Visibility in Motorcycle Customization
Stylish and Functional Mirror Choices
When you start your motorcycle customization, picking the right mirrors can change both the look and safety of your ride. You have many choices today. Some of the latest trends include:
- Adjustable mirrors that let you set the perfect angle
- Convex and aspherical mirrors for a wider view behind you
- Foldable mirrors that protect themselves if you bump into something
- LED-integrated mirrors that light up for better visibility
- Vintage-style mirrors for a classic look
You can also find mirrors with special features like Blind Spot Detection or built-in Tire Pressure Monitoring. Many riders choose carbon fiber backs for strength and style. Some mirrors have anti-fog or anti-rain coatings, so you always see clearly. You get to pick the color, finish, and shape to match your customization style. Remember to adjust your mirrors before every ride for the best view.
Enhancing Rear Visibility
Good rear visibility keeps you safe on the road. You can upgrade your motorcycle with LED tail lights and turn signals. These lights shine brighter and react faster than old bulbs. Some riders use special modules that combine running lights, brake lights, and turn signals into one system. This makes your intentions clear to everyone behind you.
You can also try advanced systems like the P3 rear visibility lighting. This system flashes your brake light when you slow down, even if you do not touch the brakes. It helps drivers notice you during engine braking or downshifting. When you add new lights, check your wiring and make sure everything fits your motorcycle. Some bikes make it easy to add new tech, while others need extra care.
Tip: Test your lights and mirrors after every customization. Make sure you see clearly and others see you.
Meeting Legal Requirements for Mirrors
You want your motorcycle to look great, but you also need to follow the law. In Texas and many other places, you must have at least one mirror that gives a clear view behind you. If something blocks your rear view, you need two mirrors—one on each side. These rules help keep you and others safe. Your mirrors must be in good shape and mounted securely. If you change your motorcycle’s design, check that your mirrors still meet local laws. Following these rules means you can enjoy your customization without worry.
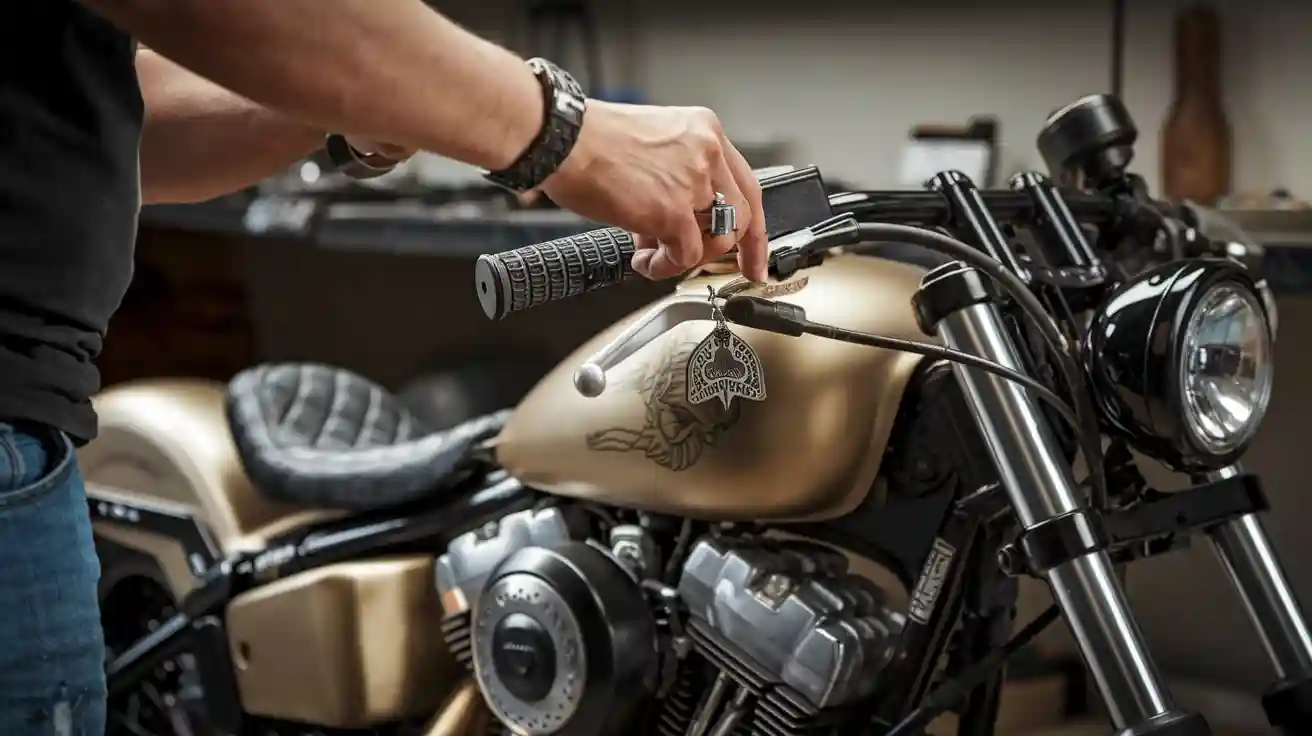
Custom Accents and Accessories for Your Custom Build
Badges, Emblems, and Trim
You can make your custom build stand out with unique badges, emblems, and trim. These small details show off your style and make your motorcycle different from the rest. Some riders choose classic logos, while others design their own emblems. Chrome trim or blacked-out pieces can change the whole look of your bike. You might even add colored accents to match your fairings or paint. Dressing up your ride with these touches gives it a finished, personal feel. When you pick the right trim, you boost both the aesthetics and the value of your custom motorcycle.
Tank Pads and Frame Sliders
Tank pads and frame sliders do more than just look good. They protect your motorcycle and help you ride better. Here’s how they help your custom build:
- Tank pads improve the motorcycle's appearance while protecting the tank from scratches and wear.
- They also enhance rider grip and control, contributing to better handling.
- Frame sliders protect critical parts like the engine and frame during falls or slides, helping to avoid expensive repairs.
- Both accessories combine aesthetic enhancement with practical protection, making them valuable upgrades in motorcycle customization.
You get both style and safety with these motorcycle customization parts. They fit right in with your fairings and other upgrades, making your custom build ready for anything.
Personalized Touches for Your Motorcycle
You can take your custom build to the next level with personalized touches. Many riders use cosmetic customization to show off their creativity. Check out some popular ideas in the table below:
| Personalized Touch | Description |
|---|---|
| Custom Paint Jobs | Use of bold colors, matte finishes, pinstripes, or wild graphics to make the bike's appearance unique. |
| Personalized Decals & Graphics | Adding personal logos, racing numbers, or artistic signatures as decals to make the bike instantly recognizable. |
| Lighting Upgrades | Incorporation of LEDs, custom turn signals, ground lighting effects to enhance safety and style. |
| Custom Seats & Accents | Custom seat covers with materials like diamond-stitched leather or airflow mesh, tailored to comfort and style. |
| Tank Grips | Custom-made grips possibly featuring personal designs or added padding for comfort and protection. |
| CNC Machined Accessories | Precisely machined parts such as brake levers, footpegs, or frame braces with personalized designs. |
| Custom Grips & Footpegs | Grips and footpegs made from various materials and patterns, including non-slip or artistic styles. |
| Billet Aluminum Parts | Durable, lightweight parts like engine covers or gas caps carved from billet aluminum for sophistication. |
| Patina Accents (Vintaging) | Techniques to artificially age paint and metal for a vintage, weathered look with clear protective coating. |
| Custom Engine & Drivetrain Parts | Custom exhausts, titanium valves, sprockets, and springs tailored for performance and uniqueness. |
You can mix and match these ideas to create a custom motorcycle that fits your vision. Every detail, from fairings to trim, adds to the story of your custom build. When you focus on both protection and style, your motorcycle customization becomes something truly special.
Selecting Quality Parts and Ensuring Fitment in Motorcycle Customization
Sourcing Reliable Aftermarket Parts
When you start your motorcycle customization, picking the right parts matters a lot. Not all aftermarket parts are the same. You want to make sure you get quality and reliability. Here’s what you should look for:
- Check the supplier’s reputation by reading reviews and looking for industry awards.
- Compare prices, but remember that the cheapest option might not last.
- Ask about after-sales support and warranty. Good suppliers stand behind their products.
- Look for parts made from strong materials like aluminum or high-grade steel.
- Request proof of quality, such as material testing or certifications.
- See if the supplier offers bulk discounts or has a good return policy.
- Ask other riders or your mechanic for recommendations.
You want your motorcycle modifications to last, so always choose suppliers who care about quality and customer service.
Checking Compatibility and Fit
Not every part will fit your motorcycle perfectly. Aftermarket parts can sometimes be tricky. Unlike original parts, they might not line up just right. This can make installation hard and leave you guessing if things will work. Always check if the part matches your motorcycle’s make, model, and year. Read product reviews and fitment guides. If you are not sure, ask an expert or your local shop. Some parts can even void your warranty, so double-check before you buy. Taking these steps helps you avoid problems and keeps your customization smooth.
Avoiding Common Installation Mistakes
You want your modifications to look good and work well. Many riders make the same mistakes during customization. Here are some to watch out for:
- Buying parts without checking if they fit your motorcycle.
- Adding heavy parts that mess up the bike’s balance.
- Trying tough modifications without the right skills.
- Skipping regular maintenance after installing new parts.
- Picking looks over comfort or performance.
- Not setting a clear budget for your project.
- Making wiring mistakes, like poor grounding or messy cable routing.
Tip: Take your time, follow instructions, and ask for help if you need it. Good planning and careful work make your motorcycle customization safer and more fun.
Safety and Legal Compliance in Custom Motorcycle Builds
Meeting Local and State Regulations
You want your motorcycle customization to look awesome, but you also need to follow the rules. Every state has its own laws about what you can change on your motorcycle. Some places have strict rules about exhaust noise, lighting colors, or even how high your handlebars can go. If you skip these steps, you might get a ticket or have to undo your customization. Always check your local DMV website or talk to other riders in your area. They can help you understand what’s legal for your custom build.
Tip: Keep a copy of your state’s motorcycle laws handy. It makes it easier to double-check your customization plans.
Maintaining Structural Integrity
When you work on motorcycle customization, you want your ride to stay safe and strong. Changing parts like the frame, suspension, or wheels can affect how your motorcycle handles. If you cut or weld the frame, you could weaken it. Always use quality parts and follow the manufacturer’s instructions. If you’re not sure, ask a pro to check your work. A strong motorcycle means you can enjoy your customization without worry.
Here’s a quick checklist for structural safety:
- Use only trusted parts for your custom build.
- Never cut or drill the frame unless you know what you’re doing.
- Check that all bolts and fasteners are tight.
- Test your motorcycle at low speeds after big changes.
Inspecting Your Motorcycle After Customization
After you finish your motorcycle customization, take time to inspect everything. Look for loose bolts, leaking fluids, or wires that might touch hot parts. Test your brakes, lights, and signals. Make sure your mirrors give you a clear view. If you added new lighting or controls, check that they work as planned. A good inspection keeps you safe and helps your customization last longer.
| Inspection Area | What to Check |
|---|---|
| Brakes | Firm feel, no leaks |
| Lights | All work, right colors |
| Fasteners | Tight, nothing loose |
| Wiring | No frayed or pinched wires |
| Mirrors | Clear view behind you |
Remember: A safe motorcycle lets you enjoy your custom build every time you ride.
Applying Finishing Touches: DIY or Professional Custom Build?
When to Customize Motorcycle Yourself
You might want to customize motorcycle parts on your own if you enjoy hands-on work. Simple upgrades like changing grips, adding decals, or swapping out mirrors can be fun and rewarding. You save money and learn new skills. Many riders start with small projects before moving on to bigger ones. If you have the right tools and patience, you can handle many finishing touches at home. Watching online tutorials helps a lot. You get to see your vision come to life with each step.
Tip: Start with easy tasks. Try changing your seat or adding new lights before you tackle bigger jobs.
When to Hire a Professional for Motorcycle Customization
Some jobs need special skills or tools. If you want a custom paint job, frame work, or electrical upgrades, you should hire a pro. Professionals know how to avoid mistakes that could hurt your motorcycle or make it unsafe. They also finish the work faster and often give you a warranty. If you want your custom build to look perfect, a shop can help. You get peace of mind knowing your motorcycle customization meets safety rules.
| DIY Projects | Professional Projects |
|---|---|
| Grips, mirrors, decals | Paint, welding, wiring |
| Seats, lights, small parts | Engine mods, frame changes |
Tips for a Smooth Custom Build Process
You want your custom build to go well from start to finish. Here are some tips:
- Make a plan before you start building a custom motorcycle.
- Set a budget and stick to it.
- Gather all your parts and tools first.
- Take photos as you work. This helps if you need to put things back together.
- Ask for help if you get stuck. Online forums and local shops are great resources.
- Test your motorcycle after each change to make sure everything works.
Remember: Good planning and patience make any customization project easier and more fun.
Finishing touches make your custom motorcycle shine and feel just right. You get to show off your style and boost how your motorcycle performs. Don’t be afraid to try new ideas or add special details. When you work on your custom motorcycle, always check for safety and follow the rules. Your motorcycle should look great and keep you safe every ride.
Remember: Quality parts and smart choices help your motorcycle stand out and last longer.
FAQ
What finishing touches make the biggest difference on my custom motorcycle?
You can start with custom paint, new grips, and upgraded lighting. These changes stand out right away. Small details like badges or seat stitching also help your bike look unique. Try a few and see what feels right for you.
Can I install custom parts myself, or should I hire a pro?
You can handle simple upgrades like grips, mirrors, or decals at home. For paint, wiring, or frame work, you should ask a pro. If you ever feel unsure, get help to keep your ride safe.
How do I know if a part will fit my motorcycle?
Always check the part’s description for your bike’s make, model, and year. Read reviews and ask the seller if you have questions. You can also talk to other riders or visit a local shop for advice.
Are custom lighting and fairings legal everywhere?
Not always. Some states have rules about light colors and fairing shapes. You should check your local laws before you buy or install anything. This helps you avoid tickets and keeps your motorcycle street-legal.
See Also
Top Motorcycle Fairing Mods Every Rider Should Explore
Key Advice To Create The Motorcycle Of Your Dreams
Reasons Custom Fairings Are A Bikegirl’s Perfect Choice
Nicefairings Offers Custom Fairings For Distinctive Bike Styles
