SV650 Fairing Installation Possibilities and Challenges

Can you put fairings on a sv650? Yes, you can put fairings on a sv650, but you need to check your motorcycle model first. Every motorcycle is different, so not every fairing will fit the same way. When you look for motorcycle fairings, you should think about the year and style of your bike. Suzuki sv650 fairing options include many shapes and sizes. Motorcycle fairings can help protect your motorcycle and give it a new look. Some fairings may need extra work or special tools.
- Tip: Always check if the fairing matches your motorcycle before you buy.
Can You Put Fairings on a SV650?
Overview of Fairing Installation Feasibility
Can you put fairings on a sv650? Yes, you can. Many riders choose to add motorcycle fairings to their Suzuki SV650 for better wind protection, a sportier look, or to shield the motorcycle from road debris. You have several options when it comes to motorcycle fairings. Some riders want a full fairing that covers most of the motorcycle, while others prefer a half or bikini fairing for a lighter feel.
You should know that not every Suzuki SV650 fairing will fit every model. The most compatible years for aftermarket and OEM fairings are 2003 to 2009. During these years, Suzuki made the SV650 S model with a half-fairing and the SV650SF with a full fairing. Manufacturers design most motorcycle fairings for these models. If your motorcycle is from another year, you may have trouble finding a fairing that fits without extra work.
Tip: Always check your motorcycle’s model year before buying a fairing. This step helps you avoid costly mistakes and ensures a smoother installation.
You can install fairings on your SV650, but you may need to make some changes. Many motorcycle fairings do not have a standard hole pattern. You might need to drill or trim parts of the fairing or windshield. Use a special drill bit for acrylic to avoid cracks. Drill slowly and keep the drill straight. Sometimes, you will need to sand, prime, or paint the bodywork after fitting the fairing. Some fairings also lack tabs for mounting the headlight, so you may have to create your own mounting solution.
Key Factors Affecting Installation
When you ask, "Can you put fairings on a sv650?" you need to think about several key factors. These factors help you decide if you can install motorcycle fairings easily or if you will face challenges.
-
Model Year and Version:
The 2003-2009 Suzuki SV650 models are the easiest for fairing installation. These motorcycles have more fairing options, and manufacturers make parts that fit them well. If you own a different year, you may need to look for custom motorcycle fairings or prepare for extra work. -
Type of Fairing:
You can choose from full fairings, half fairings, or bikini fairings. Full fairings cover most of the motorcycle and offer the best wind protection. Half fairings and bikini fairings are lighter and easier to install but provide less coverage. -
Mounting Points and Hardware:
Some motorcycles do not have the right mounting points for certain fairings. You may need to buy extra brackets or hardware. Sometimes, you must make your own mounting points, especially if you use non-OEM motorcycle fairings. -
Custom Fitting and Tools:
Many motorcycle fairings require custom fitting. You might need to drill holes, trim edges, or sand surfaces. Use the right tools, such as acrylic drill bits, to avoid damaging the fairing. Take your time and check your work often. -
Electrical and Headlight Fitment:
Some fairings do not have built-in tabs for headlights. You may need to create a custom solution to mount your headlight. Check the wiring and make sure everything fits before you finish the installation.
Note: Installing motorcycle fairings on your SV650 can take time and patience. You may need to finish the bodywork with sanding, priming, or painting to get a clean look.
You can put fairings on a sv650, but you must plan ahead. Check your motorcycle’s model year, choose the right type of fairing, and gather the tools you need. If you follow these steps, you can enjoy a new look and better protection for your Suzuki SV650.
Types of Suzuki SV650 Fairing Options
OEM Motorcycle Fairings
You can choose OEM motorcycle fairings if you want the best fit for your Suzuki SV650. These fairings come from the original manufacturer. They match your motorcycle’s design and color. OEM fitment means you get parts that line up with your bike’s mounting points. You do not need to make big changes or use extra brackets. Many riders like OEM motorcycle fairings because they offer improved aerodynamics and keep the classic look of the motorcycle. You also get good durability since these fairings use high-quality materials. If you want a simple installation and a factory look, OEM motorcycle fairings are a strong choice.
Tip: OEM fitment helps you avoid problems with mounting and alignment.
Aftermarket Fairings for SV650
Aftermarket fairings give you more choices for your Suzuki SV650 fairing. You can pick from many styles, colors, and shapes. Some aftermarket fairings look sporty, while others have a retro feel. Popular brands include YOSHIMURA, MORIWAKI, K-FACTORY, DAYTONA, SP TAKEGAWA, KITACO, PMC, DOREMI COLLECTION, WM, GOODS, Puig, World Walk, and Factory Reika. Many riders like Puig and World Walk for their bikini cowls and retro motorcycle fairings. Users say these brands offer good wind protection and style. Some people mention small problems, like tricky installation or finish quality, especially with Factory Reika side covers. Most aftermarket fairings get positive reviews for their looks and performance. You can find a kit that fits your needs, but you may need to adjust the fairings or use extra hardware.
- Benefits of aftermarket fairings:
- More style options
- Lower cost than OEM
- Good durability with some brands
Full Fairing Kits
Full fairing kits cover most of your motorcycle. These kits give you the best wind protection and a sportier look. When you install a full fairing kit, you need to check that it matches your Suzuki SV650 fairing model. You will need tools like an electric drill and the kit’s toolset. The installation steps include:
1. Check that the fairing kit fits your motorcycle. 2. Gather all tools and parts. 3. Mount the tail section fairing behind the seat and drill holes as needed. 4. Fix the front fender over the wheel, using the bike’s holes. 5. Place the tank cover and align the corners. 6. Position the front fairing around the headlight and use clips first. 7. Attach the lower fairing, marking and drilling holes for a good fit. 8. Install smaller motorcycle fairings like the rear hugger and swingarm covers. 9. Test-fit all parts before drilling to avoid mistakes. 10. If you are new to tools, ask for help or supervision.
Full fairing kits can take time to install, but they give your motorcycle a new look and better protection. Many riders like these kits for their durability and the way they change the style of the bike.
Half Fairings and Lower Fairings
When you look at motorcycle fairings for your Suzuki SV650, you will see many options. Half fairings and lower fairings are popular choices. These fairings change how your motorcycle feels and performs. You can use a kit to add these fairings to your bike. Many riders choose a kit because it comes with all the parts you need.
- Half fairings cover the upper front part of your motorcycle. They protect the headlights, handlebars, and instrument panel. This design improves aerodynamics by reducing drag and wind resistance.
- You get some wind protection with half fairings, but not as much as with full motorcycle fairings. You may feel more wind in cold or rainy weather. You can add a taller windscreen or wear insulated clothing for extra comfort.
- Lower fairings are part of a full fairing kit. They help your motorcycle cut through the air better. You will notice better fuel efficiency and less noise when you ride.
- Full fairings, which include lower fairings, give you the best protection from wind, debris, and weather. You will feel more comfortable, especially on long rides.
- Motorcycle fairings also reduce vibration and road noise. This makes your ride smoother and more enjoyable.
- Half fairings improve aerodynamics and reduce drag. They do not add much weight to your motorcycle. You will not get as much wind and weather protection as with a full kit.
- For your Suzuki SV650, half and lower fairings make your ride better. They help with comfort and performance. Full motorcycle fairings give you the most benefits.
Tip: If you want better comfort and protection, choose a full fairing kit. If you want a lighter feel, try half fairings.
Bikini Fairing Styles
Bikini fairing styles give your Suzuki SV650 a sporty look. This type of fairing is a half-fairing that you often see on the 'S' version of the motorcycle. You will notice lower handlebars and higher foot pegs. This setup creates a more aggressive riding position. Many riders in Europe and Canada liked this style first. It became so popular that it came to the USA.
You should pick a bikini fairing if you want a sportier ride. Racers and motorcycle fans use this style in lightweight twin racing classes. The aerodynamic shape helps you go faster and handle better. The 2003 SV650S model uses a bikini fairing. It feels different from the naked version. You sit in a more forward position, which helps on twisty roads and fast straightaways. The dual headlights and sharp lines make your motorcycle look ready for racing.
A bikini fairing kit works best for experienced riders who want a dynamic ride. You get better aerodynamics and a bold style. If you like spirited riding or want to race, this fairing style is a strong choice.
Fairings Compatibility by SV650 Model
Naked vs. S Models Compatibility
When you look at fairings for your Suzuki SV650, you need to know if you have the naked or S model. The SV650S comes with factory mounting points and special parts that support full fairings. You will find that the S model makes it much easier to add fairings because the motorcycle was designed for them. The naked SV650 does not have these mounting points. If you want to put fairings on a naked motorcycle, you must use the S model’s fairing parts and mounting hardware.
- The SV650S has fairings made just for it, and many suppliers offer these parts.
- No OEM fairings exist for the naked SV650, so you must look for aftermarket or custom fairings.
- To fit full fairings on a naked motorcycle, you need to get S model parts or use custom solutions.
- Most fairings you find online will say they fit the S model, not the naked version.
Tip: Always check your motorcycle’s model before you buy fairings. This step saves you time and money.
First, Second, and Third Generation Differences
You will see differences in fairings fitment across the three generations of the Suzuki SV650. The first generation (1999-2002) used mostly semi-faired designs with curved styling. These motorcycles had a simple look and were easy to work on. The second generation (2003-2014) brought fuel injection and looked better with full fairings, especially on the SV650S. In 2008, Suzuki released a full fairing version called the SV650SF in the US and SV650 Sport in the UK. The third generation (2009-2013) replaced the naked motorcycle with the SFV650 Gladius in the US, but the SV650S with semi-fairings stayed in the UK and Australia until 2012. Each generation changed the style and fitment of fairings, so always match your fairings to your motorcycle’s year and model.
What to Check Before Buying a Fairing
Before you buy a fairing for your motorcycle, check the mounting points and measurements. Manufacturers do not always give exact measurements, but most fairings are designed for direct fit with minimal effort. Some upper fairings do not have tabs for headlights or driving lights. You may need advice from the technical department to mount these parts. Modern fairings usually fit without much work, but older or custom fairings may need sanding, trimming, or drilling. For windshields, measure along the vertical centerline to make sure you get the right size. Always check the fitment and compatibility before you buy to avoid problems during installation.
Note: If you have questions about fitment, contact the supplier’s support team for help.
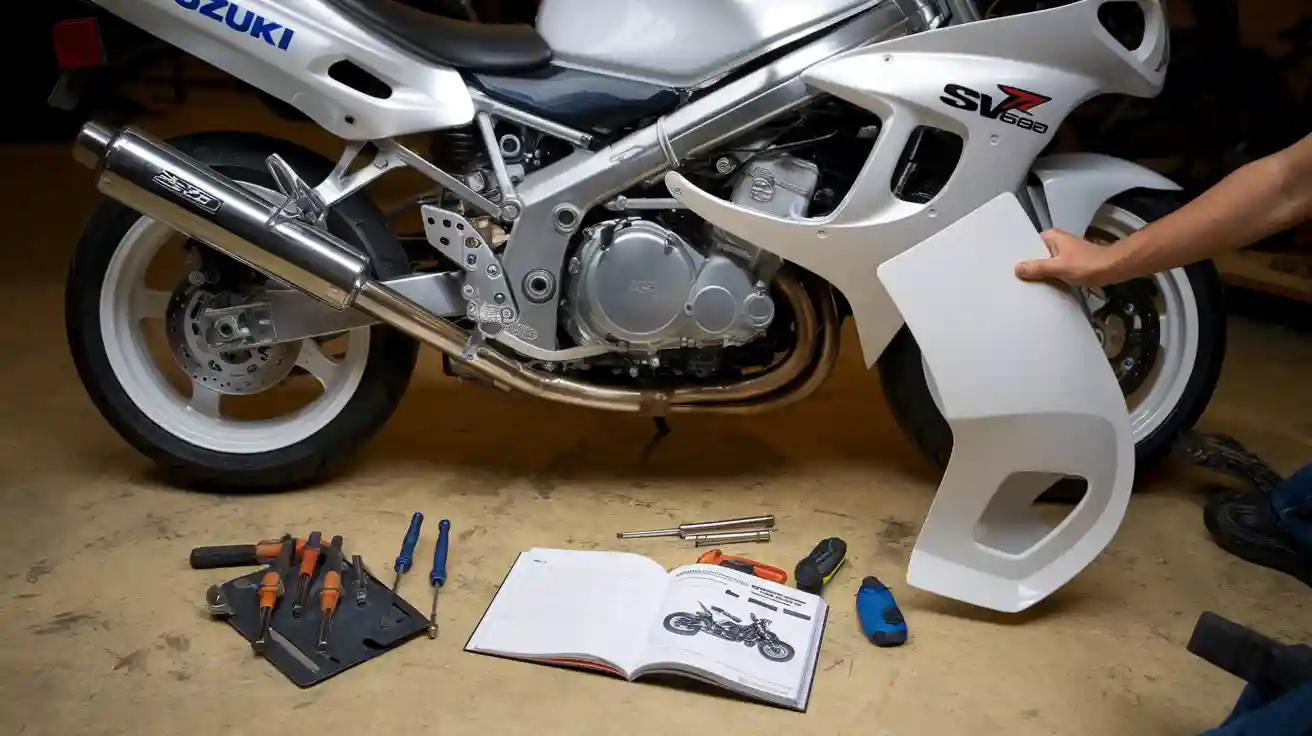
Fairing Installation Process for SV650

Required Tools and Materials
You need the right tools and materials to install fairings on your Suzuki SV650. This step makes the process smoother and helps you avoid mistakes. Many riders use aluminum sheetmetal with a thickness of 0.100 inches or aluminum strips for strong support. You may also need 3/4" aluminum angle iron for extra strength. For fasteners, gather 5mm cap head screws and nuts, at least six Dzus fasteners, and eight push-pin fasteners. Some people use a GSX-R1000 fairing stay and GSX-R1000 bodywork, such as Armour Bodies, for a better fit.
Here is a list of common tools you will use:
- Sheetmetal brake (an inexpensive type works well)
- Drill press
- Electric drill
- Hacksaw
- Tap
These tools help you cut, shape, and secure the fairings to your motorcycle. Always check that you have all the materials before you start the assembly.
Tip: Lay out all your tools and parts before you begin. This step saves time and keeps your workspace organized.
Step-by-Step Fairing Installation Guide
Follow this installation guide to add fairings to your motorcycle. Each step helps you build a strong and neat fairing assembly.
- Remove any old bodywork from your motorcycle.
- Test-fit the new fairings to see how they line up with your bike.
- Mark the spots where you need to drill holes for mounting.
- Use the electric drill or drill press to make the holes.
- Cut or trim the fairings with a hacksaw if needed.
- Attach the fairings using the 5mm cap head screws, Dzus fasteners, and push-pin fasteners.
- Secure the fairing assembly with the aluminum angle iron and sheetmetal for extra support.
- Check the fit and make sure the fairings do not touch moving parts.
- Tighten all fasteners and check for loose spots.
- Reconnect any lights or wiring that run through the fairings.
Note: Always double-check your work as you go. A careful assembly keeps your motorcycle safe and looking good.
Estimated Time and Skill Level Needed
You can expect the fairing installation to take about three to five hours if you have some experience with motorcycle repairs. If you are new to this kind of work, you may need more time. The process needs basic mechanical skills, such as drilling, cutting, and using hand tools. You do not need to be an expert, but you should feel comfortable working with your motorcycle. If you get stuck, ask a friend for help or look for a video guide online.
Tip: Take your time and do not rush the fairing assembly. A careful job gives you the best results.
Common Challenges with Motorcycle Fairings
Fitment and Mounting Issues
When you install fairings on your motorcycle, you may face fitment and mounting issues. Not all fairings match every motorcycle perfectly. Sometimes, the holes in the fairings do not line up with the mounting points on your motorcycle. You might need to drill new holes or adjust the fairings to get a good fit. Some motorcycle fairings come with instructions, but others do not. You should always check the fitment before you start the full installation.
Tip: Test-fit the fairings before you drill or cut anything. This step helps you avoid mistakes and keeps your motorcycle looking good.
Brackets, Hardware, and Mounting Points
You need the right brackets and hardware to secure fairings to your motorcycle. Some fairings require special mounting brackets that do not come with the kit. You may need to buy extra hardware or make your own brackets. If you use the wrong hardware, the fairings might not stay in place. This can affect the durability of your motorcycle fairings. Always use strong brackets and check that all mounting points are tight. Loose fairings can rattle or even fall off while you ride.
Here is a simple table to help you remember what you need:
| Part Needed | Why It Matters |
|---|---|
| Brackets | Hold fairings in place |
| Mounting hardware | Secure fairings tightly |
| Strong fasteners | Improve durability |
Wiring and Electrical Considerations
Many motorcycle fairings cover parts of your motorcycle where wires and lights run. You must check the wiring before you finish installing the fairings. Some fairings block access to headlights or turn signals. You may need to reroute wires or extend them. If you pinch a wire under the fairings, it can cause electrical problems. Always test all lights and signals after you install the fairings. Good wiring helps keep your motorcycle safe and improves the durability of your setup.
Note: Take your time with wiring. Careful work helps your motorcycle fairings last longer and keeps your ride safe.
Modifications for Non-OEM Fairings
When you choose non-OEM fairings for your SV650, you often need to make some changes to get a good fit. Non-OEM fairings do not always match the original mounting points on your motorcycle. You may need to drill new holes or trim the fairings to line up with your bike. This process can take time, but it helps you get the look and protection you want.
You should start by test-fitting the fairings before you make any cuts. Hold the fairings up to your motorcycle and see where they do not fit. Use a marker to show where you need to trim or drill. Always use the right tools, like a sharp drill bit or a fine saw, to avoid cracking the fairings.
Tip: Wear safety glasses and gloves when you work with fairings. Small pieces can break off and cause injury.
Sometimes, you need to make or buy extra brackets to hold the fairings in place. You can use metal strips or angle iron for strong support. Make sure the fairings do not touch moving parts like the wheels or the chain. If you use custom fairings, you may need to adjust the wiring for your lights or signals. Check that all wires fit behind the fairings and do not get pinched.
Customizing your SV650 with non-OEM fairings gives you more style choices. This type of customization lets you pick colors, shapes, and designs that match your taste. You can make your motorcycle stand out with unique fairings.
Here is a checklist for modifying non-OEM fairings:
- Test-fit all fairings before drilling or cutting.
- Mark and trim fairings as needed.
- Use strong brackets for support.
- Check wiring and lights after installing fairings.
- Make sure fairings do not block moving parts.
With careful work, you can install non-OEM fairings and enjoy a new look for your SV650.
Recommendations for SV650 Fairing Installation
Best Practices for Installing Fairings
You can make your SV650 upgrade easier by following some best practices when working with fairings. Professional mechanics suggest these steps to help you avoid mistakes and get a clean result:
- Use a drill bit made for acrylic when working with motorcycle fairings. A 60-degree bit with a diamond dust coating works best. This helps prevent cracks and chips.
- When you drill into acrylic windshields, do not press on the back. Hold the drill straight and use slow to medium speed. Let the bit cut through the material slowly. Each hole may take up to a minute.
- Always hold the fairings up to your bike before you drill or trim. This trial fit helps you see if you need custom mounting hardware or extra trimming.
- If you need to trim the fairings, sand the edges carefully. Take your time to get a smooth finish.
- Drill mounting holes only after you confirm the fit. This step keeps your motorcycle fairings looking neat.
- You can paint the fairings after installation. Scuff and prime the surface with several coats before painting for the best results.
- If you have trouble with fitment, contact the supplier. Many will help with custom modifications or part exchanges.
- For custom or vintage fairings, try exchanging parts instead of returning them if the fit is not perfect.
- Remove old parts by turning the bolts, then replace them with your new fairing kit.
Tip: Take your time with each step. Rushing can lead to mistakes or damage to your fairings.
Trusted Brands and Fairing Kits
Choosing the right fairing kits for your SV650 makes installation easier and gives your motorcycle a better look. Many riders trust brands that offer strong, well-designed motorcycle fairings. Some of the most popular brands include Puig, World Walk, and Factory Reika. These brands offer fairing kits that fit well and last a long time.
You can find a kit that matches your style, whether you want a sporty look or a classic design. Puig and World Walk are known for their bikini fairings and retro styles. Factory Reika offers side covers and other parts that work with many SV650 models. When you buy a fairing kit, check that it includes all the hardware you need. Some kits come with brackets, screws, and instructions, making the job easier.
Here is a quick table to help you compare trusted brands:
| Brand | Style Options | Durability | Ease of Installation |
|---|---|---|---|
| Puig | Sport, Retro | High | Easy |
| World Walk | Retro, Bikini | High | Moderate |
| Factory Reika | Side Covers, OEM | Good | Moderate |
Note: Always read reviews and check if the fairing kits fit your SV650 model year before you buy.
Resources and Community Support
You can find a lot of help online when installing fairings on your SV650. The Bay Area Riders Forum (BARF) has many detailed discussions about motorcycle fairings. Riders share tips about hidden screws, bolt sizes, and the best ways to prepare your bike. Members like Gabe and Project510 give step-by-step advice and talk about important locking points, such as rubber grommets. These posts help you avoid common mistakes and learn from other riders’ experiences.
The SV Rider forum is another great place to get support. You can join active discussions about fairing customization and compatibility. Members often share ideas about mixing parts from different models. The forum has features like advanced search, a marketplace, and FAQs. This makes it easy to find answers to your questions about fairing kits and installation.
Tip: If you get stuck, ask questions in these forums. Many experienced riders are happy to help you with your motorcycle fairings project.
You can also find video guides and step-by-step tutorials online. These resources show you how to install fairing kits and solve problems you might face. With the right support, you can install fairings on your SV650 and enjoy a new look and better protection.
Installing fairings on your SV650 can give your bike a new look and better protection. You need to check your model year and pick the right fairing type. Research helps you avoid mistakes. Many riders face challenges, but you can succeed with patience.
Tip: If you feel unsure, ask a professional or join an online forum. You can find answers and support from other SV650 owners.
FAQ
Can you install SV650 fairings by yourself?
Yes, you can install fairings by yourself. You need basic tools and some patience. Many riders do this at home. If you feel unsure, ask a friend for help or watch a video guide.
Do you need to modify your SV650 to fit aftermarket fairings?
You may need to drill holes or trim some parts. Aftermarket fairings do not always match perfectly. Always test-fit before making changes. Use the right tools to avoid damage.
Will fairings affect your SV650’s performance?
Fairings can improve wind protection and reduce drag. You may notice better comfort at higher speeds. Some fairings add weight, but most riders do not feel a big difference in handling.
What should you check before buying a fairing kit?
Always check your SV650’s model year and type. Make sure the kit includes all brackets and hardware. Read reviews to see if other riders had fitment issues.
Can you paint your SV650 fairings?
Yes, you can paint your fairings. Clean and sand the surface first. Use primer and several thin coats of paint. Let each coat dry before adding the next. This gives you a smooth finish.
See Also
Unique Motorcycle Fairings Crafted By Nicefairings Experts
Nicefairings Offers Personalized Fairings For Distinctive Motorcycles
Best Affordable 2024 Suzuki GSX-R600 And 750 Fairings
Comprehensive Guide To Understanding Motorcycle Fairings Today
Step-By-Step Guide To Making Custom Motorcycle Fairings Yourself
