Complete Guide to Installing a 2019 Ninja 650 ABS Fairing Kit in Black and Blue

Installing a 2019 ninja 650 abs fairing kit black and blue gives your motorcycle a fresh look and better protection. You need to follow each step carefully for a smooth upgrade. Use the right tools and check that all parts fit well. Pay attention to the finish, and keep the panels clean. If you spot any loose fittings, fix them right away. Regular care helps your fairing kit last longer.
2019 Ninja 650 ABS Fairing Kit Black and Blue Options
OEM vs. Aftermarket Fairing Kits
When you choose a fairing kit for your Ninja 650 ABS, you need to decide between OEM and aftermarket options. OEM fairings come from the original manufacturer. They fit your bike perfectly and use high-quality materials. Aftermarket fairings give you more choices in style and price, but you may need to adjust them during installation.
Here is a table to help you compare:
| Aspect | OEM Fairings | Aftermarket Fairings |
|---|---|---|
| Fitment | Perfect fit, no adjustments needed | Fit varies; may require drilling or alignment |
| Material Quality | High-quality, factory-standard | Varies; often ABS plastic with UV-resistant coatings |
| Durability | Built to last; usually warranty covered | Quality varies; some approach OEM durability |
| Cost | Higher price range ($500-$1,500) | Lower price range ($300-$700) |
| Warranty | Usually included | Often limited or none |
| Customization | Limited styles | Many styles and finishes available |
You get a precise fit and long-lasting protection with OEM fairings. Aftermarket kits can save you money and offer more colors, but you may need extra work to make them fit right. Some aftermarket brands meet high standards and can last as long as OEM parts.
Black and Blue Color and Finish Choices
You can find many color and finish options for your 2019 ninja 650 abs fairing kit black and blue. Some kits use glossy paint for a shiny look. Others use matte finishes for a modern style. Many aftermarket kits offer custom paint jobs, so you can match your bike’s style. UV-resistant coatings help protect the colors from fading in sunlight. You should check that the paint quality matches your expectations before you buy.
Tip: Hold a sample or look at customer photos to see how the black and blue colors appear in real life.
Where to Buy and What to Look For
You want to buy your fairing kit from a trusted source. Here are some reputable places:
- Monster Fairings offers high-quality fairings for the 2019 Ninja 650 ABS. Many riders praise their fitment and paint quality.
- The company provides customization options, so you can request black and blue kits.
- Customer reviews mention fast service and helpful support.
- You can order universal bolt kits and get direct help with your order.
Always read reviews and check for warranty information. Make sure the kit matches your bike’s model year and ABS features.
Preparation for Installing a 2019 Ninja 650 ABS Fairing Kit Black and Blue
Tools and Materials Checklist
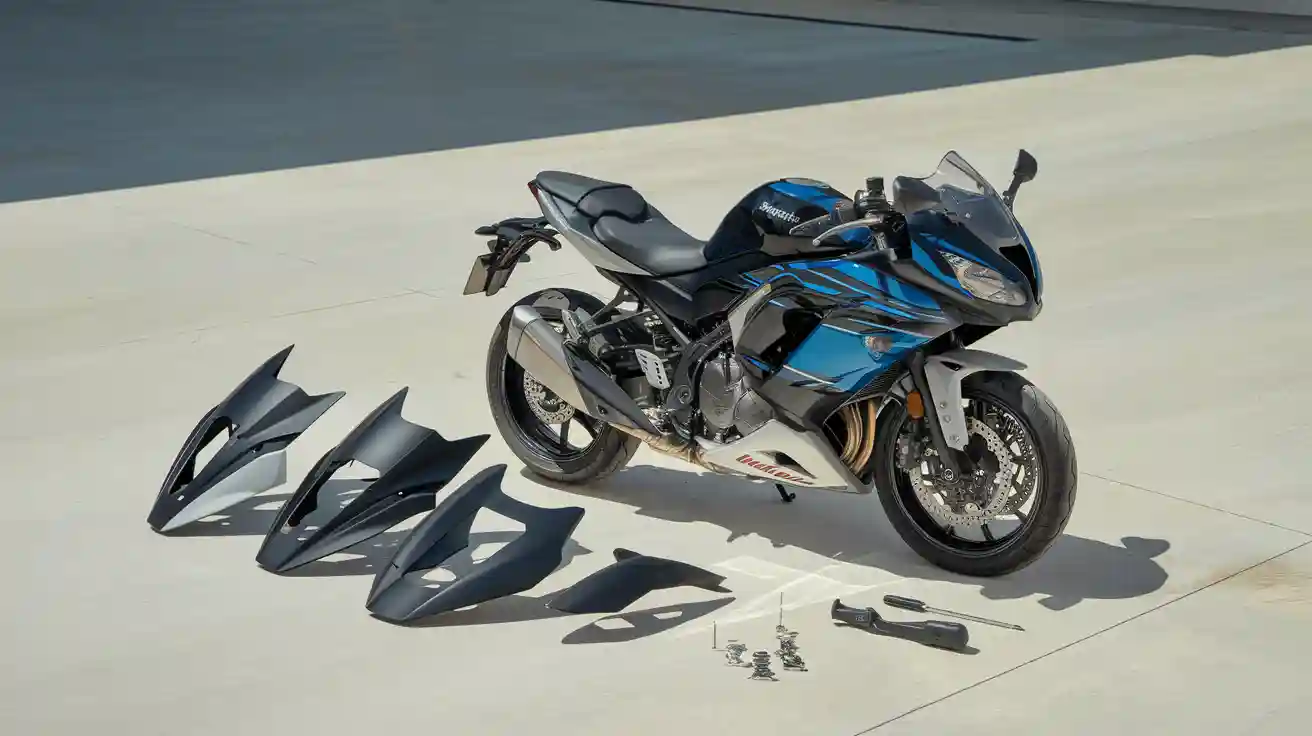
Before you start, gather all the tools and materials you need. The 2019 ninja 650 abs fairing kit black and blue usually comes with everything required for installation. You will find high-quality ABS plastic fairings, a windscreen, a heat shield, and a fairing bolts kit in the package. The fairings have pre-drilled holes, which makes the process easier. You do not need special tools, but having a few basic items helps:
- Phillips and flathead screwdrivers
- Allen wrenches
- Soft cloth or microfiber towel
- Small container for bolts and screws
- Torque wrench (optional for precise tightening)
Tip: Keep all bolts and small parts in a container so you do not lose them during the process.
Safety Precautions for Installation
Safety should always come first. Make sure your motorcycle stands on a stable surface. Use a paddock stand or center stand if you have one. Wear gloves to protect your hands from sharp edges. Turn off the engine and remove the key before you begin. Let the bike cool down if you have ridden it recently. Avoid working near hot engine parts.
Note: Always check that the bike cannot tip over while you work.
Setting Up Your Workspace
A clean and organized workspace helps you install the fairing kit smoothly. Choose a well-lit area with enough space to move around your bike. Lay out all the parts and tools before you start. Place a soft mat or towel on the ground to protect the new fairings from scratches. Good lighting helps you see all the mounting points and hardware clearly.
You can now prepare for a smooth installation by following these steps. Careful preparation makes the process faster and helps you avoid mistakes.
Installing the 2019 Ninja 650 ABS Fairing Kit Black and Blue
Removing Existing Fairings
You need to remove the old fairings before you can install your new 2019 ninja 650 abs fairing kit black and blue. Follow these steps to take off the existing panels safely:
- Take off the lower fairings first.
- Remove the four bolts that hold the windscreen, then lift the windscreen away.
- Find the plastic locking pins (also called rivets) that secure the meter cowling. Remove these pins and take off the meter cowling.
- Remove the plastic locking pins and socket bolts from the inner cowlings on both sides.
- Disconnect the electrical connectors for the headlights, turn signals, and running lights. Unlock each connector as needed.
- Remove the bolts that hold the left and right center cowlings. Also, remove the bolts that attach the upper fairings to the frame.
- Take off the left and right center cowlings.
- Find and remove the socket bolts hidden behind the center cowlings.
- Disconnect the meter by pulling off the rubber boot and unplugging the meter connector.
- Gently pull the left and right fairing tabs out of the rubber frame grommets.
- Remove the three bolts that attach the meter bracket to the main cowling bracket. The fairings will now be loose, but they may still feel heavy because of attached parts.
- Carefully pull the upper fairings forward until they clear the bike. Ask for help or use padding to avoid scratching the panels.
Tip: When you remove screws or fasteners, gently pull the fairing away from the bike and screw the fasteners back into their original holes. This keeps them safe and makes reinstallation easier.
Inspecting Mounting Points and Hardware
After you remove the old fairings, check all the mounting points and hardware. Look for any broken tabs, bent brackets, or missing bolts. Clean the mounting areas with a soft cloth to remove dirt or grease. If you find any damaged parts, replace them before you install the new fairings.
You should also check the rubber grommets and clips. These small parts help hold the fairings in place and stop rattling. Make sure they are not worn out or cracked. If you need new ones, most fairing kits or hardware stores sell replacements.
Note: A careful inspection now can prevent problems later. Secure mounting points help your new fairings fit tightly and last longer.
Installing New Black and Blue Fairings
Now you can start installing your new 2019 ninja 650 abs fairing kit black and blue. Most kits use injection-molded ABS plastic, which matches the original shape and size. The panels come with pre-drilled holes and a full set of bolts, so you do not need to drill or cut anything.
Follow these steps to install the new fairings:
- Unpack the fairing kit and check that all parts arrived in good condition. The kit should include the main fairings, a windscreen, a heatshield, and a fairing bolts kit.
- Start with the upper fairings. Line up the pre-drilled holes with the mounting points on your bike. Use the supplied bolts to attach the panels, but do not tighten them fully yet.
- Attach the center and lower fairings next. Work from the top down, making sure each panel lines up with the others.
- Reconnect all electrical connectors for the headlights, turn signals, and running lights.
- Install the windscreen and meter cowling. Use the original bolts or the ones from your kit.
- Once all panels are in place, tighten all bolts evenly. Do not overtighten, as this can crack the plastic.
- Double-check that all tabs and clips are secure. Make sure the panels do not move or rattle.
Tip: The fairings are painted with UV-resistant paint and a three-layer clear coat. Handle them with care to avoid scratches during installation.
Most riders can install a 2019 ninja 650 abs fairing kit black and blue in a short time if they follow these steps and stay organized. The process uses a simple bolt-on method, so you do not need special skills or tools.
Securing and Aligning Panels
You want your new fairings to look great and stay in place. Start by checking that each panel lines up with the mounting points on your bike. Hold the panel gently and look at the gaps between panels. The lines should look even on both sides. If you see a gap or the panel does not sit flat, adjust its position before tightening any bolts.
Use the bolts and fasteners from your kit. Do not tighten them all at once. Instead, insert all the bolts loosely first. This lets you move the panels a little to get the best fit. Once everything lines up, tighten the bolts in a crisscross pattern. This helps spread the pressure and keeps the panels from warping.
You can use a strong two-part epoxy if you find a spot where the plastic does not hold well. Test the glue on a hidden part of the fairing first. Some plastics work better with certain glues. If you have a broken attachment point, do not worry. The 2019 ninja 650 abs fairing kit black and blue uses many fastening points. Even if one is damaged, the others will keep the panel secure.
Tip: If you need extra strength, bolt through the fairing and use a locknut on the inside. Cover the end of the bolt with rubber. This creates friction and helps the panel stay tight against the frame.
Some attachment points help absorb vibrations. If you see a broken tab that does not affect the fit, you can leave it alone. The other points will still hold the panel in place.
Final Checks and Adjustments
After you finish installing the panels, take a few minutes to check your work. Walk around your bike and look at each panel. Make sure the lines match up and the colors look even. Press gently on each panel to see if it moves. If you feel any loose spots, tighten the bolts a little more.
Check all the electrical connections for the headlights and turn signals. Make sure they work before you ride. Look at the windscreen and meter cowling. These parts should sit flat and not rattle.
Use a torque wrench if you want to be precise. Most bolts on the 2019 ninja 650 abs fairing kit black and blue need only a snug fit. Do not overtighten, or you might crack the plastic.
Note: Take your bike for a short ride after installation. Listen for rattles or squeaks. If you hear anything, stop and check the panels again.
A careful final check helps your fairing kit last longer and keeps your bike looking sharp.
Maintenance for 2019 Ninja 650 ABS Fairing Kit Black and Blue
Cleaning and Protecting the Finish
You want your fairings to look new for a long time. Clean your panels with a soft microfiber cloth and mild soap. Avoid harsh chemicals because they can damage the paint. Rinse with clean water and dry with a towel. Wax your fairings every few months to add a layer of protection. Use a wax made for motorcycles or cars. This helps keep the black and blue colors bright and shiny.
Tip: Clean your 2019 ninja 650 abs fairing kit black and blue in the shade. Sunlight can cause water spots and streaks.
Inspecting for Damage and Loose Fittings
Check your fairings often. Look for cracks, scratches, or faded spots. Run your hand along the edges to feel for loose panels. Wiggle each panel gently to see if it moves. Tighten any loose bolts with the right tool. If you find a missing fastener, replace it right away. A quick check after each ride helps you catch problems early.
Here is a simple checklist:
- Look for cracks or chips
- Check all bolts and fasteners
- Test the fit of each panel
- Inspect the paint for fading
Touch-Up and Repair Tips
Small scratches or chips can happen. You can fix them with touch-up paint. Buy paint that matches your fairing kit. Clean the area first, then use a small brush to apply the paint. Let it dry before you ride. For bigger cracks, use plastic repair glue. Follow the instructions on the glue package. If a panel breaks, you may need to replace it. Keep extra fasteners and touch-up paint in your garage for quick repairs.
Note: Regular care keeps your fairings looking great and helps them last longer.
You can upgrade your bike with a 2019 ninja 650 abs fairing kit black and blue by following each step carefully. Choose the correct model and year for the best fit. Many riders ask about the process, so here are some quick answers:
- The kit uses injection-molded ABS for a 99.99% fit.
- Professional installation gives you the best results.
- Decals come with the kit, and you can request custom orders.
- Orders include tracking and support for returns.
Proper care and regular checks keep your fairings looking sharp. Enjoy your Ninja 650 ABS with confidence.
FAQ
How long does it take to install a fairing kit?
Most people finish the installation in 2 to 4 hours. You work faster if you organize your tools and parts before you start. Take your time to avoid mistakes.
Do I need special tools for this installation?
You do not need special tools. A basic set of screwdrivers, Allen wrenches, and a soft cloth will work. A torque wrench helps you tighten bolts correctly, but you can install the kit without it.
Will the fairing kit affect my bike’s performance?
The fairing kit does not change your bike’s speed or handling. It protects your bike and gives it a new look. Make sure you install all panels tightly to prevent rattling.
Can I install the fairing kit by myself?
You can install the kit by yourself. Some steps are easier with help, especially when lifting large panels. Ask a friend to hold parts if you want extra support.
What should I do if a panel does not fit?
Check the mounting points and hardware. Sometimes, you need to adjust the panel or move it slightly. If the problem continues, contact the seller for advice or replacement parts.
See Also
Complete Instructions For Installing Honda CBR500R Fairings
Top Aftermarket Fairing Options For Kawasaki Ninja 400
Features And Benefits Of Black White Fairings For Suzuki
