2012 CBR1000RR fuel tank plastic red replacement secrets you need

You can replace your 2012 cbr1000rr fuel tank plastic red, but you will notice some important differences if you try this with a 2006 model. The shapes and mounting points do not match. You may need to make changes before the new tank cover fits well.
Note: Always check the design and hardware before starting your upgrade.
2012 CBR1000RR fuel tank plastic red Compatibility Verdict
Direct Fitment Between 2012 and 2006 Models
You might think you can swap the fuel tank plastic from a 2012 CBR1000RR onto a 2006 model. This is not the case. The 2012 cbr1000rr fuel tank plastic red will not fit directly on a 2006 bike. The shapes and mounting points changed between these years. Honda redesigned the frame and fairings in 2012. The tank cover from 2012 uses different clips and bolts. If you try to install it on a 2006 model, you will see gaps or misalignment. You may also find that the mounting holes do not line up.
Tip: Always compare the mounting points and shape before you buy a replacement tank cover.
Compatibility Summary and Key Considerations
You need to know which years work together. Honda made the 2012-2016 CBR1000RR models with the same tank cover design. This means you can use a 2012 tank cover on any bike from 2012 to 2016. The fit will be perfect. The plastic is injection molded from high-quality ABS, so it matches the original in strength and look.
Here is a quick guide to help you:
| Model Year Range | Compatibility Notes |
|---|---|
| 2012 - 2016 | The 2012 CBR1000RR fuel tank plastic (tank cover) fits all models from 2012 through 2016, indicating full compatibility within this range. |
You should not try to use this part on bikes outside the 2012-2016 range. The tank cover will not fit older or newer models without heavy modification. Honda made changes to the frame and fairings in other years.
- Check the model year before you order.
- Make sure the part number matches your bike.
- Look for signs of different mounting hardware.
If you follow these steps, you will avoid costly mistakes. You will also keep your bike safe and looking great.
Replacement and Upgrade Process for 2012 CBR1000RR fuel tank plastic red
Tools and Parts Required
Before you start, gather all the tools and parts you need. This step helps you avoid delays and mistakes. Here is a checklist to guide you:
- Phillips and flathead screwdrivers
- 8mm and 10mm socket wrenches
- Allen key set
- Plastic trim removal tool
- Clean microfiber cloths
- New 2012 cbr1000rr fuel tank plastic red or cover
- Replacement clips and bolts (if needed)
- Masking tape (to protect paint)
Tip: Lay out your tools on a clean surface. This makes it easy to find what you need during the process.
You may also want to wear gloves to protect your hands. If you plan to reuse any hardware, keep a small container nearby for screws and clips.
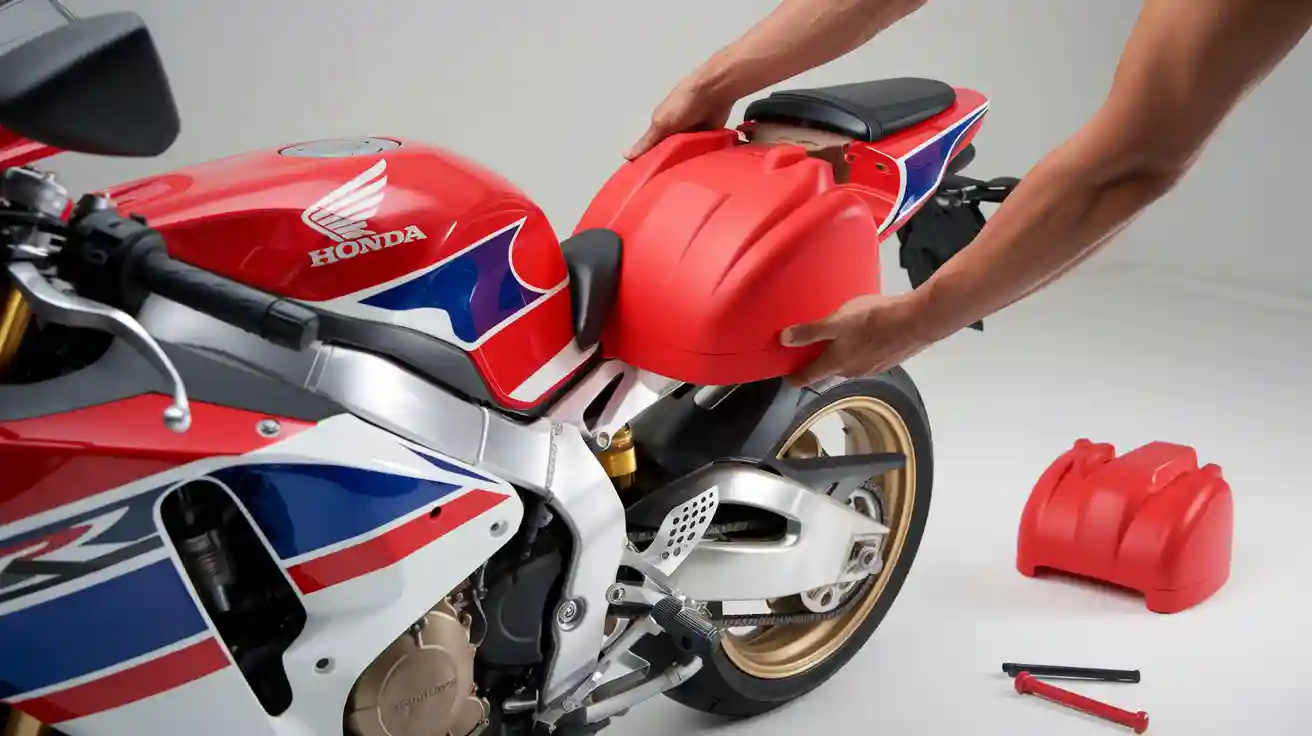
Removing the Old Fuel Tank or Cover
Start by making sure your motorcycle is stable. Place it on a flat surface and use a paddock stand if you have one. Turn off the ignition and disconnect the battery for safety.
- Remove the seat. Use your socket wrench to loosen the bolts and lift the seat away.
- Take off the side fairings. Unscrew the bolts and gently pull the fairings away from the tank area.
- Use the plastic trim tool to release any clips holding the old tank cover in place.
- Carefully lift the old tank cover. Watch for any hidden screws or clips. If you feel resistance, check for missed fasteners.
- Set the old cover aside. Clean the exposed tank area with a microfiber cloth.
Note: Keep all screws and clips in your container. You may need them for the new cover.
Installing the 2012 Fuel Tank Plastic Red or Cover
Now you are ready to install the new cover. Take your time with this step. A careful installation helps the cover fit well and look great.
- Test-fit the new cover. Place it over the tank to check alignment with the mounting points.
- If you see any gaps or misalignment, adjust the position or check for obstructions.
- Secure the cover using the original or new clips and bolts. Tighten them evenly to avoid stress on the plastic.
- Reattach the side fairings. Make sure they line up with the new cover.
- Install the seat and tighten the bolts.
- Reconnect the battery and turn on the ignition. Check that nothing interferes with the controls or wiring.
Safety Alert: Double-check all fasteners before riding. Loose parts can cause problems on the road.
When you finish, step back and inspect your work. The 2012 cbr1000rr fuel tank plastic red should fit snugly and match the rest of your bike. If you notice any issues, address them before your next ride.
Key Differences Between 2012 and 2006 CBR1000RR Fuel Tanks
Design and Material Changes
You will notice big changes in the design and materials between the 2006 and 2012 CBR1000RR fuel tanks. The 2012 model uses a sleeker shape. Honda made the tank cover more aerodynamic. The plastic feels smoother and looks more modern. The 2012 cbr1000rr fuel tank plastic red uses high-quality ABS plastic. This material resists scratches and fading better than the older covers. The 2006 tank cover has a bulkier look. Its plastic may not hold up as well over time. If you want a fresh and sporty appearance, the 2012 design stands out.
Mounting Points and Hardware Variations
You will find that the mounting points changed a lot between these two years. The 2012 tank cover uses different clips and bolts. The holes do not line up with the 2006 frame. You cannot swap the covers without making changes. The hardware on the 2012 model feels more secure. Honda improved the way the cover attaches to the bike. You will need to check every mounting point before you try to install a new cover. Using the wrong hardware can cause rattling or loose parts.
Tip: Always keep the original bolts and clips in a safe place. You may need them if you switch back to the old cover.
Functional and Safety Considerations
You want your bike to be safe and reliable. The 2012 cbr1000rr fuel tank plastic red does not have any known safety recalls or problems. Honda did issue a recall for the fuel pump on some models, but not for the tank cover itself. You can feel confident that the plastic cover will not cause safety issues. The 2012 design also helps protect the fuel tank from scratches and minor impacts. The improved fit means fewer gaps, which keeps water and dirt away from the tank. Always check that the cover fits snugly before you ride.
Common Issues and Solutions When Replacing 2012 CBR1000RR fuel tank plastic red
Alignment and Fitment Challenges
You may notice that the new tank cover does not line up perfectly with your bike. The 2012 cbr1000rr fuel tank plastic red has a unique shape and mounting points. If you see gaps or the cover feels loose, check each mounting hole. Sometimes, the clips or bolts do not match the frame. You can use washers or spacers to help with small gaps. If the problem is bigger, you might need to adjust the mounting brackets. Always test-fit the cover before tightening any bolts.
Tip: Take photos of the old cover before you remove it. These photos help you remember where each part goes.
Managing Wiring, Hoses, and Connectors
When you remove the old tank cover, you may find wires or hoses running close to the tank. You must move these carefully. Do not pull or twist them. If you see connectors, unplug them gently. After you install the new cover, check that no wires or hoses get pinched. Use zip ties to keep everything neat and away from sharp edges. If you feel unsure, label each wire or hose with masking tape before you start.
- Always double-check connections before you finish.
- Make sure nothing touches hot or moving parts.
Color Matching and Finish Problems
You want your bike to look great after the upgrade. Sometimes, the new tank cover does not match the rest of your bike. The red color may look different in sunlight. Paint can fade over time, so even a new 2012 cbr1000rr fuel tank plastic red might not match older fairings. If you see a big difference, you can use touch-up paint or vinyl wrap. Some riders visit a professional painter for a perfect match.
Note: Always clean the new cover before you install it. Dirt or oil can affect how the color looks.
Pro Tips for a Successful 2012 CBR1000RR fuel tank plastic red Upgrade
Expert Advice for DIY Installations
You can upgrade your 2012 cbr1000rr fuel tank plastic red at home if you follow the right steps. Many experts suggest a careful approach to avoid mistakes. Here is a step-by-step guide you can use:
- Place your motorcycle upright. This gives you easy access to all parts.
- Remove the seat and side covers first.
- Take off the top shelter.
- Disconnect the battery before you start any work.
- Remove the fuel tank mounting bolts and collars on both sides.
- Release the fuel tank drain hose by pulling it up.
- Lift the front of the fuel tank slowly. Make sure you do not stretch any hoses or wires.
- Support the tank with a wooden rod or use a steel rod through the breather hose holes.
- When you reinstall, lower the tank carefully. Avoid kinks in hoses and wiring.
- Guide the drain hose back into place.
- Install the mounting collars and bolts. Tighten them to 10 Nm.
- Remount the top shelter.
- Reconnect the battery.
- Put the seat and side covers back on.
Tip: Use a lamp or mirror to check hard-to-see spots. Wear gloves to protect your hands.
Recommended Products and Resources
You can make your upgrade easier by choosing the right products and guides. Many riders use parts and resources from trusted brands. Here is a table to help you find what you need:
| Category | Description and Relevance |
|---|---|
| Bodywork | Bodywork kits and replacement panels, including red options |
| Fuel Tanks and Fueling | Plastic fuel tanks for Honda CBR1000RR 2012-2015 |
| Other Products | Accessories for tank and bodywork upgrades |
| Information | Fitting manuals and helpful guides for installation |
You can also use these resources for extra support:
| Resource Type | Purpose and Usefulness |
|---|---|
| Fitting Manuals | Step-by-step guides for installing tank and bodywork |
| Useful Information | Extra tips and technical details for a smooth upgrade |
| RC30 Tribute Build Guide | Insights for bodywork and fuel tank upgrades |
Best Practices for Durability and Safety
You want your upgrade to last and keep you safe. Always check that all bolts and clips are tight before you ride. Clean the new cover before you install it. This helps the color look even and bright. Use copper grease on bolts to prevent rust. Avoid over-tightening, which can crack the plastic. After your first ride, inspect the tank area for any loose parts or leaks. If you see any problems, fix them right away.
Safety Alert: Never ride if you notice loose or missing fasteners. Always double-check your work.
You can replace or upgrade your 2012 cbr1000rr fuel tank plastic red, but you must check for compatibility. Review the differences between model years before you start. Gather the right tools and follow each step carefully.
Careful planning helps you avoid mistakes and keeps your bike safe.
With good preparation, you can enjoy a smooth and successful upgrade.
- Check compatibility
- Prepare your tools
- Follow each step
FAQ
Can you use a 2012 CBR1000RR fuel tank plastic red on a 2006 model?
You cannot use the 2012 tank cover on a 2006 model without modifications. The shapes and mounting points do not match. You will need to adjust the hardware or make custom brackets.
What tools do you need for replacing the fuel tank plastic?
You need basic hand tools.
- Phillips and flathead screwdrivers
- Socket wrenches
- Allen keys
- Plastic trim tool
- Microfiber cloths
Tip: Keep all screws and clips organized.
How do you avoid color mismatch with the new tank cover?
Check the color code before you buy. Sunlight can fade paint, so compare your old parts in daylight. If the red looks different, use touch-up paint or a vinyl wrap for a better match.
What should you check after installing the new tank cover?
Inspect all bolts and clips. Make sure the cover fits tightly.
- Check for gaps
- Look for pinched wires
- Test all controls
Safety first: Never ride with loose parts.
See Also
How To Easily Replace Fairings On A 2019 BMW S1000RR
Top Five Ways To Save On Motorcycle Fairing Replacements
Where To Buy Budget-Friendly Motorcycle Fairing Parts Online
A Simple Guide To Motorcycle Fairings For UK Riders
Benefits And Fitment Of Black White Fairing Kit For 2014 Suzuki GSX-R1000
