Mix and match 2007 GSXR 600 fairings for 2006

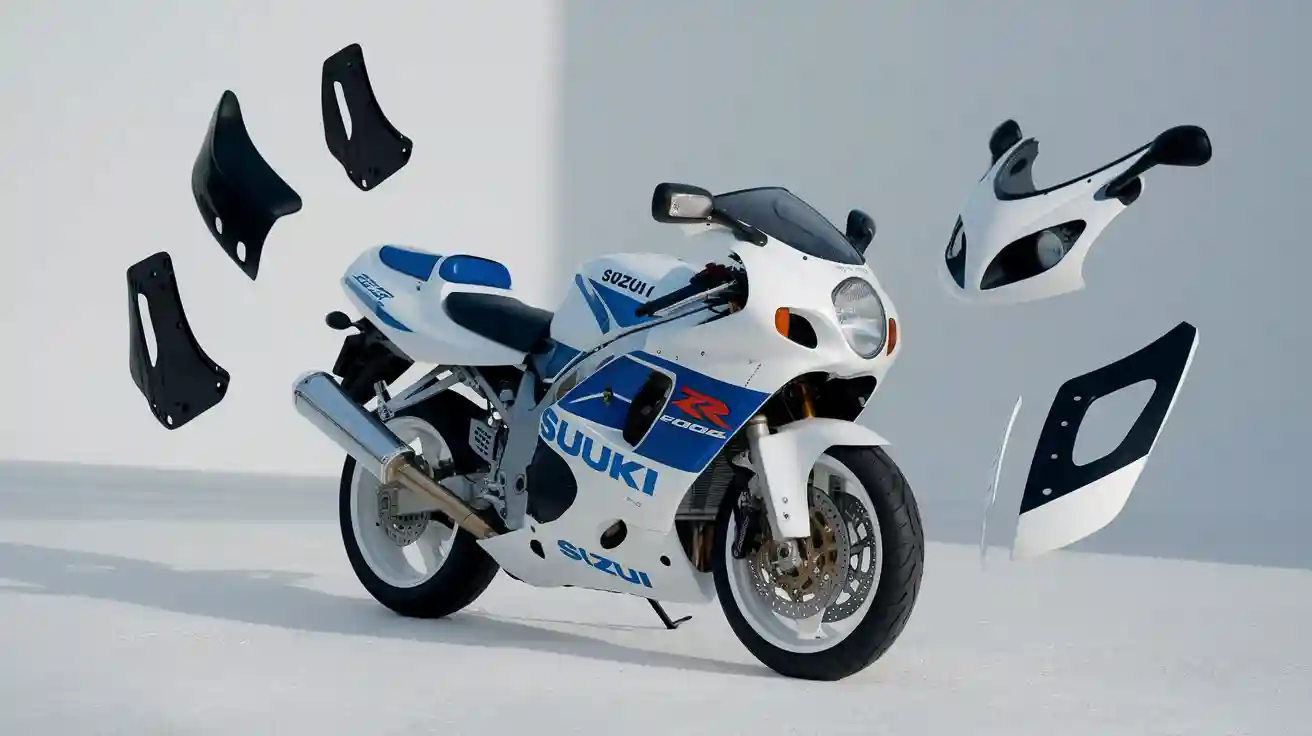
You can swap 2007 gsxr 600 fairings onto a 2006 model without any major changes. Most 06/07 fairings from both OEM and aftermarket brands fit both years as interchangeable fairings. For example, iFairings makes kits that match the original fit and finish, with pre-drilled holes to make installation easy. You will not run into significant problems when you upgrade your 2006 bike using 2007 gsxr 600 fairings.
2007 GSXR 600 Fairings Compatibility
Similarities Between 2006 and 2007 Fairings
You will notice that the 2006 and 2007 GSXR 600 fairings share the same mounting points and dimensions. Suzuki designed the fairing kit for both years, so you can expect all the holes to line up perfectly. The kit uses injection-molded ABS plastic that matches the original thickness and shape. This means you can install 2007 gsxr 600 fairings on your 2006 bike without worrying about gaps or misalignment. The process feels straightforward because the parts fit just like the originals.
Differences to Consider
While the main structure and fit remain the same, you might see some differences in color schemes and decals. Aftermarket fairings for these models come in many styles, such as matte black, orange, pearl white, and more. Decals are usually pre-installed and sealed under a clear coat, which helps them last longer. Sometimes, the position or color of a decal may look a little different from one set to another. You can also ask for custom paint or decals at no extra cost. If you want your bike to stand out, you have many options to choose from when picking 06/07 fairings.
Tip: Always check the color and decal details before you order. This helps you avoid surprises when your new fairings arrive.
Fitment Issues With Other Model Years
If you try to use 2007 gsxr 600 fairings on bikes from other years, you may run into problems. Here are some common issues:
- The upper and lower fairings from 2007 can fit a 2009 GSXR 600, but only if you also use the 2007 air ducts and fairing stay.
- The tail section does not fit 2008 or newer models because Suzuki changed the sub-frame and tail design after 2007.
- Some riders tried to use a 2007 tail on a 2009 bike but had to switch back to the 2009 tail due to fitment problems.
- Fitting a 2008 tail on a 2007 model does not work well, as the newer tails are flatter.
- You might be able to modify the 2007 tail to fit newer models, but this is not confirmed.
- Other than the tail section, most parts do not have major fitment issues.
You should always double-check compatibility if you plan to use fairings from a different model year.
Modifications for 2007 GSXR 600 Fairings
Adjustments for a Perfect Fit
When you install new 2007 GSXR 600 fairings on your 2006 bike, you may need to make small adjustments. Sometimes, the holes in the parts do not line up perfectly. You can gently move the panels or use a rubber mallet to tap them into place. If you see a small gap, try loosening the bolts and shifting the panel before tightening them again. Always check that each part sits flush against the frame. This helps you avoid rattling or loose panels when you ride.
Tip: Lay out all the parts before you start. This helps you spot any missing pieces and plan your installation.
Tools and Materials Needed
You do not need special tools to install these fairings. Most people use basic hand tools from a standard toolbox. Here is a list of what you should have ready:
| Tool/Material | Purpose |
|---|---|
| Metric socket set | Removing and installing bolts |
| Phillips and flathead screwdrivers | Handling screws and clips |
| Allen wrenches | Adjusting specific bolts |
| Rubber mallet | Gently tapping panels into place |
| Microfiber cloth | Cleaning parts before installation |
Some aftermarket suppliers, like Memphis Shades and Slip Streamer, offer hardware kits that make mounting easier. These kits include brackets and adapters for different Suzuki models. You can use them if you want a faster installation, but they are not required for GSXR 600 fairings.
Troubleshooting Common Fitment Problems
If you run into problems, do not worry. Many riders face small issues during installation. Here are some common problems and solutions:
- Panel does not fit: Check if you have the correct part. Try loosening nearby bolts and realigning the panel.
- Bolt will not thread: Inspect the bolt and hole for dirt or damage. Clean them and try again.
- Gap between panels: Loosen the bolts, adjust the parts, and tighten them slowly.
- Missing clips or fasteners: Use spare clips from your old fairings or buy a universal fastener kit.
Stay patient and work step by step. You will get a clean, professional look when you finish.
Installing 2007 GSXR 600 Fairings on a 2006 Model
Preparation Steps
Start by gathering all your tools and laying out the new fairings. Make sure you have a clean, flat workspace. Park your bike on a stable surface and use a paddock stand if you have one. Disconnect the battery to prevent any electrical issues. Take photos of your bike before you begin. These pictures help you remember where each part goes during reassembly. Keep a small container nearby for bolts and clips so you do not lose them.
Tip: Label each fastener as you remove it. This makes the reinstallation process much easier.
Removing Existing Fairings
You need to remove the old panels before you can do a full fairing swap. Work slowly and carefully to avoid damaging the plastic. Here are some common mistakes to avoid:
- Do not pull hard on the panels. Always release the clips first.
- Warm the plastic with a hair dryer or let the bike sit in the sun. Warm fairings bend more easily and resist cracking.
- Learn how the push-pin and clip fasteners work. Push the center pin to release the clip before pulling.
- Check both sides of the bike. The right and left fairings may have different mounting points and clips.
- Never try to remove panels when the plastic feels cold and brittle.
- Look for all fastener locations. Missing one can cause you to break a tab or crack the panel.
Take your time and inspect each step. This careful approach keeps your original parts in good shape.
Mounting the 2007 Fairings
Now you can install the new panels. Start with the lower fairings and work your way up. Align each piece with the mounting points on your bike. Insert the bolts and clips loosely at first. This lets you adjust the fit before tightening everything down. Check that each panel sits flush and does not wobble. Use a rubber mallet if you need to tap a panel into place. Once all the panels fit well, tighten the bolts and clips. Step back and look at your bike to make sure everything lines up. You have now completed a full fairing swap and given your 2006 GSXR 600 a fresh look.
Final Inspection and Adjustments
You have installed your new fairings, but your job is not done yet. You need to check your work to make sure everything fits and works as it should. A careful inspection helps you catch small problems before they become big issues.
Start by looking at each panel. Make sure every edge lines up with the next one. Run your hand along the seams. You should not feel any sharp edges or big gaps. If you find a spot that does not sit right, loosen the bolts in that area. Shift the panel gently, then tighten the bolts again.
Next, check all the fasteners. Use this checklist to help you:
- All bolts and screws are tight, but not overtightened.
- Clips and push pins are in place.
- No missing or extra hardware.
- Panels do not move or rattle when you tap them.
Tip: If you hear a rattle, tap each panel to find the loose spot. Tighten the fastener or add a rubber washer if needed.
Now, test your bike’s controls. Turn the handlebars from side to side. Make sure the fairings do not touch or block the movement. Check the brake and clutch levers. They should move freely. Look at the headlights, turn signals, and mirrors. Everything should work and sit straight.
Take a short ride around your block. Listen for any strange noises. Stop and check the panels again. Sometimes, a bolt may loosen after your first ride. Tighten anything that feels loose.
A final inspection keeps your bike safe and looking sharp. You can ride with confidence, knowing your fairings fit just right.
Best Replacement Fairings Options
OEM Fairings Pros and Cons
OEM fairings give your GSXR 600 the same look and feel as when it left the factory. You get the exact Suzuki colors and graphics. The fit is perfect because these parts use the original factory molds. You do not need to make any changes during installation. The material is high-quality ABS plastic, which lasts a long time. OEM parts also help keep your bike’s resale value high.
However, OEM fairings cost more than other options. You might pay around $1200 for a full set. Sometimes, you have to wait longer for certain parts to arrive. You also have fewer choices for style or color. If you want your bike to look unique, OEM fairings may not offer enough options.
| Aspect | Advantages | Disadvantages |
|---|---|---|
| Appearance | Factory look, Suzuki colors and graphics | Limited style options |
| Fitment | Perfect fit, easy installation | N/A |
| Material Quality | High-quality ABS plastic | N/A |
| Cost | Preserves resale value | More expensive than aftermarket options |
| Availability | Easy to find replacement parts | Longer wait times for some OEM parts |
Aftermarket Fairings for 2006-2007 GSXR 600
Aftermarket fairings give you a budget-friendly way to refresh your bike. These fairings use the same ABS material and match the fit of OEM parts. You can find a full set for about $639.98 to $839.98. Some brands, like Fairing Worlds, offer sets for as low as $569.00. This price is much lower than OEM fairings.
You get more choices for paint and graphics. Many companies let you customize the look for free. The fit and finish are very close to OEM, but you might notice small color differences. Most sellers offer a satisfaction guarantee or a full refund if you are not happy. Customer reviews often mention good service and easy returns.
| Aspect | OEM Fairings | Aftermarket Fairings (e.g., alFairings) |
|---|---|---|
| Material & Fitment | Made from ABS, exact OEM specs | Same ABS material and craftsmanship as OEM |
| Price Range | Around $1200 | $639.98 to $839.98 (about 1/5 of OEM price) |
| Paint & Color | OEM paint formula, exact color match | Own paint formula, slight color variation possible |
| Customization | Limited/custom at extra cost | Free customization with show-quality finish |
| Customer Satisfaction | Generally high, OEM standard | Satisfaction guarantee, positive feedback |
| Warranty & Service | Standard OEM warranty | Full refund, strong customer service |
Tip: If you want to save money and still get quality parts, aftermarket fairings are a smart choice.
Custom Fairings Considerations
Custom fairings let you design your own style. You can pick special colors, graphics, or even add your name. Many aftermarket companies offer this service at no extra cost. Custom parts help your bike stand out at shows or on the street.
You should check the paint quality and finish before you buy. Some custom jobs may not match the durability of OEM paint. Ask about the warranty and return policy. Good sellers will fix any problems or offer a refund. Custom fairings give you the most freedom, but you need to choose a trusted brand for the best results.
Sourcing Quality Fairings
Recommended Retailers and Brands
You want your GSXR 600 to look sharp and last long. Start by choosing trusted retailers and brands. Many riders recommend companies like iFairings, Monster Fairings, and Auctmarts. These brands have a strong reputation for quality and customer service. You can also check out OEM suppliers if you want factory-original parts. Aftermarket brands often offer more color choices and custom designs. Look for sellers who provide clear photos, detailed descriptions, and customer reviews. Good retailers answer your questions and help you pick the right kit for your bike.
Tip: Always check if the retailer offers a fitment guarantee or a return policy. This protects you if the fairings do not fit as expected.
Evaluating Fairing Kit Quality
You should know what makes a fairing kit high quality. Industry experts look for several key features:
- Durable ABS plastic that resists cracks and damage
- Precision molding for an exact OEM fit
- Complete kits with all matching components
- Pre-drilled mounting holes for easy installation
- Hand-painted finishes with multiple layers and clear coat
- Professionally installed heat shields to protect against engine heat
- Individual inspection and quality control before shipping
- 100% fitment and delivery guarantee
Some kits even use lightweight fiberglass or Kevlar reinforcement in mounting areas. Racing teams choose these for their strength and low weight. You may also see unique textures, bold color contrasts, and modern designs. These details help your bike stand out and perform well.
Avoiding Low-Quality Fairings
Low-quality fairings can cause problems. They may not fit right, crack easily, or fade in the sun. Watch out for these warning signs:
| Red Flag | What It Means |
|---|---|
| Thin, brittle plastic | Breaks or cracks with little force |
| Rough or uneven paint | Poor finish, chips or peels quickly |
| No pre-drilled holes | Harder to install, may not align |
| No warranty or returns | Risk if the kit does not fit |
| Vague product details | Seller may hide flaws |
You should avoid kits that seem too cheap or have no customer feedback. Always read reviews and ask questions before you buy. Quality fairings keep your bike safe, stylish, and ready for the road.
You can upgrade your bike easily because 2007 gsxr 600 fairings fit your 2006 model with no major changes. Aftermarket ABS plastic fairings give you a strong and affordable choice. Always pick a trusted supplier for the best results.
Tip: Careful shopping helps you avoid problems and enjoy a smooth installation.
FAQ
Will 2007 GSXR 600 fairings fit my 2006 GSXR 600 without any changes?
Yes, you can install 2007 GSXR 600 fairings on your 2006 model. The mounting points and shape match perfectly. You do not need to make major modifications.
Can I use fairings from other GSXR years on my 2006 or 2007 model?
You should avoid using fairings from other years. Most parts from 2006 and 2007 fit each other, but fairings from 2008 or newer models do not match. The tail section and mounting points changed after 2007.
What material do most aftermarket fairings use?
Most aftermarket fairings use ABS plastic. This material resists cracks and damage. It also matches the thickness and feel of original Suzuki fairings.
How do I know if a fairing kit is high quality?
Look for these signs:
- Pre-drilled holes
- Smooth paint finish
- Strong ABS plastic
- Good customer reviews
A quality kit fits well and lasts a long time.
Do I need special tools to install new fairings?
No, you do not need special tools. You can use a basic socket set, screwdrivers, and Allen wrenches. A rubber mallet helps with gentle adjustments. Keep your workspace clean for best results.
See Also
Key Advantages Of Upgrading Your 2006 2007 GSXR Fairings
The Way 2006 GSXR 600 Fairings Shape Your Riding Style
Best 2024 Suzuki GSX-R600 And 750 Fairings Under Five Hundred
Where To Buy Budget-Friendly Motorcycle Fairing Parts Online
